
- VEHICLE: Mercedes-Benz ML
- YEAR: 2000
- ENGINE: 2.7 612.963
- SYSTEM: EDC15
Customer complaint
This vehicle came into the workshop after paying a visit to another local garage in the area. They had done a scan of the engine and there were no DTCs stored; however, the vehicle was misfiring.
Diagnosis
I didn’t know which scan tool the previous garage had used, or indeed whether it would be any good on the Mercedes, so I plugged in my own scan tool to check for DTCs. This revealed that there were no DTCs present. So, what next?
With diagnostics you can often find yourself carrying out hours of testing and working out logical test procedures to then discover that you’re not really any closer to the fix than when you first started. For a change, this was not the case on the Mercedes-Benz we had in front of us.
The vehicle had a constant misfire, so I decided to have a look at the exhaust pulses with an oscilloscope and use an amps clamp on injector No 1 for cylinder identification. Armed with my trusty Pico and a WPS (pressure transducer), I hooked up the WPS into the exhaust and attached the low amps clamp on cylinder No 1 injector for a sync.
As you can see from the first waveform (Fig 1 below), we certainly have an issue as each pulse represents cylinder contribution. Now we can definitely see the ‘miss’ but we still have a slight problem in the fact that we don’t know which cylinder is the culprit.
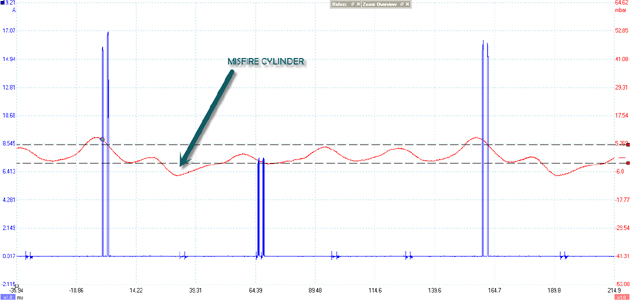
Fig 1
Pulse points
The next part of my diagnosis was actually what I would class as ‘R&D’. My understanding was that if you’re doing this test on a four-cylinder engine then you miss a pulse from the sync; this is the pulse caused by the cylinder that you have your sync on.
On a six cylinder engine, for example, you would miss two pulses from your sync; however, we had a five-cylinder engine in front of us and I wasn’t sure how to line up the pulses with my No 1 sync.
By introducing a misfire on No 4 cylinder, I was able to identify that cylinder (Fig 2 below)
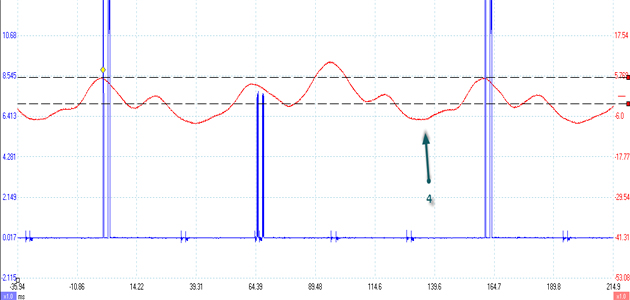
Fig 2
So, armed with this information I was able to use the firing order to identify the pulse caused by each cylinder (Fig 3 below).
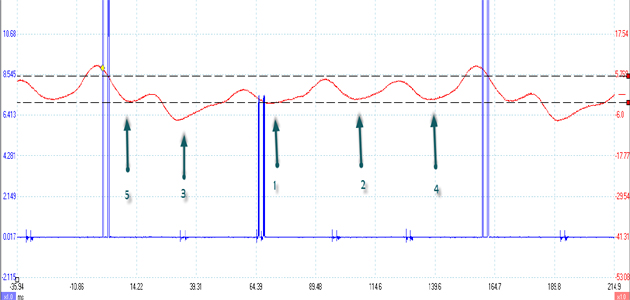
Fig 3
I now know that the misfire is being caused by No 3 cylinder, so my next question is ‘what could cause it’? I could have undertaken a relative compression test at this point to see if compression was the issue, but, as the injectors were easily accessible, I decided to swap cylinders 2 & 3 over and see if the exhaust pulse moved with the injectors (Fig 4 below).
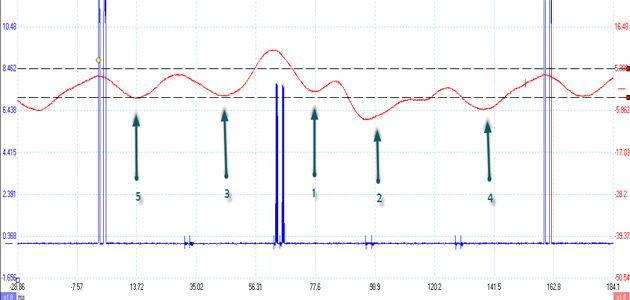
Fig 4
You can see straight away that the fault has moved with the injector. After a chat with the customer, explaining the findings from my test results, he gave me the go-ahead for repair. After the repair had been completed the misfire disappeared, so the only thing left to do was recheck the now fixed waveform to save in my waveform library (Fig 5 below).
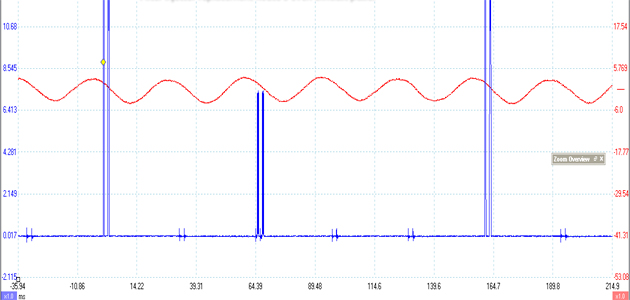
Fig 5
Conclusion
In summary, this job was very satisfying, as it further reiterated how valuable my investment in training has been. Put simply, if I did not attend the training courses that I do, I would never have been able to carry out this test and the customer may have been off the road a lot longer than necessary, waiting for the injectors to be sent away for test.
The worst case scenario could even have been that someone would try to do a compression test and a glow plug snaps off – we all know where that could end up…
To me, jobs like this prove how important training is to you and your customer, as I got the job done and paid for in a day and the customer didn’t end up paying for repairs that were not required.


