1.6 TDI Model; Timing Belt and Water Pump Replacement Guide
The Volkswagen Golf 1.6 TDI is a very popular car on today’s roads, so it’s highly likely that your workshop will receive a visit from one in the near future. Although the car we’ve featured in this tutorial wasn’t due a replacement based on its mileage, it is four years old and the manufacturer recommends a replacement every four years or 120,000 miles, whichever comes first.
For this repair we used a INA timing belt kit with water pump, which contains everything required for the job. The engine had been identified as an interference type engine, so in the event of the timing belt
failing, the likelihood of engine damage is extremely high. In terms of workshop equipment, you’ll need a two-post ramp, engine support, timing belt locking tools and a pulley counter hold tool.
Engine rotation
When replacing a timing belt, the engine needs to be at an ambient temperature to ensure the correct tension is achieved. Always rotate the engine in the normal direction of rotation (unless otherwise advised) and it is recommended that all the tensioners, idlers and fixings are replaced and torqued as per the manufacturer’s instruction.
When initially opening the bonnet, the timing belt system may look a little tricky to change, but with a little know-how and the appropriate tools it will prove to be an ideal repair for an independent garage.
Place the car on the ramp and raise, remove the engine under-tray, then the O/S/F wheel and lastly the O/S/F lower wheel arch liner (see Fig 1).
Now lower the car and remove the engine cover; we now need to gain access to the engine mounting, so remove the fixings for the diesel filter, washer bottle filler, coolant expansion tank and the DPF pressure sensor bracket, unclip the hoses as required and then place on top of the engine.
Now remove the upper timing belt cover by releasing the three retaining clips and then raise the car. We now need to remove the crankshaft pulley; loosen the four spline bolts and then remove the auxiliary drive belt by rotating the tensioner in a clockwise direction – this can be locked in the untensioned position with a 3mm pin. Now remove the auxiliary belt and the four spline bolts from the crankshaft pulley before removing the pulley.
Detach the EGR cooler metal hose from the engine mount by removing the retaining nut and retaining bolt. The lower timing belt cover can now be removed. Then remove the five torx bolts and the lower timing belt cover.
Locking tool
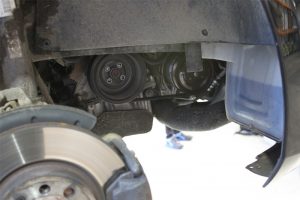
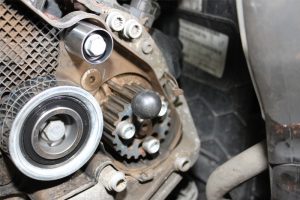
Rotate the engine and align the timing marks; the crankshaft timing mark is a line on the crankshaft timing belt pulley that aligns with the pointer on the locking tool (see Fig 2) and the locking tool pin locates in a socket.
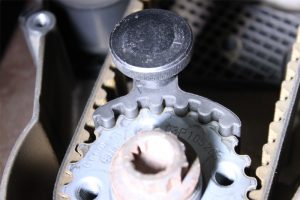
Now lock the camshaft by means of a locking pin; the hole is located on and through the camshaft pulley (see Fig 3).
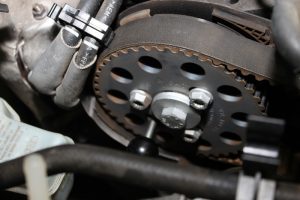
Lock the fuel pump with a locking pin in the location lug (see Fig 4), and slacken the three camshaft pulley bolts and the three high pressure fuel pump pulley bolts (a counter hold tool may be required so as not to strain the locking tools).
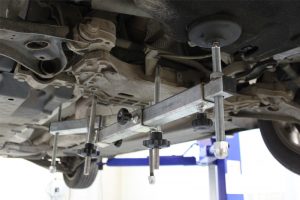
Support the engine by means of a beam or an under vehicle support (see Fig 5), and remove the engine mounting assembly.
The engine may need to be raised and lowered slightly to remove the mounting support bolts, noting that the mounting support can’t be removed from the engine bay and that it can be moved to give clearance to enable the tensioner to be changed. Ensure the crankshaft, camshaft and high pressure fuel pump are locked correctly and then slacken the timing belt tensioner nut before releasing the tension on the timing belt and removing the timing belt from the engine.
Remove the timing belt tensioner and replace the tensioner stud. There are many tools on the market to remove studs but, in this instance, we locked two nuts together on the stud and withdrew the stud. We then used the same method to fit the new tensioner stud (before torqueing) and we also followed this process for the idler stud.
At this point of the repair we replaced the water pump and slackened the cap on the coolant expansion tank to remove any pressure. Now remove the three bolts from the water pump body and remove the water pump. Clean the mating face and wipe away any coolant that could contaminate the new timing belt or bearings. Then fit the new water pump and torque the bolts.
Refill the cooling system with the correct coolant. Ensure the timing belt area is clean and dry, before replacing the idlers and torqueing to the manufacturer’s specification. Fit the new timing belt tensioner (this may be a slightly different design to the original one) and the new nut, but do not tighten. Rotate the camshaft and high pressure fuel pump pulleys fully clockwise on their elongated holes, ensuring the pulleys are free to rotate but not tip.
New belt
Fit the new timing belt, starting at the crankshaft pulley and working up towards the top of the engine, finishing off at the camshaft pulley. Tension the timing belt tensioner, making sure you align the pointer to the notch, and torque the nut. Using the pulley counter hold tool, pull on the camshaft pulley in an anti-clockwise direction, keeping the timing belt under tension. Now tighten the camshaft and high pressure fuel pump pulley bolts and torque to the manufacturer’s specification.
Remove the locking pins and crankshaft locking tool and rotate the engine two complete revolutions. Refit the crankshaft locking tool and the locking pins to ensure the timing and tension is correct. Now refit all the components, remembering that this involves the reverse sequence of the removal process.
Finally, run up the engine. We had to ensure the coolant level was correct (due to the coolant pump being changed) and so we ran it until the coolant fan operated.


