Denso explains how identifying a faulty glow plug becomes relatively simple when you use your trusty multimeter.
The basics of a glow plug are easy to explain. They are essential for ignition in diesel-powered engines as they heat the air/fuel mixture in the engine, so it ignites easily under compression and are built to be long-lasting and work reliably no matter what happens.
However, occasionally external factors or faults with other components can lead to issues with glow plugs, which owing to their rarity, can easily be missed or wrongly identified.
It is important to regularly check and maintain glow plugs/ignition components, especially before the winter season. If a technician, or the customer, has spotted a potential sign that their glow plugs are faulty, or at the end of their lifespan, the next step is to accurately establish whether replacement plugs are needed. Thankfully, this is easier than ever to do, and can usually be achieved without removing the glow plug from the engine. All that’s needed is a multimeter and the following 10 steps.
1. Get to know the multimeter
In essence, a multimeter is a box of electronic circuitry that can be used to run a variety of tests on electrical wiring or devices and most technicians will be extremely familiar with their model of multimeter already, but if not, here is a refresher:
- The large dial in the centre of the multimeter is used to adjust the settings
- The leads that come with the multimeter are used to test electrical current and resistance. These leads will be black (negative) and red (positive), and usually have metal clamps or pins at the end of them
- A multimeter may be analogue or digital. Analog multimeters have a changing display, which means they can show the current fluctuation. Digital multimeters show a definitive figure, which means they have a difficult time measuring current that is constantly changing. However, digital multimeters are more accurate overall than analogue meters. Analogue meters can also apply higher voltage to the circuit digital meters, so use them with care.
It is best to use a digital multimeter for this test. It will show the exact result of the test, while an analogue meter will list a range of results, making it harder to read/conclude. If an analogue multimeter is being used, make sure to choose one with at least 20k ohm/V sensitivity.
2. Set the multimeter to ohms
On the multimeter, only ohms are needed for this test. The ohms setting will be denoted by the omega symbol (Ω) resembling a horseshoe. Unless an auto-ranging multimeter is being used, set the maximum range for the test. It can, however, be changed during the test if it isn’t providing a useful reading.
3. Find the resistance value of the multimeter
Connect the two leads of the multimeter together, making sure the metal clamps/pins on the leads touch each other, and record the result. If a digital multimeter is being used, the precise reading will appear across the screen. At this point, it may be possible to use the multimeter’s calibration function to adjust the reading to zero.
4. Test the voltage of the battery
Put the multimeter in DC-volt-reading mode. The symbol denoting DC is ⎓: two lines, one solid and one dotted. Place the negative lead onto the negative terminal of the battery, and the positive lead onto the positive terminal. The reading should be close to 12.5V when the car is off and close to 13V when the car is running. If this is not the case, check the battery or alternator before proceeding, since they may be the cause of the issue rather than the glow plugs. Glow plugs only work correctly if they have the correct voltage running into them.
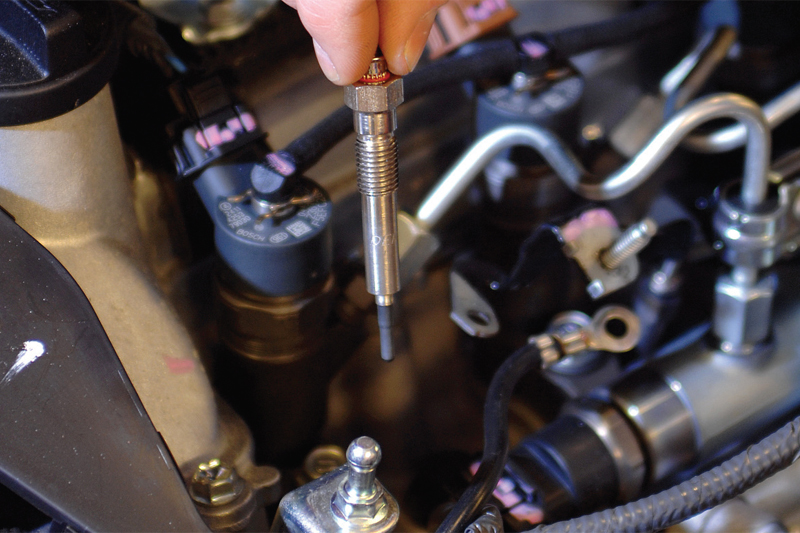
5. Locate the glow plugs
The location of the glow plugs in the engine will vary based on the make and model of the respective vehicle. Consult the manufacturer’s handbook for the vehicle to find the correct location.
6. Remove the caps or connectors to the glow plugs
There is usually a cover or cap over the glow plugs, so removing it will allow the multimeter clamps to be applied to the glow plugs. However, look at the connector and pins and check for any signs of rust, corrosion or looseness. Take the opportunity to clean them as this alone could have a beneficial effect.
7. Connect the multimeter’s negative lead to a ground point in the engine
The main two ground points can be found by following the wire that leads from the negative battery terminal into the engine wall or following the wire that leads from the alternator into the engine wall. Again, consult the manufacturer’s handbook to find the exact locations of the ground points. The wires will be attached to bolts. So, clip the negative lead onto one of these bolts for grounding.
8. Connect the multimeter’s positive lead to the top of the glow plug
The multimeter should now give a reading. This is when the range setting can be adjusted on the multimeter to give more significant figures, if required.
9. Evaluate the multimeter’s reading
Refer to the repair manual to determine the acceptable resistance range for glow plugs for the vehicle – it will usually be no more than 6 ohms. Subtract the resistance value of the multimeter from the resistance value of the glow plug. For example, if the plug’s resistance measured 0.9 ohms and the meter’s resistance measured 0.2 ohms, the real reading for the plug is 0.7 ohms. If the multimeter’s resistance was zeroed earlier, then do not subtract anything now.
All the glow plugs in the engine should have similar readings. One glow plug with a higher resistance can affect the engine’s performance – even if the plug appears functional otherwise.
10. Replace the glow plugs
If one or more of the glow plugs gives an unusually high reading, it should be replaced. However, best practice is to replace every plug – not just the one that appears to be faulty!
If the area around the glow plugs has dirt or build-up, clean it first. Some manufacturers offer special tools (‘reamers’) to clean out the bore where the glow plugs are inserted into the cylinder head. These tools clean out carbon build-up inside the combustion chamber or pre-charge chamber, as well as the threads that the glow plug screws into.


