Brake Pads
Removal
Prior to starting this procedure, if the brake fluid reservoir is at the maximum level then remove the filter and partially empty it using a clean syringe.
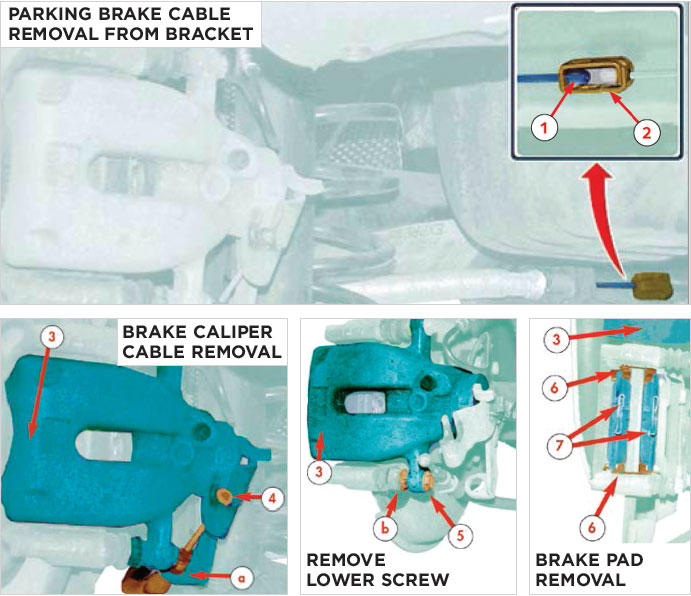
Disengage the parking brake and then disconnect the battery negative terminal. Position the vehicle onto the lift and loosen the wheel nuts before removing the rear wheels. Remove the parking brake cable terminal (1) from the bracket (2).
FERODO PART NUMBERS USED: BRAKE FLUID (DOT 4) – FBX050; BRAKE PADS – FDB4224; BRAKE DISCS – DDF1735
Parking brake cable
Remove the parking brake cable terminal (4) from the brake caliper (3) and also remove the handbrake cable from the caliper body (a).
Loosen the lower screw (5) with a wrench in point (b), before turning the brake caliper (3) up. Remove the brake pads (7) and pad abutment shims (6). Make sure you check the brake pad wear evenness to detect any potential caliper fault.
Assembly
Visually check the sealing around the brake caliper piston and the conditions of the protective caps. Turn clockwise and press the brake caliper piston using a special tool to make it move back. During this operation, you should visually check the brake fluid inside the reservoir to prevent any leakage.
When changing brake pads, you should also change the brake pad abutment shims.
Fit the new pad abutment shims and pads. Then re-position the brake caliper and tighten the (new) fastening bolts to a torque of 35 Nm. Refit the parking brake cable into its original location. Fit the rear wheels (and retorque nuts) and remove the vehicle from the lift. Make sure you carry out the operations after battery re-connection.
With the engine running press the brake pedal several times, slowly and progressively until the brake pedal feels firm. Check the brake fluid level and top up, if necessary. Adjust the parking brake and then fill up and bleed the braking system, if necessary.
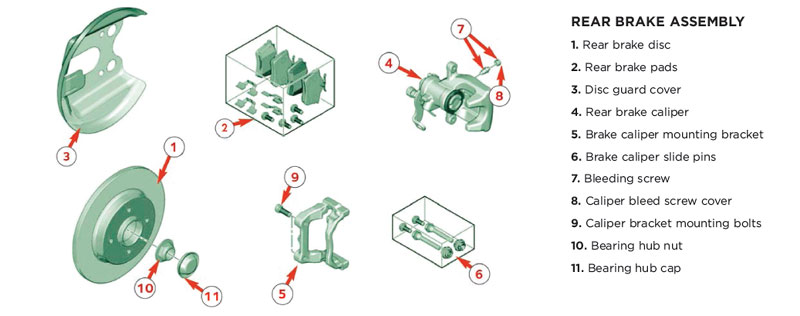
Brake Discs
Removal
 Disengage the parking brake and then disconnect the battery negative terminal. Position the vehicle onto the lift before loosening the fastening nuts and removing the rear wheels. You can now remove the brake pads (see procedure above).
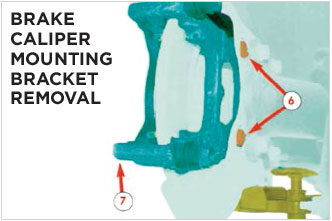
Remove the fastening screw from the brake caliper hydraulic pipe fitting and remove the bolts from the slide pins between the brake caliper and the caliper mounting bracket. Remove the fastening bolts (6) between the brake caliper mounting bracket (7) and the rear suspension.
Visually check the sealing around the brake caliper piston and the conditions of the protective caps. Turn clockwise to retract the caliper piston into the caliper body using a special tool.
Remember that during this operation you should visually check the brake fluid inside the reservoir to prevent any leakage. Tighten the brake caliper hydraulic pipe fitting screw to the manufactures torque.
Assembly
Position the brake disc with bearing onto the rear bearing spindle and tighten the hub/bearing nut to the manufacturer’s torque. Position the caliper mounting bracket onto the rear suspension and tighten the mounting bolts to the manufactures torque.
Fit the new brake pad abutment shims to the caliper bracket. Re-position the brake caliper and tighten the (new) fastening screw to a torque of 35 Nm and then re-attach the parking brake cable. Fit the rear wheels (and re-torque) before removing the vehicle from the lift.
With the engine running press the brake pedal several times, slowly and progressively until the brake pedal feels firm. Check the brake fluid level and top up, if necessary. Adjust the parking brake and then fill up and bleed the braking system, if necessary.
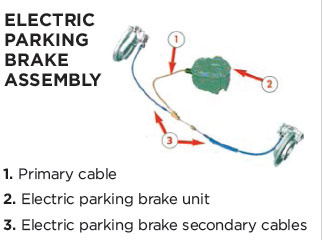
Electric Parking Brake
Adjustment
 Before you start this procedure, it should be noted that the electric parking brake can only be adjusted using a diagnosis tester that is compatible with that of the manufacturer.
Calibrate the parking brake (follow all the steps described by the diagnosis tester) and then read and delete any stored DTC. Operate the parking brake control and check that the rear wheels are safely locked.
In case of total system failure, such as a battery fault or electric parking brake fault, the system can be manually disengaged using the special tool supplied with the vehicle tool kit.
It is strictly forbidden to open an electric parking brake assembly after sale. If an electric parking brake fault is detected, the whole unit must be replaced.
Brake Fluid
Topping Up and Bleeding
Top up the brake fluid reservoir to the maximum level. Use a transparent pipe on the brake caliper bleeding screw, making sure you stick to the following bleeding sequence:
- Right hand rear wheel
- Left hand rear wheel
- Right hand front wheel
- Left hand front wheel
Press the brake pedal slowly to pressurise the braking circuit. Keep the brake pedal pressed and then open the bleeding screw (the brake pedal lowers and system pressure decreases).
Keep the pedal pressed all the way down and close the bleeding screw. Now let the pedal move up. Wait for two seconds to let the brake fluid reach the brake master cylinder and then repeat the operation until the brake fluid is clean, with no air bubbles.


