Often, when parts such as oil seals fail prematurely they are replaced and returned under warranty; however, in most cases the seal itself isn’t the reason the failure has occurred. In this guide, Corteco explains the causes and advises on how to avoid premature leaks and failures in the future.
Lip Leakage Diagnosis
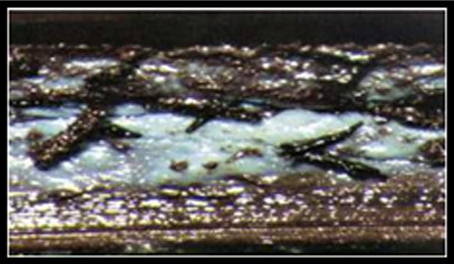
Damage due to excessive wear
If the lip has worn out then this is often caused by the seal not being sufficiently lubricated before installation causing abnormally high temperatures, the build up of foreign matter, disproportionate internal pressure or an excessively rough shaft surface. Similarly, if when removing a seal the lip has hardened and there are visible cracks, you can be sure that this has again been caused by abnormally high temperatures, excessive internal pressure or insufficient lubrication. The cause for the abnormally high wear has occurred due to friction as the amount of lubricant is below the specified level and therefore did not reach the seal lip. Alternatively, insufficient lubrication can come from dry-wear conditions because the vehicle’s oil levels are low. Another sign of this is if the lip wear band is smooth and glossy.
Although problems during fitting can contribute to the part failing, other issues may also be key. If the lip’s waist (flex area) is broken, then this can be because of improper assembly but can also be triggered by excessive internal pressure. If the lip is turned-under, the lip edge is severely worn and the wear band is concave, then this is connected to an incorrect shaft chamber. Improper assembly and excessive internal pressure means the oil seal area has exceeded the maximum pressure it was originally designed for. To prevent this reoccurring, identify the maximum pressure for the seal and check it is compatible with the vehicle. However, if the lip edge is severely worn but there are circumferential grooves on the wear band then the cause is that the shaft finish was rougher than the specified range. Again, this can be prevented by sourcing the correct part for the specific application.
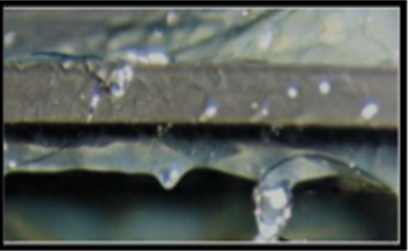
Installation errors & mechanical damage
Installation errors tend to be a big factor in the premature failure of automotive parts. This is apparent if you can see that the lip of the seal is scratched which is caused by improper assembly, improper handling, an incorrect shaft chamber or the presence of foreign matter entering the seal. The scratches are often caused by being assembled over burrs or other defects in the shaft chamber, the lip coming into contact with sharp metal parts during transit or storage, or if the seal was handled with gloves contaminated with metal particles.
As stated, improper handling can be a factor in causing a seal to fail prematurely, the tell-tale sign is the seal lip being swollen or soft. The swelling is caused by the lip being soaked in solvents or petrol before installation. Alternatively, if when removing a seal you see the fit trace is disconnected locally then the seal could have been deformed because of an improperly designed assembly jig or a gap in the press-fit occurring due to rough handling.
If the lip has softened, then the main cause of this is the lip having the incorrect material required for the application. In order to prevent this from reoccurring make sure the correct seal is sourced for the specific application before installation.
If you notice the lip of the seal has worn unevenly then this is due to cocked seal installation or an excessive shaft offset. As before, both should be checked during installation but crucially, before the vehicle is out on the road.
If when removing a seal the garter spring has become disconnected then this has likely been caused by an incorrect shaft chamber or improper assembly. Checking the installation can ensure you and your customers are happy with the finished job.
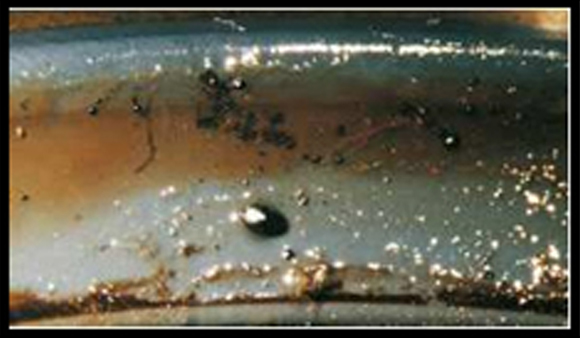
Contamination
Foreign matter can affect the seal in many ways. This is due to a shaft or seal having been contaminated with foreign particles or the contaminants embedding into the seal lip, normally triggered when the seal is assembled in the presence of dirt and/or dust. In addition to this, if the seal or the housing is assembled with silicone, the sealant will have contaminated the shaft or seal.
If there isn’t an obvious fault with the oil seal, the cause is often difficult to diagnose, but before you prematurely condemn a good seal, first check if the shaft is scratched or the diameter is incorrect. If the shaft rotational direction does not match the helix on the seal, this means that either there is excessive shaft offset/runout or the shaft is worn/seal has been installed incorrectly.

Press-fit area leakage diagnosis
Below we identify some common causes of premature leaks due to incorrect handling/installation.
If the oil seal is cocked then this can be caused by an improperly sized bore diameter, incorrect shaft chamber or improper assembly jig.
Like with the lip leakage diagnosis, if the oil seal is problem free, check if there is a scratched or an improperly sized bore or excessive bore surface roughness. Similarly, if the seal OD is damaged or chafed, the bore is often the cause. Ensure you check if there is an improper sized bore diameter, incorrect shaft chamber or improper assembly jig before installation.
All the causes mentioned can be avoided if the correct steps are taken when assembling, ordering and fitting a part.


