Martin Jensen talks through the process of diagnosing a Lexus GS 300, which was having driveline vibration problems, using the new 4-channel Pico NVH kit.
Background story:
My customer bought the car six months previously. During the initial test drive, he noticed a slight driveline vibration. The salesman told him it came from the tires. The car got four new tires matched with rims, balanced and road force tested. But the car still had a driveline vibration.
The dealer he bought the car from (a Toyota dealer) sent the propshaft to be balanced. There was no change in the vibration. The problem grew worse, leading to the dealer replacing the pinion bearing. This repair wasn’t successful either, so they replaced the rear diff completely with a brand-new OEM unit – yes, a very expensive fix. They returned the car to the customer, but he could still feel the vibration. The dealer insisted that the car was ok, and they were not willing to do any more work on it. So, I was asked to take a look at the vehicle.
The vehicle’s condition is like new. So far, I have:
- Performed a visual inspection of suspension and steering, which is OK
- Inspected the suspension and steering to look for excessive play, everything seemed fine
- Checked the tire pressure, no problem there
- Checked the wheel alignment on all four wheels – all good there
- Done a road test with the NVH kit to verify the complaint. I could feel the vibration at 90km/t (55mph) and upwards
- Balanced all 4 wheels to 0 grams
- Road force tested all 4 wheels: 3 tires on 4kg and one tire on 11kg (left front)
- Visually inspected the propshaft – OK
- Measured propshaft for runout: maximum runout measured = 3/10mm
- Measured propshaft angles – OK
- Inspected the centre bearing – OK
- Inspected the U-joint – OK 0.05mm
- Performed an NVH test with the car on the hoist.
I took a capture from the front inner seat bolt (left-hand drive) while driving at highway speed. On this recording, you could see a T1 a T5 and a P1. I also took a capture with the car running freely on the hoist (90kmt/55mph) with one sensor (3-axis) mounted on the rear diff, and another sensor (Y-axis) mounted on the centre support bearing.
- Please note that in the first half of the recording, the two sensors were mounted in the same location, and in the second half of the recording the second sensor was mounted on the centre support bearing
- Also note that the rear wheels were freely suspended in the air (the suspension was not compressed, so the rear-drive axels did not have their natural driving angles).
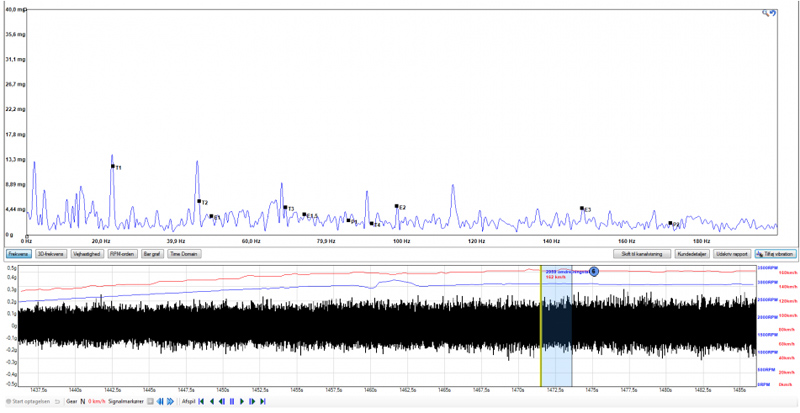
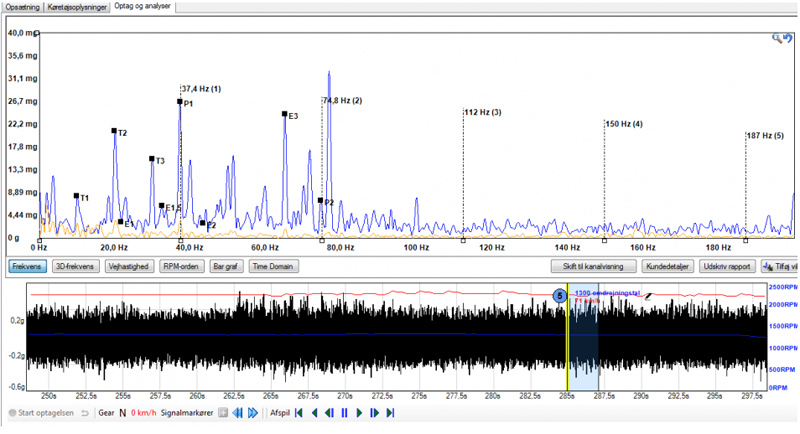
On this recording, the P1 levels were above the scale and there seemed to be a second vibration just under P2.
On hoist, sensor on rear diff and centre support bearingThe vibration could be felt and measured the strongest on the rear diff. Being open for ideas and tests to carry out to diagnose and eliminate this problem, I reached out to the Pico Forum for advice.
Kev advised that having the vehicle on a two-post lift could produce some odd results due to components being at the wrong angles and therefore not working the same way as when the vehicle was on the road. I decided to take the same capture with the accelerometers in the same location, but to do a road test instead of using the lift to keep the variables as low as possible, so I had the vehicle brought back in for further tests.
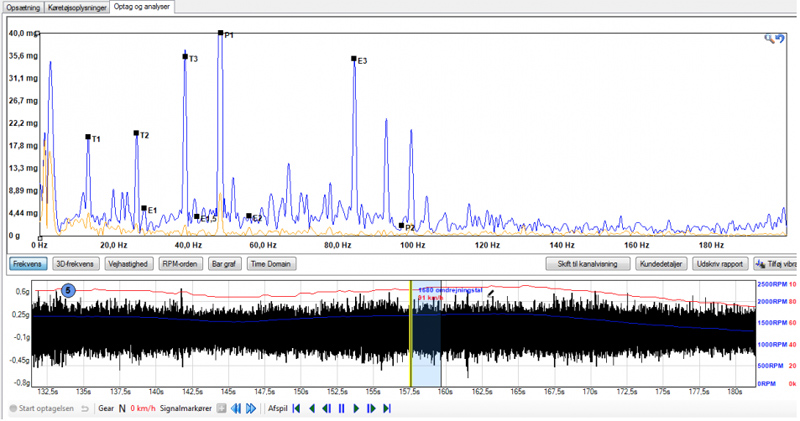
I took two captures with one sensor (3-axis) mounted on the rear diff, and another sensor (Y-axis) mounted on the propshaft centre support bearing. In these recordings, the car was driven by the customer during the road test, and he confirmed that the vibration he had been experiencing was present.
I shared the latest findings on the forum, and Steve Smith from Pico read the case and came back with the following extensive reply:
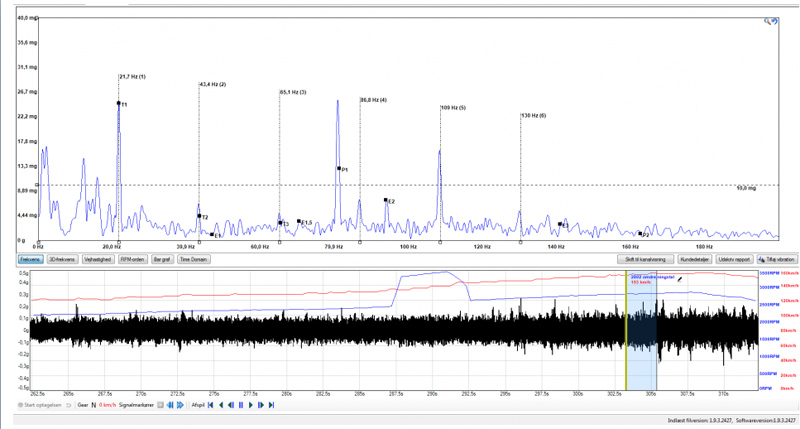
‘Using the 90 km/t file, what is clear to see is that we have a P1 or NEAR P1 vibration that is road speed related and affecting the vehicle predominately in the vertical axis at the differential. The accelerometer mounted on the centre bearing returns very little amplitude at the P1 frequency and so it would appear we are in the sweet spot of vibration with our diff mounted accelerometer.
Can we assume that the peak around P1 is present when the customer can feel the vibration? Why I have mentioned NEAR P1, is the fact that at times the P1 indicator is not fixed at peak amplitude. See the image below:
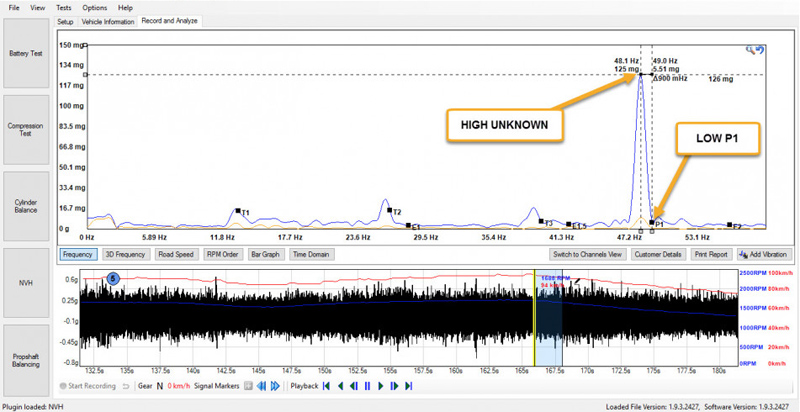
I suspect we have another gear ratio to add too (possibly 6-speed auto?) I say this is because using OBD to obtain road speed, propshaft speed/frequency is calculated by multiplying T1 by the differential ratio. 3.73:1. For example T1 is 13.1 Hz at 94 km/h x 3.73 = 48.86 Hz (P1 is displayed at 49 Hz). However when using the “Calculate Road speed” method E1 at 27.9 Hz / 5th gear ratio (0.719) = 38.80 Hz (this cannot be right).
What I would advise you to do here, is to invite the customer back for another road test, only this time use the “Calculate Road Speed Option”. See image below:
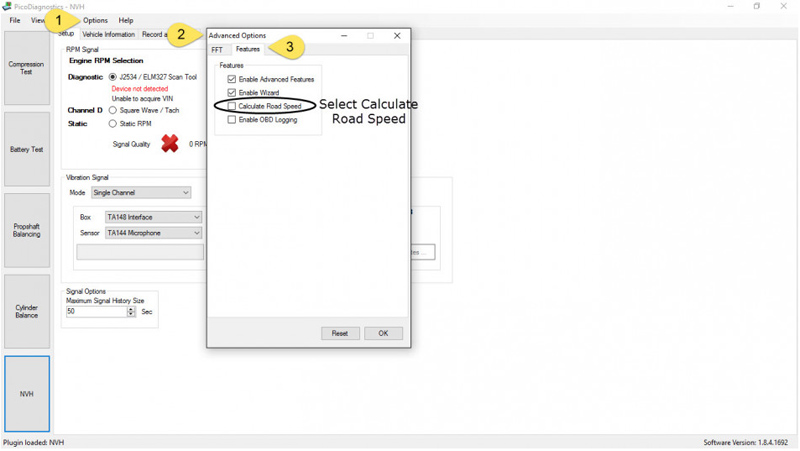
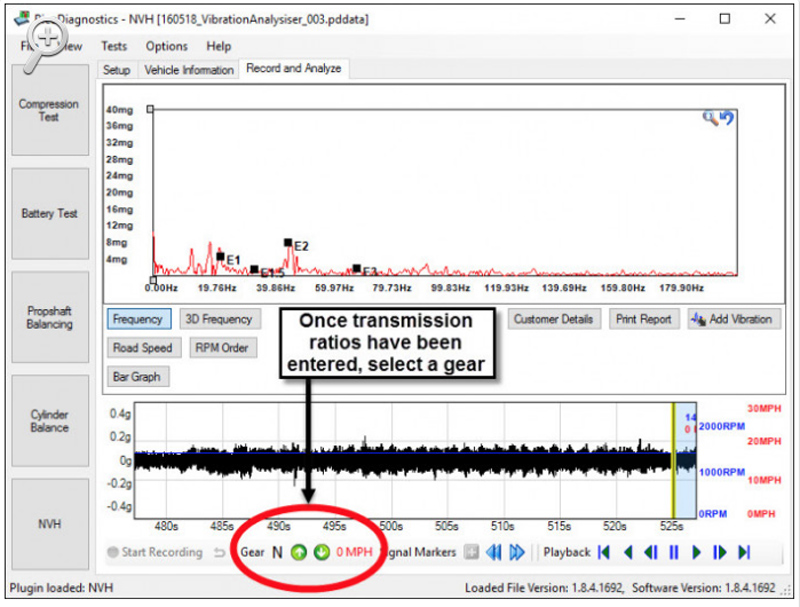
This feature will utilize engine speed and selected transmission ratio to calculate road and propshaft speed. You will need to inform the software of the gear selected by the driver (manually shifting the auto box) under the signal history See image below:
What I hope to see is a possible separation of P1 and an unknown vibration nearby. Could you also remove the front differential final drive values from the Advanced Vehicle information?
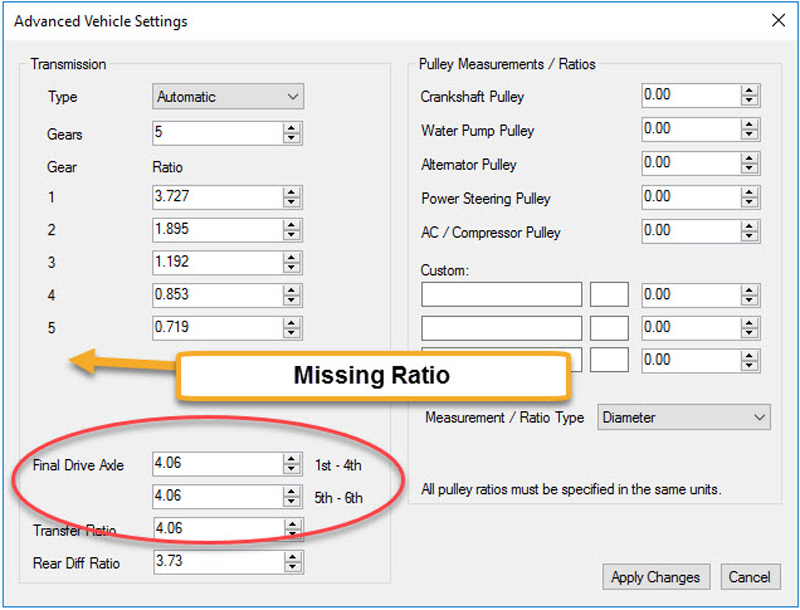
Whilst the values should be ignored for RWD settings I think it best they are removed. (Set to zero). Can we confirm our transmission and differential ratios are also correct? I can obtain these for you if required? I suspect we have a 6th gear ratio missing.
During the road test when the vibration is present can you downshift to a lower gear whilst maintaining road speed? Note the effects on P1 or vibrations close to? Could you then try to maintain road speed whilst selecting Neutral (not easy I know)? Could you again note the effects on P1 and other neighbouring vibrations?
Should P1 or vibrations nearby remain high, we most certainly have a road speed-related vibration. If they fall substantially we have engine-related vibrations present at a similar frequency to P1. Given we know the vibration sweet spot is around the rear differential, we can position our second accelerometer ( in the vertical axis) around the rear subframe adjacent to the drive shafts.
My line of thinking is we can “zone in” on a rear left or rear right P1 style vibration. If we can faithfully reproduce this vibration on a hoist with the suspension compressed as though on the road, can we run the test again with the rear wheels removed? – disable TRC.
This will remove the influences of wheel imbalance and load upon the drive train. If our vibration remains evident, can we then disconnect the driveshafts? Think of a drive shaft with CV joint generating a “T” order vibration.’
There was a lot to think of and go through. The reason for mounting the sensors on the diff and centre bearing, was because of the high P1 and the vehicle repair history, describing damage to the pinion bearing. I did not have the optical sensor kit, but I thought the imbalance was too strong to try to correct it through balancing.
I had also made some errors regarding the gear ratios:
The ratios for the gears were from a previous car, and it was my bad as I forgot to erase them – I would prefer if the software removes previous inputs when we select new measurements on the initial screen. The car was a 6-speed automatic, and I could not find the specs for ratios – I had full access to Lexus publications, but could not find them anywhere.
The Gearbox code was A960E
The rear diff ratio is: 3,727
I believed the vibration was a P1 but I could not figure out what the vibration was that was present just above P2. The P1 vibration was present when the customer was experiencing the vibration. During the road test, he was not allowed to look at my computer – to avoid a placebo effect – and when he informed me of the presence of his concern, it matched the grooving P1 amplitude.
I was thinking, based on what I’d measured, that there had to be something wrong with the propshaft, given the fact that there are a strong P1 and the pinion bearing on the old diff had failed. That lead me to measure the vibration levels on the gearbox output flange, the centre bearing, and the diff.
The vibration was very high on the rear diff and almost gone at the gearbox and centre bearing. The propshaft was mounted in the centre bearing via flexible rubber, so I believed that a direct comparison was not possible. However, given the fact that the vibration was so high on the rear diff, and the fact that the diff was relatively new and was replaced due to a pinion bearing fault, this had to be a problem with the propshaft.
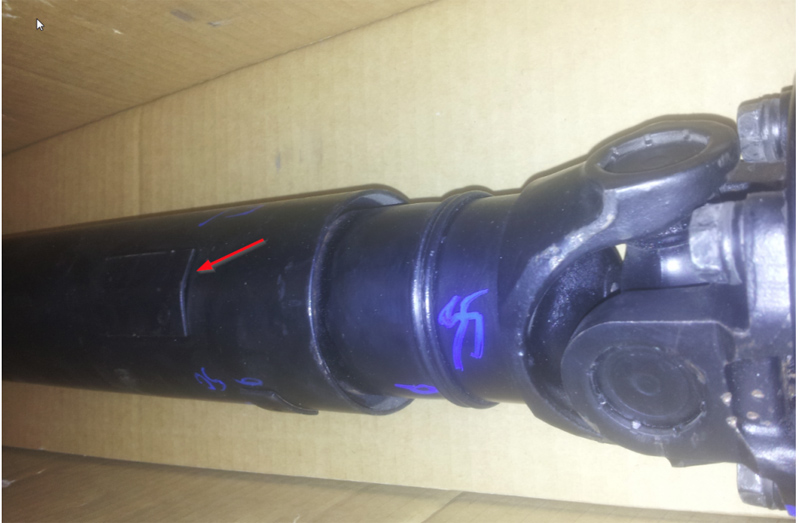
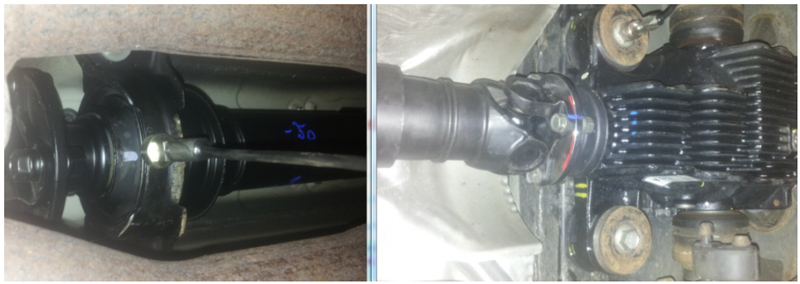
Upon closer inspection of the rear section of the propshaft, it became clear that the drive flanges were the same, so I removed the rear section of the propshaft and turned it around front to back, thinking that if it was, in fact, a propshaft problem, I should be able to move the vibration from the diff and to the centre bearing.
This lead to a reduction of the vibrations by 2/3 of the level at 72kmt and also a reduction of the vibration at 90kmt. The car also accelerated much smoother, and the customer confirmed that the vibration levels had dropped.
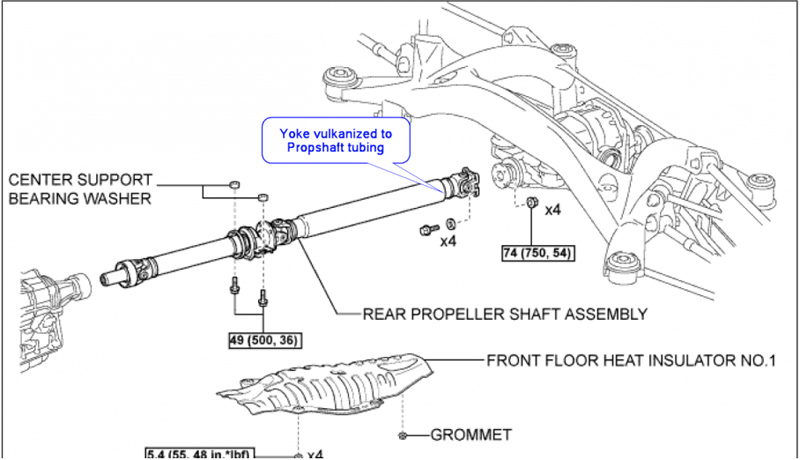
In the rear section of the propshaft, the yoke was vulcanized on the propshaft tubing and the guy that had balanced the propshaft had welded weight to the propshaft in this location. I don’t think it was a great idea to heat that rubber.
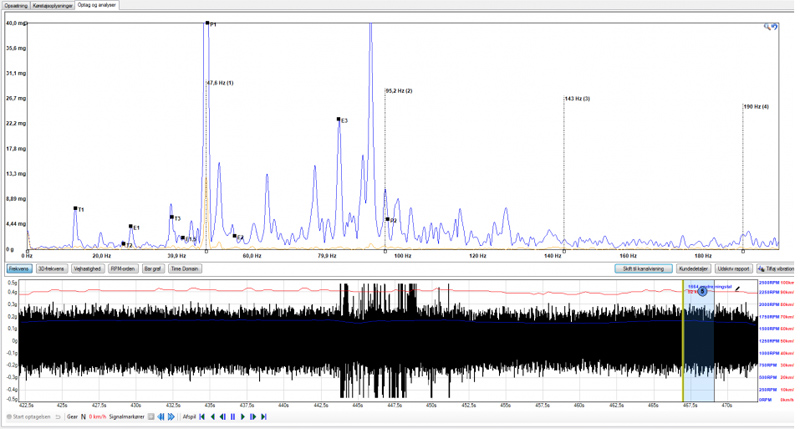
Looking at the last captures, the P1/near P1 had reduced dramatically, from approximately 126 mg to approximately 44 mg. This confirmed that we were moving in the right direction. The customer could now present our measurements and findings to the dealer, to see if they would be willing to replace the propshaft.
Steve Smith rightly expressed concern for the elevated T vibrations in this latest capture, and I have been wondering whether a strong propshaft vibration can cause T vibrations as they are directly linked via the diff.
I eventually got the Lexus back to the shop. My customer had presented the dealer with our findings and they agreed to pay for a new genuine propshaft for the car. The propshaft had now been installed on the vehicle, and the angles measured again. An after-repair capture confirmed that the propshaft related vibrations had dropped drastically, and the customer was very pleased with the car again.
There are still some Tire speed related vibrations, and we did confirm that the left front tire has a high road force. The car is on winter tires right now, but when summer comes, the tires can be replaced.