
The city car segment is fiercely competitive with many small, efficient cars driving around our towns and cities today. The Kia Picanto is one popular car in this segment, offering two engine sizes, and comes well equipped to keep the driver comfortable.
Launched in 2004 the first generation did receive a facelift, with the second generation being launched in 2011 to present day.
Recommended labour time: 3 hours. LuK part number installed: 618308700
The specific vehicle in this guide is the 1.1 petrol engine (G4HG) with a very heavy clutch pedal, making it difficult to change gears. In such a case, especially in vehicles where the disengagement system is purely mechanical (mechanical bearing, fork and shaft bushes), it is necessary that these components are replaced together with the clutch and the other system components.
When the clutch is so worn the force on the pedal will become greater, consequently the fork, shaft and bushes are stressed and can become twisted. If this happens, just replacing a clutch and not the other system components will drastically reduce its working life.
In this article, we used a two-post lift, a transmission jack and some common hand tools, as well as an alignment tool and engine support hoist. Before undertaking the repair, make sure the locking key is available (if the vehicle is fitted with alloy wheels) and disconnect the battery for safety.
Wiring harness
Remove the engine cover, battery and battery tray and then remove the air duct and air filter housing completely.
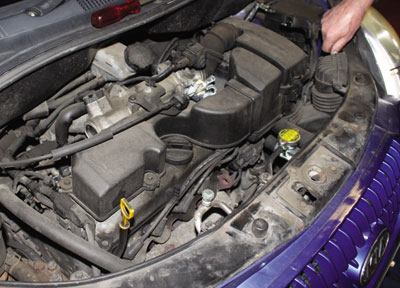
Disconnect the wiring harness that includes the reverse light, speed sensor and earth cable that are secured to a bracket that is fixed to the gearbox. In addition, disconnect the selector linkages from the release lever and detach the clutch cable.
Install the engine bridge and then remove the top bell housing bolts, starter motor bolts. Follow this by removing the gearbox support mounting and bracket, as this could prohibit the lowering of the transmission later.
Raise the vehicle and remove both the front wheels. Drain the gearbox oil and then disconnect the lower ball joints in order to remove the drive shafts.

Remove the drive shaft nuts and then detach the shafts from the wheel hub; this will more than likely require some force, but you should be careful not to cause any damage. Finally, remove both drive shafts from the gearbox. Remove the front engine mounting, taking note of which way it is fixed as it is offset.
Support the gearbox with the transmission jack and remove the remaining bell housing bolts.
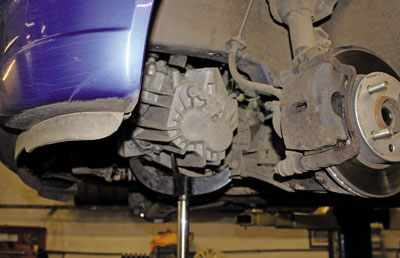
Then carefully separate the gearbox from the engine and lower to the floor.
When you remove the old clutch unit, you must ensure that the flywheel surface is in a good condition. Clean the inside of the gearbox before installing the new bearing and fork, making sure that you apply the appropriate high melting point grease (not a copper-based product) on the fork joints.

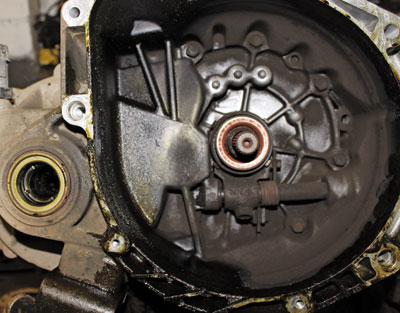
Before installing the components, it is important to check the gearbox input shaft for tolerances and wears in the splines. Don’t forget that this specific vehicle is not equipped with a bearing in the flywheel, so the input shaft must have zero tolerances and be in a perfect condition. In addition, apply a small amount of high melting point grease to the input shaft splines and install the clutch disc, moving around on the splines to ensure the grease is spread evenly. Then remove the excess grease with a clean cloth.
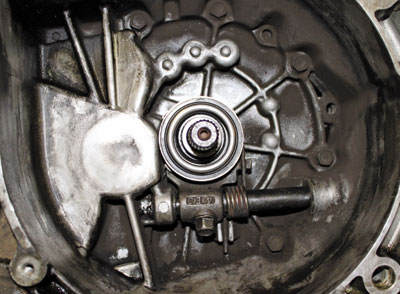
Using the alignment tool install the clutch disc to the flywheel, followed by the cover.
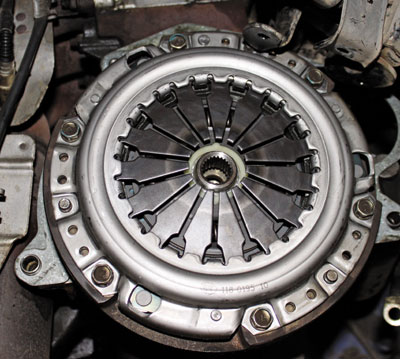
You should note that on LuK plates you will find the words ‘Getriebeseite’ or ‘Gearbox side’, which indicate correct direction of the disc.
For the installation procedure you must follow the reverse order. Before fitting the gearbox make sure the locating dowels are in place and not damaged; refit any that have become dislodged and refit the gearbox. Make sure the gearbox bell housing bolts are secured before lowering the jack. Remember to refill the gearbox with the new gearbox oil to the vehicle manufacturer’s specifications.


