A clutch fitment guide for the 4Motion 2.0TDI model, engine code CBBB, from Schaffler Automotive Aftermarket (UK).
The Volkswagen Tiguan is a popular compact crossover vehicle (CUV) for families and also company vehicles, with a good choice of engines and specifications available.
Recommended labour time: 6 hours. LuK parts fitted: 415068510 (DMF), 411013310 (DMF bolts), 624339533 (clutch kit).
The first generation was launched in 2007 and has seen some 2.7m vehicles produced. With the second generation launched this year, and the popularity of the CUV sector on the rise, your workshop is likely to receive a visit from a Tiguan in the near future.
In this month’s clinic we’re taking a closer look at how to replace the clutch, flywheel and CSC on the 2.0tdi 4motion variant. The replacement of the clutch was undertaken using a two-post ramp, two transmission jacks and an engine bridge tool. The only special tool needed is a universal alignment tool for the clutch driven plate.
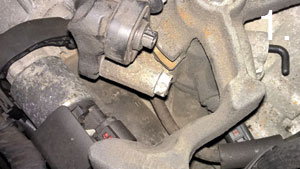 The repair starts from under the bonnet. Disconnect the battery terminals and stow safely. Remove the intake pipe and the air filter housing before removing the battery and battery tray to expose the top of the gear box. Remove the white plastic locking clip (Fig 1) that holds in place the reverse gear lever and cable and detach from its position. Remove the locking nut from the gear selector cable and remove this from its keyway stub (Fig 2). Unbolt the selector cable mount and stow safely away from the working area.
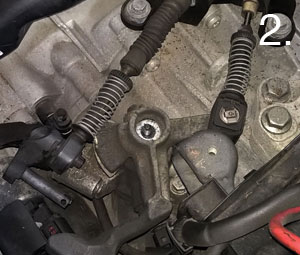
Remove the retaining clip that holds the hydraulic line into the clutch master cylinder (Fig 3) and disconnect the line and blank off; in this case we held the line vertically and blanked off using a plastic cap. You could also clamp the line with a hose clamp and then disconnect the pipe. Stow the hydraulic line safely and make sure you DO NOT operate the clutch pedal.
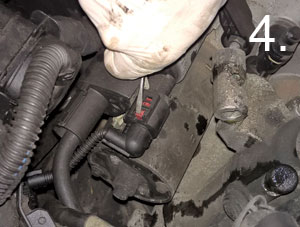
Remove the top two bell housing bolts and remove the upper starter motor bolt. Disconnect the electrical connector from the starter motor by pulling the red tab back slightly (Fig 4) to unlock the connector, allowing it to ease off from its position. Stow the cable safely and then unclip the plastic cover over the main power cable to the starter and unbolt the cable and stow. Disconnect the reverse light switch and remove the earth cable from the gearbox. Remove the two bolts that hold a plastic support bracket for the wiring loom and the starter motor in place. Now remove both parts.
Engine bridge
Install the engine bridge and remove the top gearbox mount. Raise the vehicle and remove the under tray. Then remove both front wheels and partly remove the left wheel arch liner. Now drain the gearbox oil before disconnecting the oil level/temperature sensor plug and stowing. Remove the engine/gearbox stabiliser arm bracket and then remove the stabiliser arm (Fig 5).
 Remove both driveshaft bolts and remove the bolts on both sides from the wishbones; disconnect them from the stub axles. In our case we decided not to remove the prop shaft, exhaust and transfer box, but we did remove both drive shafts and the subframe as this gives plenty of room to disconnect the gearbox from the engine. The O/S drive shaft should be unbolted from the flange on the transfer box.
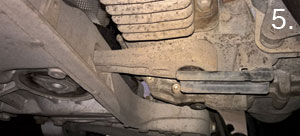
Unbolt the steering rack and anti-roll bar and disconnect the wiring harness from the subframe. Remove the six bolts securing the subframe in place and, using a transmission jack for support, carefully lower the subframe. Remember to remove the 6mm Allen key bolt through the transfer box (Fig 6) as you will not separate the gearbox from the engine.
 Support the gearbox with a transmission jack and then remove the remaining bell housing bolts. Carefully separate the gearbox from the engine – it will have to be slightly lowered on the transmission jack and pulled into the wheel arch a little, but you should have just enough clearance to lower the gearbox to the floor.
With the clutch removed, check the Dual Mass Flywheel (DMF) for signs of heat stress and evidence of grease loss. The DMF should also be tested for freeplay and rock between the primary and secondary masses – LuK tool number 400 0080 10 is specifically designed for this purpose on all LuK manufactured DMFs. Full instructions and tolerance data for all LuK DMFs are contained on a CD which comes with this special tool.
Clean the first motion shaft splines and any debris from the bell housing (especially important when a release bearing has failed). It’s important to ensure that the release bearing is always replaced if the clutch and/or DMF are worn out. Put a small dab of high melting point grease (not a copper-based product) on the first motion shaft splines and make sure the new driven plate slides freely back and forth. This not only spreads the grease evenly but also makes sure you have the correct kit.
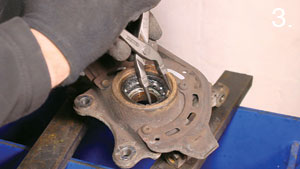
Wipe any excess grease off the shaft and driven plate hub. Using a universal alignment tool and checking the driven plate is the correct way round (note “Getriebe Seite” is German for “Gearbox Side”) the clutch can be bolted to the flywheel evenly and sequentially.
Before fitting the gearbox, make sure the locating dowels are in place and not damaged. Refit any that have become dislodged and then refit the gearbox. Make sure the gearbox bell housing bolts are secured before lowering the jack.
Refitting is the reverse of the removal.


