
As a turbocharger is now a standard feature on the vast majority of combustion engine powered vehicles, its replacement due to mechanical failure is becoming an increasingly common job. Here, Nissens Automotive guides readers through some steps that need to be followed to ensure an effective replacement.
Due to the central role the turbocharger plays to ensure the engine meets its design performance, in terms of both its power delivery and emissions levels, meticulously following the correct replacement process is paramount to achieving a successful repair.
Prior to installation
Technicians should begin the installation process by finding out if the vehicle manufacturer has issued a service bulletin with special procedures for turbo replacement, as this could save valuable time and avoid future problems.
As turbo failure can be caused by multiple factors, its associated components should also be replaced during the process to prevent any reoccurrence of the issue. This means that alongside the engine specific turbo, other parts such as oil feed and drain lines, oil and air filters, hose clamps, seals and O-rings, and if necessary, intercooler crankcase ventilation, EGR valve, plus charge air hoses and pipes, will also be needed.
As stated, most turbo breakdowns are consequential to other system failures, so thorough troubleshooting is an essential part of the replacement process. So, before installing the new turbo, establish whether the vehicle suffers from a lack of power, excessive smoking, abnormal engine noise or high oil consumption, as these are often caused by something other than turbo failures and their root causes must be eliminated first.
If the problem does lie with the turbo, run the vehicle’s on-board diagnostics to spot any relevant errors and thoroughly examine all parts around it, paying particular attention to the intercooler, replacing it if it’s in poor condition. However, if the turbo has suffered seizure, irrespective of what it looks like, the intercooler must be replaced.
In addition, check the exhaust manifold, all the pipes and hoses around the turbo, the crankcase pressure and ventilation, air intake system and the exhaust system, specifically the EGR valve, diesel particulate filter and/or catalyst. Any faults such as damage, cracks or contamination must be eliminated, so replace these parts if there is any doubt.
Handling the new turbo
After removing the old turbo, discard the old gaskets and thoroughly clean the surface of the flanges before fitting the new seals. Replace the oil and air filters and fill the engine with new oil of the correct specification.
Nissens turbos are first fit products, which means the most important installation parts are included in the box, but despite their weight, turbos are fragile, so need to be handled with care. Never grab them by the actuator, rods or the hoses, and do not change any settings or calibration on the actuator’s rod.
Before installation, remove the protective caps, but make sure no impurities get inside any part of the turbo, as these could cause catastrophic damage to it and the engine. Inject the oil from the syringe helpfully supplied in the box into the turbo spool feed hole to pre-lubricate the turbo shaft before connecting the oil feed pipe. Spin the compressor wheel by hand several times, which will rotate the shaft and introduce the fresh oil to the bearings before the initial engine start.
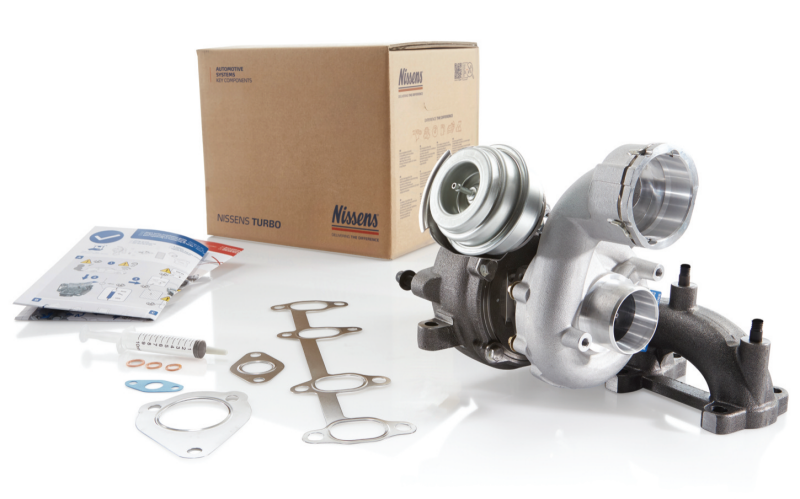
Install the new gasket from the Nissens kit, but first check that all the gaskets precisely match with the centre holes and the flange, because any incorrect positioning will restrict the flow and cause the turbo and the engine to fail. Then fit the turbo on the engine block or manifold, reconnect the exhaust pipe after replacing the O-rings, gaskets and hose clamps. For information on tightening torques and for any further installation instructions always refer to the VM’s specifications.

Check the wiring
With turbos controlled by actuators with an electronic position sensor, check the condition of the vehicle’s wiring and the connection socket, paying attention to the insulation and for any signs of breakage or moisture within the circuit. If any issue is found, the connection or wiring must be replaced. Providing all is well, carefully plug in to the connection socket.
Lubrication is crucial to the turbo’s correct operation, so the proper connection of the oil channels is critical and best practice is to install new oil feed and drain lines, which is why Nissens has introduced a complementary range to support its turbo programme.
If the lines are reused however, they must be thoroughly cleaned and be free of any inner restrictions, as well as having no bends or surface abrasions. Remember to refit any heat shields that were originally applied, as these prevent the oil lines from oil coking and then carbonising if the line is placed close to an excessive heat source.
Install the air inlet and outlet to the turbo compressor housing and ensure that the connection is leak proof by performing a pressure test on the system with a leak detector kit. Start the engine and let it idle for three minutes and inspect for any air, oil or exhaust gas leaks.
Check the back pressure in the exhaust and ensure there is the necessary oil flow throughout the turbo while the engine is idling, by either measuring the oil pressure at the feed line, which should be between three and four bars or 40 to 60 PSI, or alternatively check the oil flow when the drain line is disconnected, then stop the engine check that the oil is at the correct level.
Connect the OBD testing equipment once again and reset the previous faults, then take the car out for a drive and check if the engine operates properly running with the expected boost and power.
A correctly fitted Nissens turbo is designed to serve the engine well throughout its lifespan, ensuring it delivers the correct power output and exhaust emissions and so providing the customer satisfaction that every workshop strives for.