
A full timing belt replacement guide for a Vauxhall Vectra 1.8 VVTI model
The Vauxhall Vectra has been a popular car on our roads ever since it was first launched in 1995. The recommended timing belt change interval is every 100,000 miles or 10 years and the engine has been identified as an interference type engine so, in the event of the timing belt failing, engine damage may occur.
RECOMMENDED FITTING TIME: 1.2 HOURS INA TIMING BELT KIT USED: 530045010
Getting started
The first thing to be aware of is that it’s important to replace the timing belt when the engine is at an ambient temperature. We also highly recommended replacing the auxiliary belt when the timing belt is replaced. For safety reasons it’s always best practice to disconnect the battery and, on completion of the repair, reconnect the battery and reset the electrical system as required.
The workshop equipment we used for this repair was a two-post ramp, engine support, cam and crankshaft locking tools. With the vehicle on the ramp, detach the wiring loom
from the air box assembly, disconnect the electrical multi-plug from the air mass meter, remove the air intake pipe from the air mass meter and the throttle body and then remove the air box assembly (see below).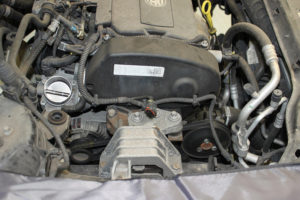
Cover the throttle butterfly to prevent any debris entering the throttle and then remove the upper section of the timing belt cover (see below). 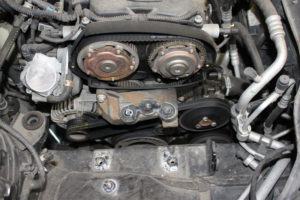
Now raise the vehicle in the air and remove the O/S/F wheel and under tray/splash guard before mounting an engine support (see below). 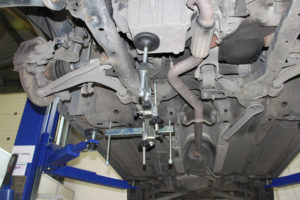
If an engine beam is to be used, this can be fitted when you lower the ramp.
Better access
Lower the ramp and remove both parts of the engine mounting – the auxiliary belt tensioner is now accessible. Rotate the tensioner back to its stop and retain with a locking pin before removing the auxiliary belt. Raise the ramp and lock the crankshaft using the locking tool located into the back of the flywheel and remove the crank pulley.
With the pulley removed check the condition of the rubber drive and bonding for cracks and wear and then replace the bottom pulley/torsional vibration damper if required.
Remove the timing belt covers and the auxiliary belt tensioner, refit the bottom pulley bolt and remove the crankshaft locking tool (see below). 
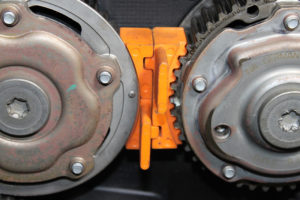
Rotate the engine to align the timing marks on the crankshaft pulley (see below) and the camshaft pulleys and then locate the crank and camshaft locking tools; the camshaft locking tool is a two piece tool. Inset section one into the inlet cam and then slide section two into the exhaust cam (see below); slight rotation of the cam pulleys may be required to locate the tool as the timing belt may have stretched slightly.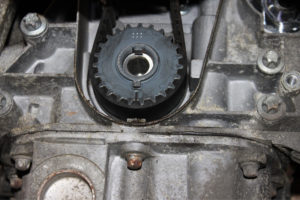
Belt tension
Now insert an Allen key into the tensioner and rotate in a clockwise direction to remove the belt tension. Remove the belt from the tensioner pulley, camshaft pulleys, idler and finally the crankshaft.
Inspect the timing belt area for any oil or coolant leaks that could contaminate the new timing belt and rectify as required. Replace
“For safety reasons it’s always best practice to disconnect the battery and, on completion of the repair, reconnect the battery and reset the electrical system as required.”
the timing belt tensioner and idler supplied in the timing belt kit, ensuring that the new tensioner is located correctly, and then torque to the manufacturer’s specification. Ensure the timing marks are all still aligned and then install the new timing belt, starting at the crankshaft and, working in an anti-clockwise direction, the idler pulley and camshafts.
Using an Allen key you should then rotate the tensioner in a clockwise direction to its stop, before sliding the timing belt onto the tensioner pulley and releasing the tensioner to tension the belt (see below).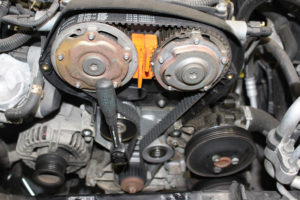
Check that the timing marks still align on the crank and camshafts and that the new timing belt is located correctly. Then remove the crank and camshaft locking tools, rotate
the crankshaft two complete revolutions, align the timing marks and insert the locking tools to ensure the timing is correct and that the belt is located and tensioned correctly.
Refit all components in reverse order and torque the bolts to the manufacturer’s specification; we also replaced the auxiliary drive belt and tensioner as best practice (see below). 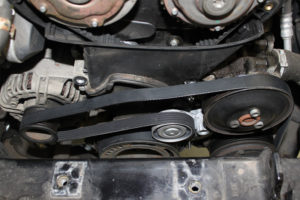 Reconnect the battery and reset the electrical units as required before carrying out a road test to ensure the car is ready for customer collection.


