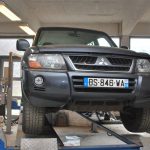
Front strut-top mount replacement guide for a Mitsubishi Shogun MK3 2000
An honest, reliable off-road icon,the Mitsubishi Shogun/Pajero is still a regular sight both on and off road, and it’s not uncommon to see even early versions still earning their keep in some of the toughest
conditions imaginable. Even the hardiest of Shoguns can’t soldier on indefinitely without maintenance though, with suspension components being one of the areas most commonly in need of routine attention and replacement, and front strut-top mounts being a case in point. These bear a significant portion of the stresses associated with driving both on and off-road, and their failure can result in the whole strut assembly moving, leading to knocking, wheel alignment issues and general ill handling.
Replacement kit
This explains why SuperPro, a company with a sterling reputation in
the field of four-wheel drive suspension components, has 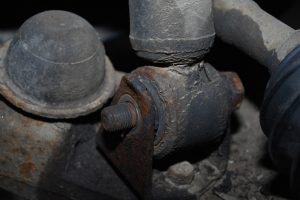
produced a complete strut-top mount replacement kit for the Mk3 model. The kit includes new durable polyurethane spring seats and shock top mounts, st
rut top caps, bump stops and boots. Fitting uprated SuperPro strut-top mounts makes a lot of sense then, especially if you’re replacing the existing dampers. The process is quite straightforward, however we did pick up a few pointers which are worth sharing:
To remove the front strut on these cars it’s necessary to remove the upper w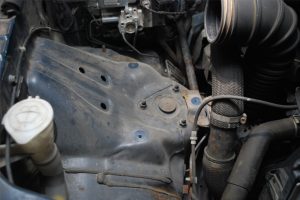 ish bone, a task which can be made tougher thanks to the amount of dirt and corrosion that’s likely to have built up. Indeed, the corrosion may be such that it might be necessary to cut the wishbone
bolts off with an angle grinder, in which case replacements are available from Mitsubishi (p/n MF104952 & MF430124).
Access to the strut tops requires the removal of the
plastic air filter housing and housing carrier, both found on the right hand side of UK cars, and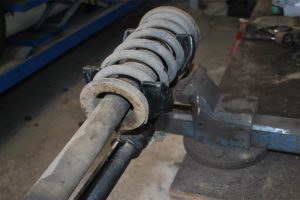 the battery and battery carrier on the left hand side.
When loosening the three nuts holding the top of the strut to strut-top mount, take care to support the strut from below to prevent it dropping once free.
Removal of the strut top mount requires the use of a suitable spring compressor. Please take care to follow the manufacturer’s guidelines when using these tools. Re-assembly of the new SuperPro top mount using the components provided in the kit is a simple reversal of the dismantling process.
Refit the rebuilt suspension upright to the vehicle, ensuring that all bolts are correctly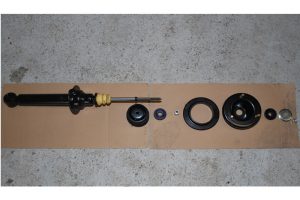 tightened to the original manufacturer’s torque settings.
On older or more heavily used cars you may find that there is heavy wear or deterioration of the original rubber upper wishbone bushes. These are a known wear issue on this model, which will also affect wheel alignment and driver feel.
Replacing the old upper wishbone bushes with a new SuperProbush kit (SPF3792K) can be done without a hydraulicpress. Simply drill a hole through the old, OEM bushes, use a saw to cut thr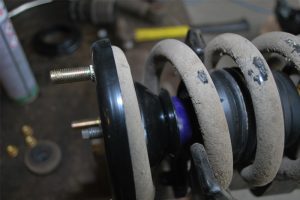 ough the outer shell, then a chisel to pry them out of the bush housings.
Once done, use finely graded emery cloth to remove any rough or sharp surfaces from the inside and edges of the bush housing, before pushing the new SuperPro bushings into the upper wishbone. Asmear of the grease supplied in the kit on the outside of the bush will help this process and, unlike fitting an OEM ‘Metalastic’ type bush, will only need the pressure that can be applied with a vice. Once the bushes are fitted a further smear of grease should be applied to the inner bore of the bush before the crush tube supplied is inserted. The arm can now be refitted to the car.


