
A full clutch replacement guide for a Citreon C4 2007 1.6 VTR+ model from Schaeffler Automotive Aftermarket UK
The Citroen C4 is the successor to the Xsara and was first launched in 2004 before receiving a facelift at the end of 2008. It was available in three model forms: three door Coupe, five door Hatchback and a MPV Picasso version.
RECOMMENDED LABOUR TIME: 3.6 HOURS LUK P/N FITTED: 620308600
This month we’ll show you how to replace the clutch on a 2007 Citroen C4 1.6 VTR+ which had covered over 80,000 miles and was booked in because the clutch pedal was biting high. A short road test confirmed this and a clutch replacement was advised.
The workshop equipment recommended for the repair is a two post vehicle lift, engine support, transmission jack and a clutch alignment tool.
Firstly, place the vehicle on the lift and, starting in the engine bay (see below), remove the pre-air box assembly by lifting in an upwards direction. Now disconnect the battery leads from the battery and remove the battery cover by lifting the front in an upwards direction and then drawing the cover forwards.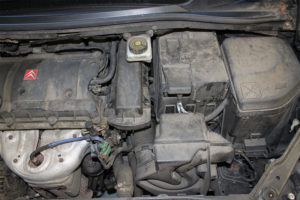
Remove the battery
Detach the battery retaining clamp and then remove the battery. The bolt holding the battery housing in place is only accessible from behind the n/s wheel arch liner. Raise the vehicle and remove the n/s/f wheel. You can now release the hub nut by removing the “R” clip, nut retainer and finally the hub nut.
Pop out the arch liner retaining clips and remove the arch liner exposing the battery housing bolt, which can be removed. Lower the vehicle and release the wiring loom retaining clip from the housing before removing the housing.
Remove the air box assembly by removing the retaining bolt at the front of the unit. Release the Jubilee clip at the throttle unit, disconnect the breather pipe and remove the air filter assembly.
“The workshop equipment recommended for the repair is a two post vehicle lift, engine support, transmission jack and a clutch alignment tool.”
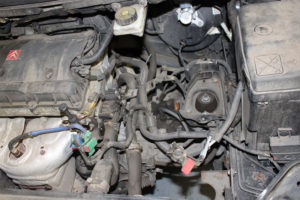
This now gives good access to the gearbox (see below). Disconnect the reverse light switch and earth cable, remove the two bolts for the clutch slave cylinder, unclip the hydraulic pipe from the support bracket and stow away from the gearbox.
Release the gear linkage from the gearbox (you can also remove the gear change pivot weight to aid removal). Whilst in this area, there are two bolts that can be removed – one for the starter motor and one for the gear linkage bracket on the outside of the bell housing.
Raise the vehicle to waist height, remove the o/s wheel, then the hub nut assembly. Now release the bottom ball joints to allow the front hub assemblies to be pulled out and then release driveshaft from the hub, raise the vehicle and drain the gearbox oil. The n/s driveshaft can now be removed from the gearbox. The o/s driveshaft has a centre bearing which has to be released by removing the two bearing retaining bolts, releasing the driveshaft from the gearbox and then withdrawing the whole driveshaft.
Remove the two retaining bolts that hold the gear linkage bracket to the gearbox and also remove the two starter motor bolts. Now remove the n/s sub-frame bar (see below) by removing the front plastic under tray, removing the two bolts in the front corner of the bar and the four bumper bracket retaining bolts and then detaching it from its location points at the rear of the bar.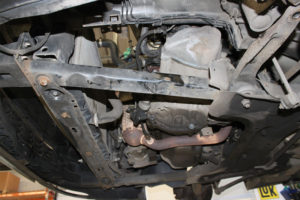
Support the engine with an engine support and remove the bell housing bolts and the engine speed sensor to avoid any damage. This leaves two accessible bell housing bolts that can be removed easily – a good tip is to store the bell housing bolts in the order they were removed (see below). Now disconnect the gearbox mounting by removing the three nuts that hold the mounting to the gearbox, remove the rear one with the vehicle at ground level, then raise the car, support the gearbox with a transmission jack and remove the final two nuts from the gearbox mounting.
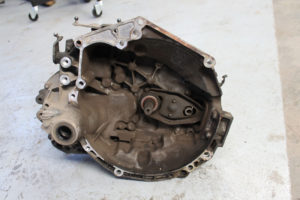
Lower the gearbox and engine so the gearbox mounting clears the gearbox studs. Then remove the final two bell housing bolts, ease the gearbox back until free and then lower the transmission jack to remove the gearbox (see below). Remove the clutch assembly (when inspecting the clutch plate wear was evident, indicating the clutch plate was near the end of its service life), clean and inspect the flywheel and remove the glaze with some emery cloth.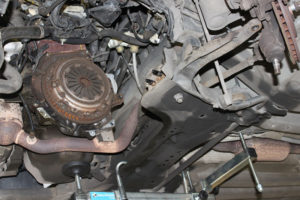
 On the gearbox, remove the release bearing and then inspect each of the sleeve/guide tube, release fork and ball pivot for wear and replace if required. Remove any clutch dust by cleaning the bell housing and fit the new release bearing. Lightly lubricate the clutch splines on the input shaft with high melting point grease and evenly distribute by fitting and sliding the new clutch plate to the input shaft and wipe off any excess. This also confirms that you have the correct clutch plate.
Fit the new clutch assembly to the flywheel using the correct clutch alignment tool – the clutch plate is also marked “Gearbox side” or “Getriebe seite“ to aid installation (see below). Now torque the clutch bolts to the manufacturer’s specification before reinstalling the gearbox and torquing the bell housing bolts. At this point you should feel the release fork for a small amount of free play to ensure correct installation.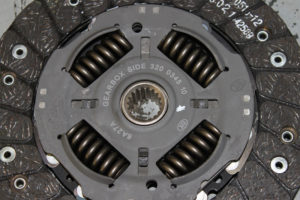
Refit the components in reverse order of removal.


