The technical team from Dayco runs through the procedure for installing the Dayco kit KTB532 on a Nissan Juke 1.5L diesel.
The 110hp 1.5L (K9K) diesel engine in the 2012 Juke is used extensively across the Dacia/Nissan/Renault model line-up, so is likely to be familiar to workshops throughout the country. However, it is also high on the European warranty log, so clearly presents challenges for technicians undertaking the installation.
As changing the timing belt requires the auxiliary belt to be removed, Dayco recommends that all the power transmission system’s components – primary and auxiliary, as well as the water pump – be replaced at the same time. As with all primary drive system jobs, always check the timing marks before removing the timing belt, and ensure the work is undertaken when the engine is cold – ideally, the vehicle will not have been run for at least four hours.
The procedure
Start by removing the engine cover, followed by the front right wheel and cowling, to expose the auxiliary drive system. With a spanner, slacken off the belt tensioner before removing the belt and the tensioner.
After removing the lower engine mount rod, securely support the engine before removing the upper rod, along with the entire upper engine mount. Release the retaining clips of the timing belt casing, and remove its upper and lower parts. This will reveal the five retaining bolts of the upper engine mounting flange, which should then be removed to give access to the timing drive assembly; camshaft, injection pump, water pump and crankshaft pulleys and the belt tensioner.
Turn the crankshaft clockwise to just before TDC for cylinder 1, and after removing the plug on the front of the engine block, insert the crankshaft locking tool (1489) and rotate the crankshaft pulley bolt clockwise so that it rests on the tool. Insert the camshaft locking pin (1430) on the flange of the camshaft pulley before removing the crankshaft auxiliary drive pulley.
Remove the timing belt tensioner, the belt itself, and the alternator, followed by the plastic cowlings attached to the top and front of the engine. This allows access to the water pump, which can then be removed.
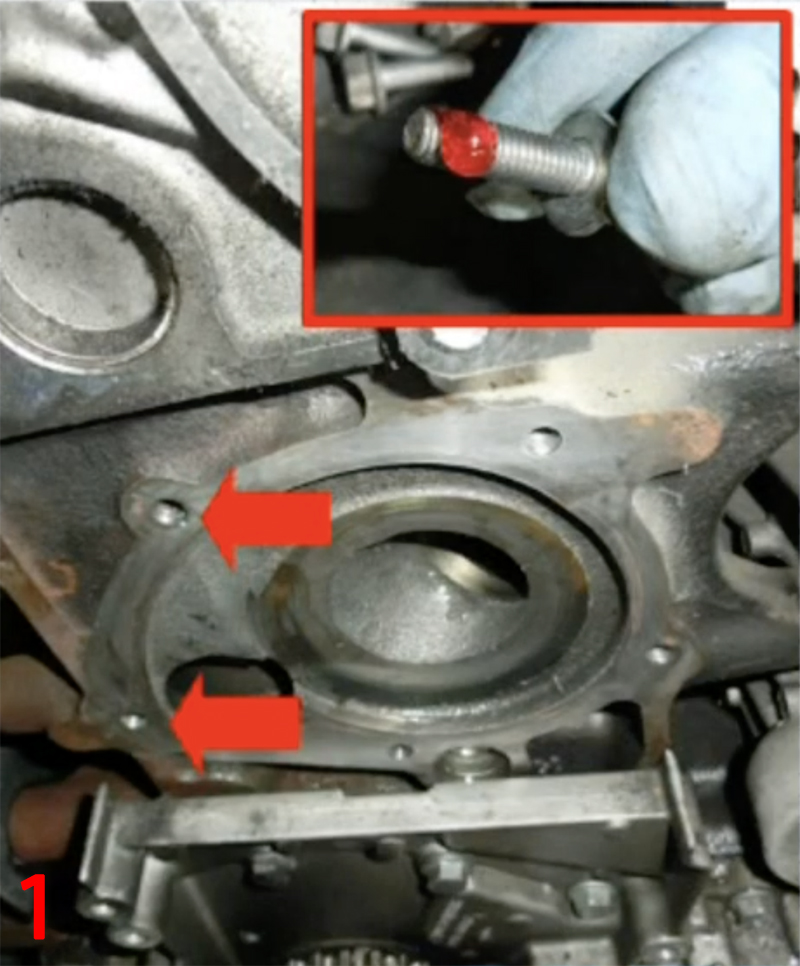
After flushing out the cooling system to remove any debris, accurately position the gasket and apply mastic to the two left retaining bolts (Fig 1), before fitting the new water pump.
Slacken off the bolts of the camshaft pulley, allowing it to turn on its slots but remain centred. Then, turn the camshaft pulley completely clockwise until it rests on the locking tool.
Fit the new belt tensioner and bolt supplied in Dayco kit KTB532, paying attention to the correct positioning with its tab located in the corresponding recess (Fig 2).

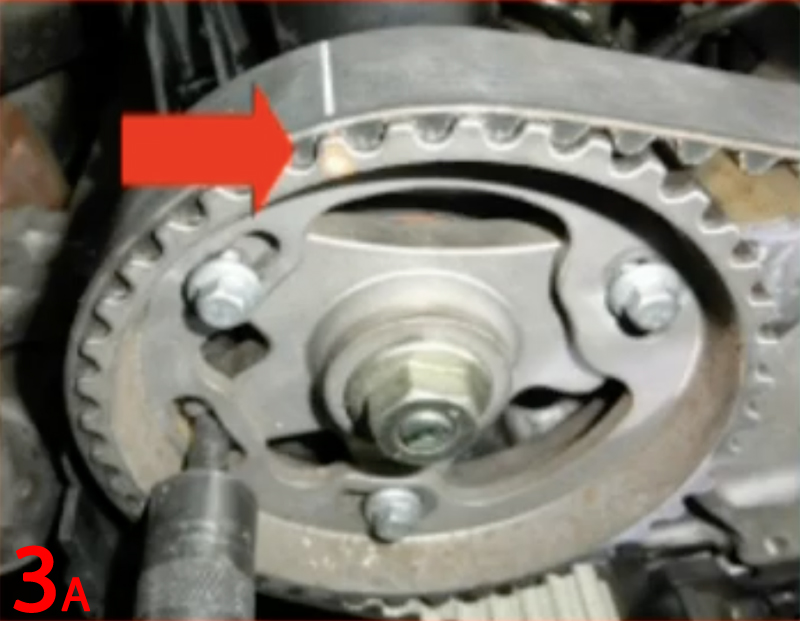
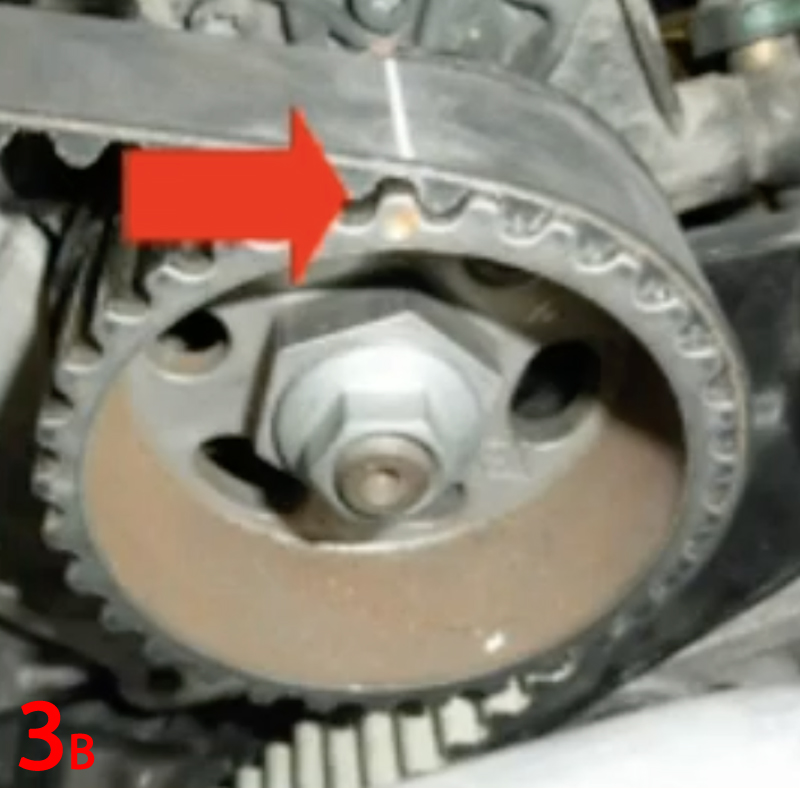
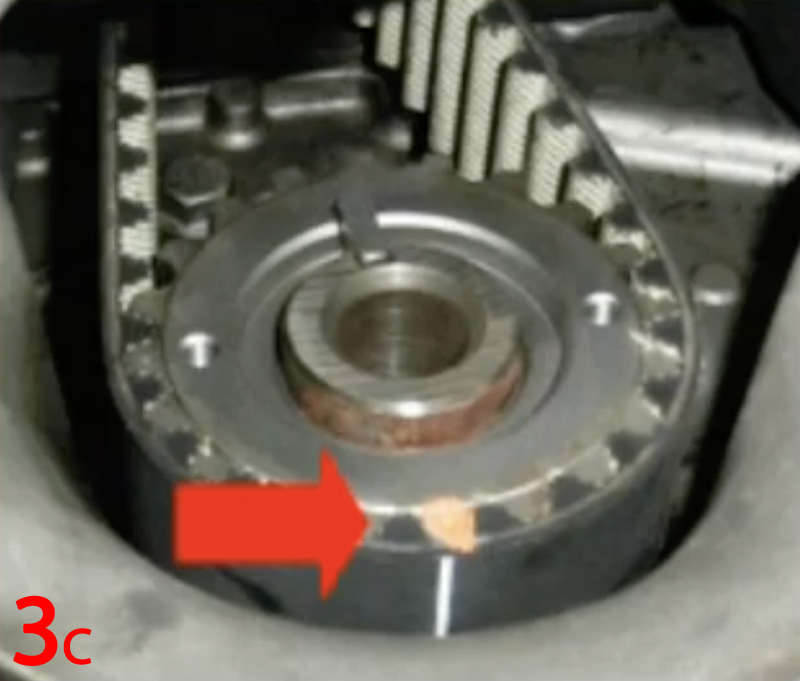
Then fit the new Dayco high tenacity ‘white’ timing belt, ensuring the correct direction of rotation and that the reference marks on the belt correspond precisely to those on the toothed wheels of the camshaft, injection pump and crankshaft (Fig 3).
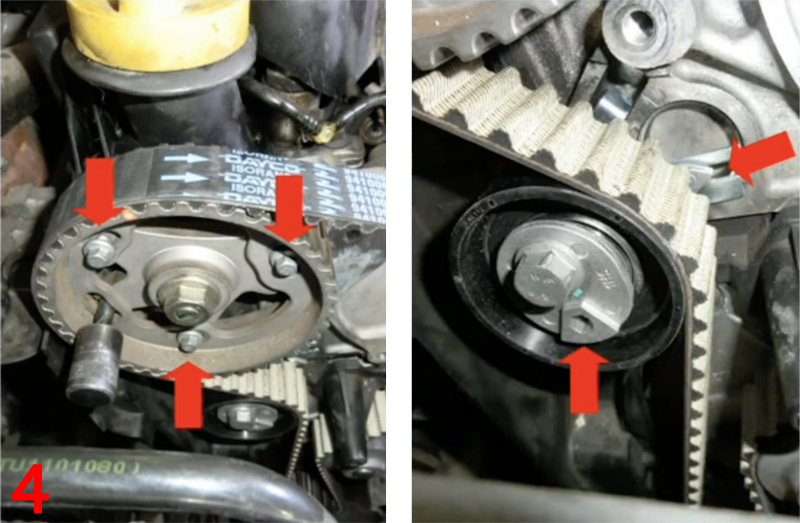
With an Allen key, position the pointer and temporarily tighten the belt tensioner. After checking they are not at the end of the slots, tighten the camshaft pulley bolts to a torque of 15Nm. Then, remove the camshaft and crankshaft timing tools.
Turn the crankshaft clockwise through two rotations and check the engine timing using the tools. Loosen the bolts of the camshaft pulley so that it can again turn on the slots but remain centred. Loosen off the belt tension bolt and reposition the pointer (Fig 4) before tightening to a torque of 25Nm.
Check that the timing is correct by torqueing the camshaft pulley bolts to 15Nm, removing the timing tools, and turning the crankshaft clockwise through two rotations and reinserting the tools.
Providing that the timing is correct, refit components in the reverse order of their removal, but change the original crankshaft pulley bolt for the new one supplied with the kit and replace the auxiliary belt with Dayco 6PK1130/1195.
Dayco also recommends that the condition of the crankshaft pulley and auxiliary belt tensioner are assessed and, if necessary, replaced with Dayco DPV1260 and APV3180, respectively.
Finally, refill the cooling system with the correct quantity and specification of coolant, start the engine and, if needed, bleed the circuit and carefully check for leaks. Also, ensure that the radiator fan is operating correctly. Then, once the engine is cold, check the coolant level again.


