Blue Print has been delivering technical courses on Hybrid vehicles for two years; the emphasis of the course being on service and repair, as well as the inevitable safety issues. As always, to diagnose and repair, it is handy if we have an understanding of the technology involved so the theme of this article focuses on the co-operative/regenerative electronic braking system fitted to the most common hybrid vehicle on our roads – the 2004 -2009 Toyota Prius.
The braking system is unlike a conventional system in that it is the Brake Control Module (BCM) that controls the brakes rather than the BCM adjusting the pressure created by the driver. The reason for this is so that co-operation between the Hybrid control module and BCM can take place. In simple terms when the brake pedal is pressed, information about the driver’s intentions is evaluated and negotiated between the Hybrid Control Module and the BCM to meet the expectations of the driver. The result is a combination of regenerative braking and application of the hydraulic system.
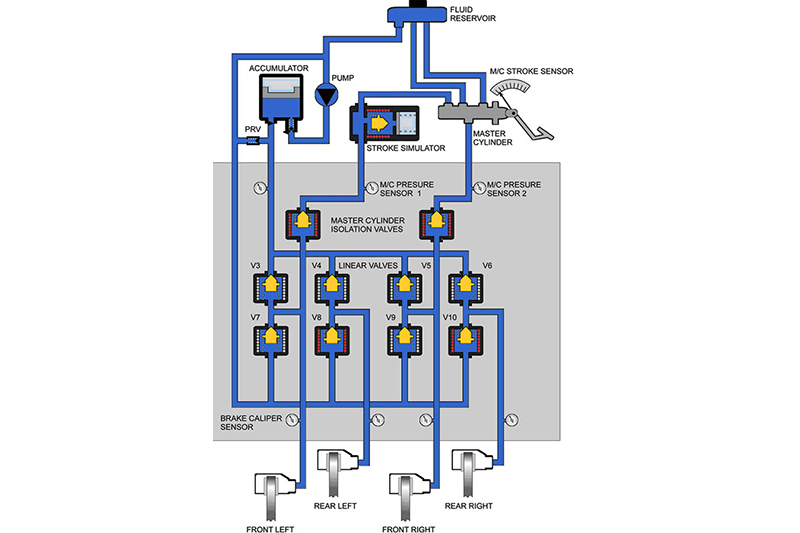
Hydraulic Control Unit
The system looks conventional but under normal operation there is no hydraulic connection between the master cylinder and the brake calipers. Instead, the pressure to apply the brakes is generated by a hydraulic pump. There are sensors to monitor the pressure at the master cylinder and at the brake calipers. These sensors are part of the brake hydraulic module. Any anomaly between these sensors will cause fault codes to be registered.
How it works
When the system is switched on, the master cylinder isolation valves are closed, the stroke sensor solenoid valve is opened and the rear brake linear valves V8 and V10 are closed (as can be seen in the picture, below).
When the driver applies the brake the BCM receives information from the master cylinder stroke sensor about speed and position, and from the master cylinder pressure sensors 1 and 2. The stroke simulator piston moves under pressure to give the same sort of feel to the driver as they would expect from a conventional system and to allow the master cylinder to stroke. This information is evaluated by the BCM and a braking strategy is decided.
Under low braking effort above 10 km/h, there may be no hydraulic pressure applied to the calipers and all the braking may be done by regeneration (the drag of the large motor/generator in the transmission as it charges the battery). Greater braking demand will be shared between the regeneration and hydraulic brake application. Communication between the Hybrid ECU and the BCM is via the Controller Area Network (CAN).
Hydraulic brake application is achieved by controlling the linear valves. V3, V4, V5 and V6 are pressure-apply valves and V7, V8, V9 and V10 are pressure release-valves. The linear valves are not on/off valves, they are controlled by a Pulse Width Modulated current (PWM), which gives very precise control of the pressure in the brake calipers. Opening the apply valves allows pressure to build in the calipers. Opening the release valve allows the pressure to vent to the master cylinder. The pressure in the caliper is monitored as is the wheel speed, and then compared with data in the BCM. This allows the braking effect to be adjusted to meet the demands of the driver.
The system is also used to control brake application for traction control and vehicle stability control without the application of the brake.
So what problems does the system present for the technician?
Firstly, don’t worry about high voltage; the system is not connected in any way to the high voltage system. That does not mean that great care need not be taken when working on other areas of the car. All of this is covered in the Blue Print Hybrid course.
Fault Codes
Brake pad replacement on the 2004-09 Prius does not require any special tools, but fault codes ‘C134x Hydraulic System xxx Malfunction’ may be generated when the brake pedal is pressed for the first time, to bring the brake pads into contact with the brake disc. This is because there will be no significant pressure rise in the caliper as would be expected by the BCM. The codes can be cleared with a suitable scan-tool or manually at the EOBD socket.
The hydraulics on the braking system can be bled without any special tools but this is best done with the assistance of the scan-tool. If the hydraulic module is removed or replaced it will need to be initialised; this process allows the system to determine the characteristics of the linear valves. For this you will need a suitable scantool such as the Blue Print G-Scan.

G-Scan screen shot
Bleeding the system
Note: the following is not a complete set of instructions on brake bleeding, it’s to demonstrate what is happening in the hydraulic system during the process. Remember you should always follow vehicle manufacturer’s instructions.
When the ignition is turned off for more than two minutes, the valves in the hydraulic module return to their default position. The master cylinder cut off solenoids will now allow brake fluid to pass to the front brakes. To ensure that the system cannot become active, the two ABS relays are removed. The front brakes are bled by pumping the master cylinder to build up a pressure in the system and then releasing the bleed nipple to vent fluid. Bleeding the front brakes like this ensures that the pipes running to and from the master cylinder and the stroke simulator are bled properly.
The rear brakes can be bled after replacing the two relays and turning on the ignition. G-Scan will help here. Select ‘bleed rear left’ or ‘bleed rear right’ from the menu and follow the instructions. Alternatively the rear calipers can be bled using accumulator pressure, but great care must be taken and you will raise fault codes which will have to be cleared.
Brake pad replacement is a simple affair. As you can see in the diagram below, when the relays are removed, a clear passage from the rear calipers to the reservoir is created and from the front calipers to the master cylinder. Toyota doesn’t recommend clamping the brake hose and venting the caliper at the bleed nipple during piston retraction.

Clearing the codes
ABS/VSC codes cannot be cleared by removing the battery negative. Codes can be cleared by using a scan tool. Alternatively ABS codes can be retrieved as blink codes and cleared at the OBD2 socket. A Special Service Tool, SST (a fancy name for a bridging wire), is inserted between pins 4 and 13 on the 16 pin OBD2 socket. When the ignition is switched on, the ABS/VSC light will flash. If the brake pedal is then pressed eight times in five seconds, followed by the SST being removed – all ABS/VSC codes will be erased.
Understanding vehicle systems is an essential part of vehicle repair. It gives the technician the confidence needed to tackle new technology.


