Despite the popularity of the unit and relative simplicity of its drive system layout, the 2.0 TDI engine used in several VW Group models can cause problems if the correct procedure is not followed during the installation of a replacement timing belt kit. In the worst case, incorrect installation can result in system failure with potentially catastrophic consequences for the engine.
Therefore Dayco, OE belt suppliers to the VW Group, has produced some guidelines to help technicians follow the correct installation procedure.

The process
Replacement must only be carried out when the engine is cold, so ensure the engine has not been run for at least four hours. Once the timing drive system is exposed rotate the crankshaft clockwise to TDC on cylinder one and make sure the camshaft pulleys are locked into position, using the appropriate locking pins, and the crankshaft locking tool is also in place. Checking the timing marks are aligned, slacken the camshaft pulleys so they can just rotate and then loosen the tensioner bolt.

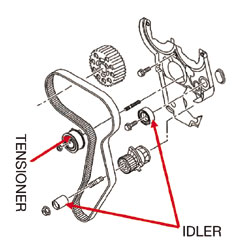
VW 2.0 TDI drive layout
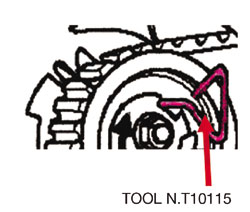
Turn the tensioner pulley anti-clockwise and insert the tensioner locking pin using Dayco special tool T10115, before rotating the tensioner fully clockwise until it stops. Re-tighten the nut and remove the timing belt (starting at the water pump), then remove the old tensioner and the idlers.
Install the new tensioner, taking great care to ensure that the locking tab is correctly inserted into the hole in the rear case. Failing to follow this step is the biggest single reason for subsequent belt failure on these units. Now install the new idlers.
Insert the tensioner pulley locking pin and secure the tensioner in its clockwise position using special tool T10115 and turn the camshaft pulleys clockwise within their slotted holes. Then, noting the direction of its rotation, fit the new timing belt clockwise, starting from the crankshaft and ensuring it remains taut between the pulleys on the non-tensioned side.
Remove the locking pin from the tensioner pulley, slacken the nut and slowly rotate the tensioner until the pointer aligns with the notch, making sure the nut does not also turn. Then, while holding the tensioner in place using the tool, lock the tensioner using Dayco special tool T10020 and tighten the nut to 20 Nm + 45°.
Hold the left camshaft pulley with Dayco special tool T10172 and tighten the camshaft bolts on both pulleys to 25Nm. Then remove the tool, camshaft locking nuts and crankshaft locking tool.

The TDI tensioner locking pin
Rotate the crankshaft two turns (slowly) until just before TDC on cylinder one and insert the camshaft locking tool into the left camshaft pulley while slowly turning the crankshaft to TDC. Ensure that the camshaft locking tool for the right hand pulley and the crankshaft locking tool can easily be inserted, make sure the timing marks are aligned and check that the tensioner pointer is aligned with the notch or is within 5mm to its right.
Naturally, repeat the installation process if any of these measures can’t be met, but otherwise reassemble the components in reverse order of their removal. When reinstalling the crankshaft pulley, use new bolts and tighten to 10Nm + 90°.


