
“The rapid development of automotive technologies means that as an industry we are thirsty for knowledge, education and training on the subject. However, we must not forget about basic components; and remind ourselves of their importance and role. As pivotal components of a car’s suspension, ball joints are safety critical parts. For a safe drive, regular checks are vital and it’s imperative that both drivers and technicians are aware of the symptoms of a failing ball joint,” says Jon Sellars, UK Marketing Manager for TRW.
Ball joints connect the car’s suspension system to control arms and steering knuckles and allow the suspension system to move while the vehicle is steered. The number and location depend on the make, model and type of system used.
Ball joints will deteriorate over time and will eventually wear out. If a ball joint fails it will affect the handling of the vehicle; the wheel’s angle alters, reducing control and the vehicle could come to an abrupt stop, damaging the tyres.
Regular inspections will help to ascertain when ball joints need replacing. The following symptoms could point to an unhealthy ball joint and ignoring these could put the driver and other road users at risk:
- A clicking or snapping sound when the wheel is turned; eventually becoming a squeaking sound when the brake is applied.
- A knocking noise coming from the front end of the car when driving over small bumps.
- Uneven tyre wear; usually the result of bad alignment (when the car pulls to one side). Continuing to drive could damage internal parts; such as the tie rod. Indeed, as these parts work in conjunction, some mechanics recommend that you replace both at once.
Ball joint health check
Sealed ball joints are lubricated at the source of manufacture, but the more traditional type of ball joints must be kept lubricated. This can extend lifespan in older vehicles. Generally speaking, standard ball joints will outlive the sealed type because eventually the seal fails, causing the joint to dry out and rust. A sealed ball joint can fail as early as 80,000 miles.
Removing the ball joint
TRW recommends that there are three ways to correctly remove and thus change a ball joint to make sure it isn’t out of alignment during assembly.
Use a stand-alone hydraulic press to press gently, in one go, the correctly positioned ball joint into the track control arm
Advantage: A stand-alone press is universal.
Disadvantage: To press the ball joint in, the track control arm has to be removed and re-fitted.
Use a mobile hydraulic press
Advantage: Fast repair.
Disadvantage: Bigger investment.
Fit a new track control arm equipped with bushes and ball joints
Advantages: No investment in tooling, no risk of mounting the ball joint wrongly.
Disadvantage: Track control arm has to be removed.
After this, the steering geometry will need to be checked and adjusted if necessary. This requires specialist tools and knowledge.
A GOOD WORKMAN USES THE RIGHT TOOLS – WHEN CHANGING A BALL JOINT IT IS VITAL THAT THE CORRECT TOOLS ARE USED!
Here’s some examples where they clearly haven’t been:

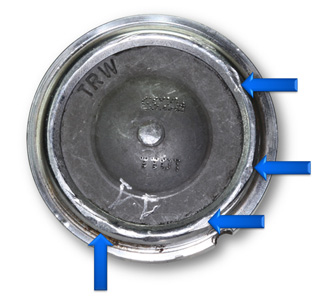
The image above shows a damaged ball joint. This part has worked its way loose, and then been damaged by hitting against the track control arm.
The images directly above and below show how a ball joint has been damaged by using a hammer instead of a hydraulic press. This was a fast option – but not safe.
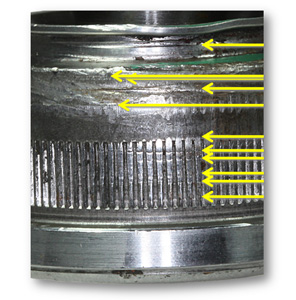
Each of the lines on the image above shows a hammer blow. Clearly the lines are not horizontal and this will widen the bore of the track control arm. This is on the end reducing the clamping force, which leads to loosening of ball joints.
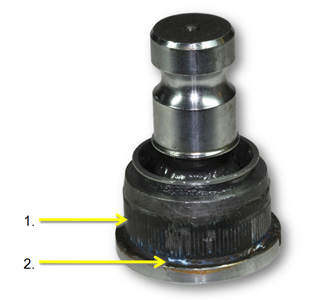
The image above shows that:
1. The spline isn’t visible and has filled with thread locking fluid. If properly repaired, the ribbing would be clearly visible.
2. Indicator of the thread locking fluid (blue colour).


