This guide from BTN Turbo explains the steps that need to be undertaken before fitting a turbocharger.
February’s issue of PMM includes a turbo ‘Tech Tip’ from BTN Turbo which explains how to avoid common mistakes when replacing a turbo on various PSA models with DV6 engines.
Grab a copy from your local stockist.
This accompanying piece provides some critical instructions of how to reduce risk when fitting a turbo…
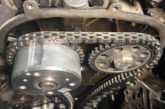
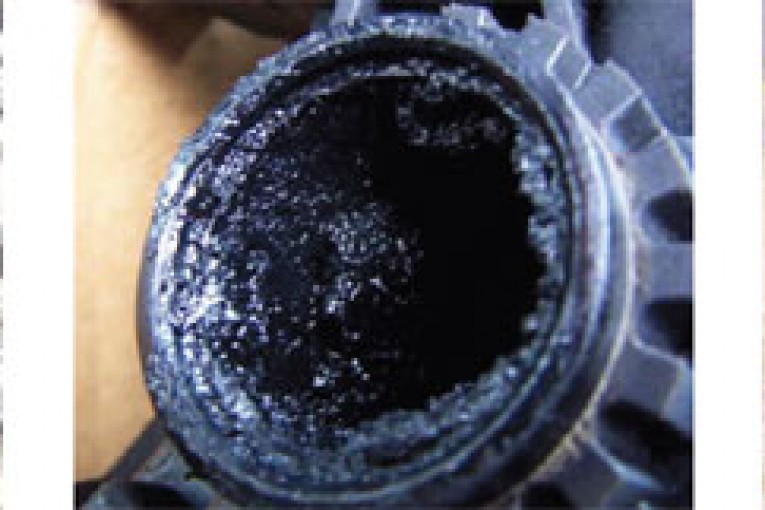
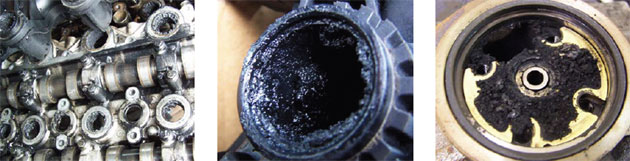
Failure of successful operation of the turbocharger can be caused by external influences and not faulty turbocharger components. In particular residual engine carbon/sludge penetrating the turbocharger and damaging it. This risk can be reduced by, ideally, removing all engine carbon/sludge, but often this is very difficult to do. However, risk can be reduced by following all the procedures set out below:
• Before removing old turbocharger carry out two engine flushes using FLUSHING OIL not flushing additive. Change oil filter each time. Note: Condition of turbocharger and oil leakage needs to be assessed before this operation as not to cause excessive oil leakage allowing engine to run on own oil.
• Sump must be removed and cleaned.
• Check that engine has latest specification sump.
• Replace the dipstick if the vehicle is fitted with yellow plastic version. Latest spec. is white with orange grip.
• Oil strainer (pick up) must be removed and replaced due to residual carbon/sludge build-up.
• Oil pump should be removed and checked.
• Oil cooler and filter assembly should be removed and cleaned.
• Charge air cooler to be removed, cleaned thoroughly and any oil inside drained off.
• Brake vacuum pump to be removed and checked for debris/ carbon – clean/replace as necessary.
• Fuel injector gaskets to be checked as not burnt or compromised – replace as necessary.
• Replace injector flange nuts.
• Check valve cover breathers and pressure regulator valve in fume re circulation circuit. Replace/clean as required.
• Inlet and outlet hoses to be removed and checked for damage and debris.
• Oil drain pipe checked for blockage/restrictions, clean/replace as necessary.
• Exhaust system to be checked for contamination/blockage (Catalyst, DPF etc.).
• Turbocharger oil feed pipe & banjo bolts must be replaced.
• New oil filter and oil to be fitted.
• Oil flow must be checked:
– Fit turbocharger to engine leaving oil return pipe off.
– Install a longer oil return line and feed into suitable container.
– Start engine and idle for 60 seconds, then switch off engine.
– Measure volume of oil in container – 60 seconds of idle should produce at least 0.3 Litres of oil.
– Repeat test two or three times to confirm oil flow is correct.
– During this test, do not allow engine to run below minimum oil level!
• Vehicles with DPF: carry out static regeneration according to manufacturer guidelines.
• Engine should be run for 20 to 30 minutes then the oil and filter must be changed and the filter in the banjo bolt removed.
• Engine oil and filter must be changed after one month of normal driving.
• Advise oil/filter are changed at 3000 mile/six monthly intervals.
If you do not understand the procedures or have difficulty doing so, please call your local distributor for guidance.
WARNING: To reduce the risk of premature turbocharger failure by residual carbon/sludge, you must ensure you follow the above procedure. You should NOT fit the turbocharger where you know, or have reason to believe, that the risk cannot be overcome due to the possible age of the application and/or lack of service history etc. In these circumstances you must decide how best to prepare the application in order to avoid damage to the turbocharger once fitted.