
When repairs are needed to front wheel suspension, small variations can make the difference between correct and incorrect adjustment. Maladjustment potentially leads to compromised road-holding and handling performance, and accelerated wear of suspension components and tyres.
After replacing damaged or worn parts on the front suspension, or repairing accident damage, ZF Services UK recommends carrying out a front end alignment, checking and adjusting the toe setting and where necessary/possible, castor and camber angles. Some VMs also give specifications for the toe-in curve (also referred to as toe constant); an important check that may be inadvertently overlooked. The toe-in curve defines the alteration in toe setting that occurs during bump and rebound of the suspension, and incorrect adjustment can result in inaccurate steering response when braking and accelerating or when driving over an uneven surface.
Typical scenarios that require the toe-in curve to be checked or adjusted:
- Accident damage to axle and/or bodywork components
- Pulling to one side during braking or when driving over bumps
- Replacement or loosening of front axle components
To check the toe-in curve, the toe setting is recorded in an initial position with the vehicle parked at rest and again when the vehicle is raised by a specified amount. The measured values are then compared to the VM’s specifications to determine whether adjustment is required. The initial setting for the toe-in curve is established via vertical adjustment of the track rod end, with the vehicle raised.
HOW TO PERFORM THE TOE-IN CURVE SETTING PROCEDURE
As an example we’ll now take a look at the VM approved toe-in curve setting procedure recommended by ZF Services UK for four mainstream B5 platform models from the Volkswagen Group; the Audi A4, Seat Exeo, Skoda Superb and VW Passat. The checks should be carried out on a suitable ramp equipped with wheel turntables and jacking beam as follows:
1. First check and, if necessary, adjust tyre pressures to the VM’s specifications. For standard suspension models, insert spacer gauge VAG 1925 plus adapters VAG 1925/3 or VAG 1925/4, depending on the lift platform. For models equipped with sports suspension, adaptors VAG 1925/6 will also be needed (see Fig 1).

Fig 1
Unscrew the two threaded stems on the spacer gauge until the adaptors just make contact with the front bolts (Fig 2 – arrowed) of the subframe , but not so firmly that they cause the vehicle to be raised. The vehicle is now in the initial position and the first toe reading can be taken. If correction is required to meet the VM’s specifications, carry this out in the normal way by adjusting the track rod length.
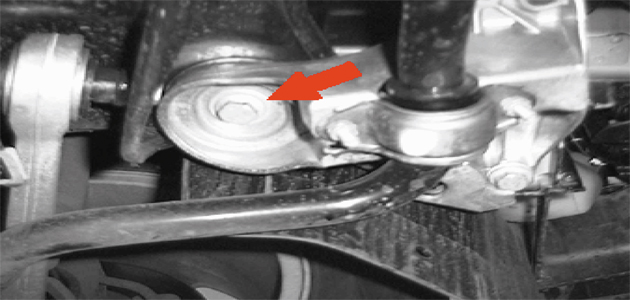
Fig 2
2. Position the jacking beam under the front vehicle lifting points and raise the vehicle slightly – around 60mm for the A4 and 70mm for the longer wheelbase Passat and Superb – while ensuring the wheels remain in contact with the turntables.
3. Extend the cylinders from the threaded stems on the spacer gauge and fix them in position with locking pins (Fig 3 – arrowed). Lower the vehicle fully onto the spacer gauge. The vehicle is now in the raised position and the second toe reading can be taken.
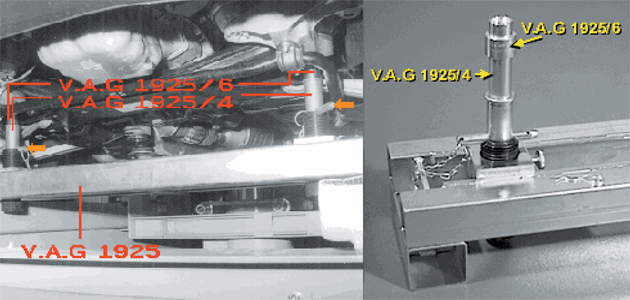
Fig 3
4. If the toe-in curve requires adjustment, first loosen clamping nut ‘A’ (Fig 4), then unscrew bolt ‘B’ by approximately 4mm. Press down the track rod by hand as far as it will go, then screw in bolt B until the correct toe specification is achieved. Retighten the clamping nut (A) to 45Nm and check that the toe setting is still correct. Now tighten bolt B to 7Nm.
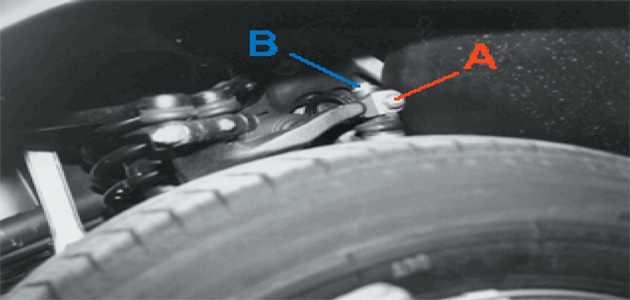
Fig 4
5. Repeat this procedure at the other front wheel, then lower the vehicle to the initial position of Step 1. On the spacer gauge, unscrew the threaded stems below the adaptors so that they are clear of the axle then bounce the vehicle several times to settle the suspension before rechecking the values. Repeat the procedure as required until the values are within the manufacturer’s tolerances, indicating that the toe-in curve is correctly set. After this has been achieved, recheck the toe setting of the front wheels and adjust as required.
Carrying out the toe-in curve checks and adjustments as described here will help to ensure accurate steering response without pulling to either side during normal driving.


