The timing drive system on this vehicle utilises a single overhead camshaft driven directly by crankshaft via a toothed belt. Valves are operated by rocker arms and mechanical tappets.
Replacing the seals
Disassembly
– Remove the crankshaft and camshaft drive gear;
– Remove the crankshaft and camshaft seals using suitable extractors;
– Make sure not to damage seal housings and shafts. Any scoring – especially across the seal seating area – will let oil leak past a seal.
Note: failure to replace the seals as part of timing belt service may lead to belt damage and oil leakage and adversely affect engine reliability.
Installation
– Inspect the crankshaft and camshaft seats for burrs and/or scoring that could damage the sealing lips. Be especially careful of burrs and/or scoring across the seats;
– If you need to slide a sealing lip over a keyway, sharp edge or thread during installation, provide suitable protection;
– Use the suitable seating tool to apply even pressure over the outside diameter and push the seal squarely to the bore until fully seated. This avoids distorting the gasket and ensures proper sealing.
Note: do not use any sealant between gaskets and seal seats. No matter how carefully sealant is applied, a minimal quantity of sealant getting in the sealing area will damage the seal resulting in lubricant leakage.
Valve clearance adjustment
– Remove the tappet cover with its gasket;
– Remove both spacers and the baffle plate;
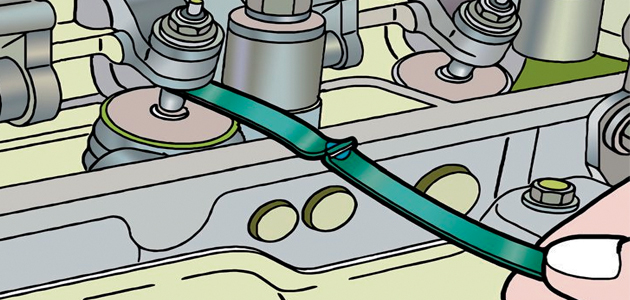
– Set valve clearances to the specified values using a feeler gauge;
– Tighten the M9 lock nuts to 17.5 Nm;
– Tighten the M6 lock nuts to 9 Nm.
Note: valve clearances must be adjusted with a cold engine.
Replacing the timing belt
Removal
– Remove the auxiliary drive belt;
– Unscrew the crankshaft pulley bolts;
– Remove the crankshaft pulley;
– Remove the timing cover;
– Turn the crankshaft clockwise to the required position for adjustment procedures;
– Insert the timing pin into the camshaft sprocket;
– Insert the flywheel timing pin;
– Loosen the belt tensioner nut to slacken the belt;
– Pull the belt tensioner away from the belt and slightly tighten the nut;
– Take off the timing belt;
– Remove the crankshaft and camshaft drive gear;
– Use two screwdrivers to remove the crankshaft and camshaft seals.
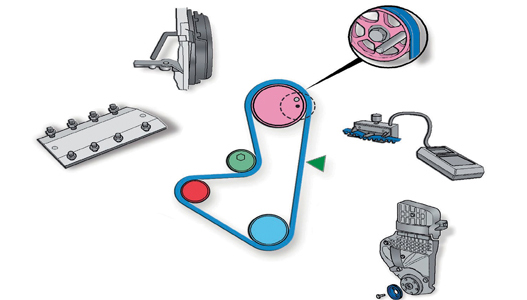
Timing belt components: Tensioner; Camshaft Pulley; Crankshaft Pulley; Water Pump Pulley
Installation
– Use a seal installer to fit the crankshaft and camshaft seals;
– Make sure the timing pins are correctly positioned;
– Install the timing belt as follows: begin with the crankshaft pulley and leave the belt tensioner for last;
– Make sure the belt is taut on the sprockets on the slack side;
– Fit the tension meter to the belt;
– Slacken the belt tensioner nut;
– Turn the belt tensioner anti-clockwise until the tension meter reads 44 SEEM units;
– Tighten the belt tensioner nut to 22 Nm;
– Remove the timing pins and the tension meter;
– Turn the crankshaft clockwise through four full turns until bringing it to the required position for adjustment procedures;
– Insert the timing pin into the flywheel;
– Make sure that the timing pin fits smoothly into the camshaft sprocket;
– Remove the timing tool;
– Install the valve spring compression tool;
– Fit the tension meter to the belt at the arrowed position;
– Hold the belt tensioner pulley steady in position and loosen the belt tensioner nut until slackening the belt;
– Turn the belt tensioner clockwise until the belt meter reads 29-33 SEEM units;
– Tighten the belt tensioner nut to 22 Nm;
– Turn the crankshaft clockwise through two full turns;
– Make sure the timing pins fit smoothly into place.
Note: tighten the tool bolts just enough to release the tappet rollers from the camshaft. Do not over-tighten or you will damage the valves or pistons.