
In this ‘Scope School Bonus’ column we want to carry on where Scope School 3 left off, opening more avenues within the software, allowing you to get the absolute most from your PicoScope and presenting users with the ability to develop the scope for their own applications.
 Steve Smith is a former Toyota Master Technician and winner of the 2013 Top Technician competition. He now puts his extensive knowledge to good use as an Automotive Application Specialist for Pico Technology.
Maths channels
Just the mention of these words used to fill me with fear. Maths implies calculations, but who has time for that? Here we don’t have to worry as the software is pre-loaded with calculations that take away the fear and introduce the facility to simplify the data we see on screen.
A typical and very useful maths channel would be A-B which is simply the value of the input signal on Channel B subtracted from Channel A.
To access the Built-in maths channels, select Tools>Maths Channels and tick the box adjacent to A-B.
Why do we need maths channels?
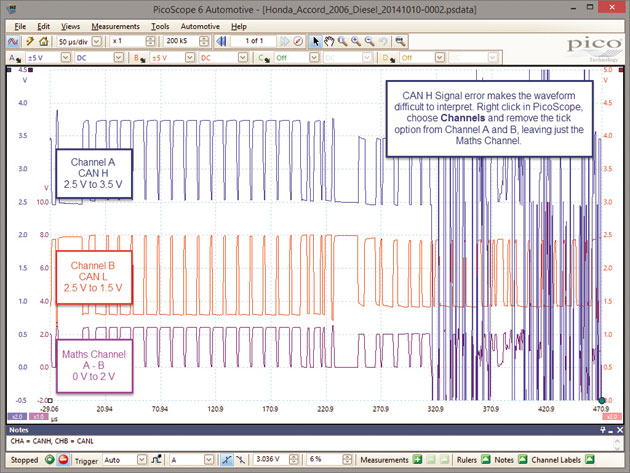
The captures below are examples of how the maths channel A-B can assist the technician by revealing the disruption to a CAN message as a result of component failure. Subtracting CAN LO from CAN HI reveals the physical layer of the message contained within the original capture.

New features
The maths channel A-B demonstrates perfectly a new feature available within the brand new 4225 & 4425 Automotive PicoScopes.
Think back to a starter motor voltage-drop measurement using a voltmeter across the main supply cable. This would traditionally be carried out by placing the positive test lead to battery positive and the negative test lead to the starter motor terminal 30 (main connection terminal). The starter motor would be energised and the value displayed on the voltmeter would read the voltage drop across the starter cable.
Ground work
Using the previous 4000 series scopes, each input shared a common ground. Connecting the ground cable of a test lead to battery negative (of any channel) would also ground the scope’s remaining BNC sockets. This is fine for all measurements made with reference to ground (0V) and this test has the ground lead connected to +12V.
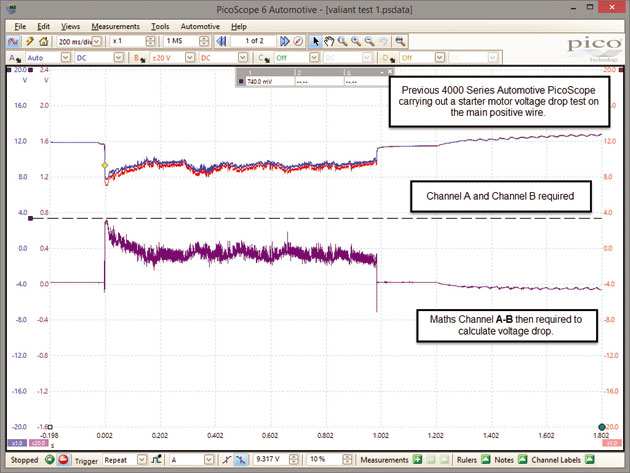
To carry out this test using the previous 4000 series scope we need to utilise 2 x Channels – Channel A connected to battery Positive terminal, Channel B connected to terminal 30 of the starter motor and a test lead ground cable connected to the battery negative terminal. The engine is cranked and two voltage readings are taken at the battery and the starter motor. Using the maths channel (A-B) we can calculate the voltage drop.
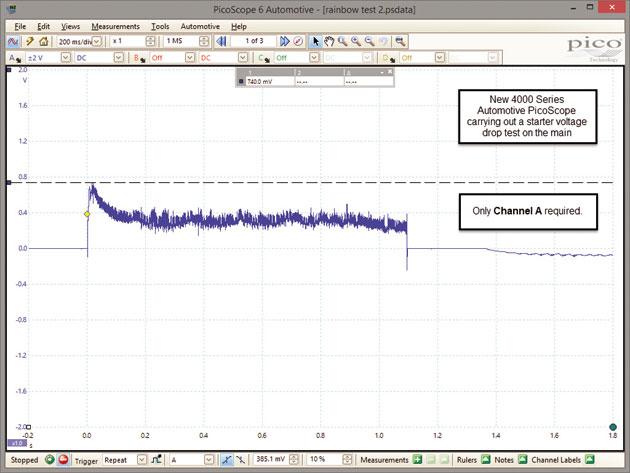
Using the brand new 4000 series scope with floating ground inputs we can carry out the volt drop test as with the voltmeter (using one channel only).
Connecting the ground cable of our test lead to either battery negative or +12V no longer connects the remaining BNC sockets to ground or +12V. Each BNC socket can now be connected to a reference voltage of ±30 V relative to chassis ground. In this scenario the scope reads the voltage drop during cranking without the need for a maths channel whilst utilising only one channel, allowing your remaining channels to be used for additional measurements. For example, Channel A connected as per the voltmeter, whilst Channel B could be connected to the crankshaft sensor measured with reference to ground (monitoring cranking speed).
Whilst we have a number of built-in maths channels, the sky really is the limit as the technician can create any combination of mathematical equations to calculate frequency of digital MAF meters, engine RPM from exhaust gas pulsations, and road speed from ABS wheel speed sensors, to name just a few.
Custom probes
A question that is often raised by customers who purchase a PicoScope is “Will my existing probes work with it?” In the majority of cases the answer is ‘yes’. PicoScope software has a feature to allow users to add their own probes over and above the already pre-loaded probes. These range from attenuators and current clamps to pressure transducers. To access the custom probes feature select Tools>Custom Probes and New Probe.
The custom probe wizard will now open and ask all the relevant questions the scope needs to know in order to display the values from your probe correctly. Assuming you have a previous current clamp with an output of 100 mv/A, you will be required to select the units to be displayed, the scaling method required, the range of units you intend to measure e.g. ±10 A, any filtering required and the name of the clamp used to identify the clamp in your probe library (My old probe).
Filtering
Filtering provides the user with the ability to remove noise from a waveform that would otherwise prevent adequate evaluation of the waveform. The term ‘noise’ refers to areas of the waveform that display the effects of other circuits upon the device being measured. Interference is often a word used to describe noise as there may be times when the influence of our environment can induce noise onto our waveform.
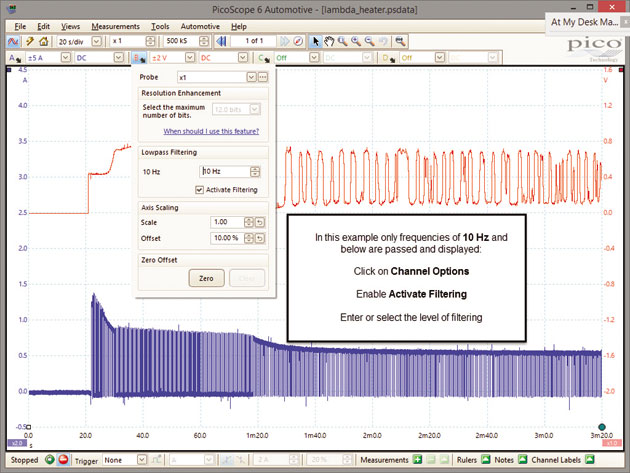
A typical signal susceptible to noise would be an Oxygen sensor output signal which has a low voltage output (0.1 to 0.9V) at a very low frequency (approx. 1 Hz). Imagine now the environment of an engine bay with high frequency, high voltage switching circuits in operation, such as those responsible for ignition and injection events. The effects of these circuits upon our weak Oxygen sensor signal can render the acquired waveform unrecognisable.
The Low Pass Filtering option with PicoScope allows the user to filter high frequency signals, to reveal only the relevant detail of interest. Low pass filters high frequency noise, allowing only low frequencies to pass through to the scope display.
Low pass filtering is only one example of the filtering techniques available. The new 4000 series scope has a built in selectable 20 kHz hardware low pass filter available across all channels, so filtering the signal before reaching the display, pre-capture rather than post-capture.
Attenuation
Whilst the PicoScope has the ability to measure a wide range of voltages, we have to be conscious of the maximum input voltage under test to prevent internal damage to the scope. Until now the maximum input voltage of the previous 4000 series scope was 100V. This has now been increased to 200V with the new 4000 series, so removing the need for ‘attenuation’ when measuring devices such as injectors etc.
What can catch us out here is induced voltages that are present whenever a magnetic field collapses about a coil winding. An ignition coil is a perfect example, whereby the primary coil may be subjected to induced voltages exceeding 300V when the 12V supply is switched to off.
When measuring circuits of this nature we have the attenuators supplied with the PicoScope kits. Think of the attenuator as a step-down transformer, whatever you feed into the front of an attenuator will be reduced in size by its given factor as the signal passes through.
The new 4000 series scopes utilise x10 attenuators, allowing you to reduce the input voltage by a factor of 10. For example, a voltage of 300V into an attenuator will only pass 30V to the scope, so protecting the device.
300 into x10 attenuator results in 30V into the scope (300V / 10 = 30V).
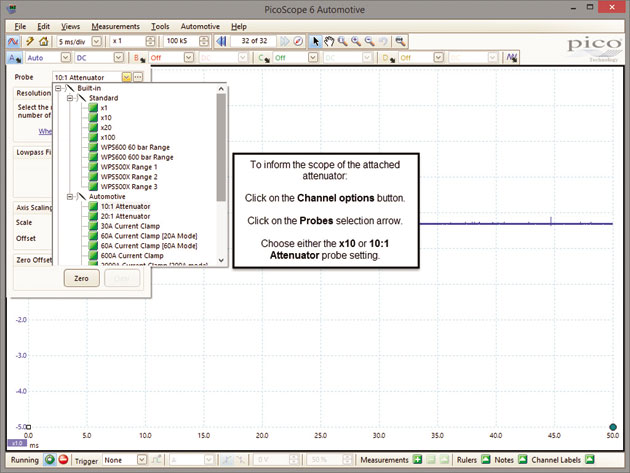
When measuring high voltages of this nature, we need to inform the scope that an attenuator is attached. This will allow the scope to recalculate the input voltage, so displaying the correct values on screen.
ConnectDetect™
How many times have you believed you’ve found the fault based on a voltage reading taken, only to find your probe tip had not made contact with the terminal under test?
The frustration experienced as a technician when following the wrong diagnosis path, as a result of an erroneous measurement based on a poor terminal connection, is both painful and expensive.
The new 4000 series scopes utilise a brand new feature called ConnectDetect allowing the user to confirm a connection has been made to the circuit under test before a measurement is taken.
The feature is applicable to the x1 test leads only (non-attenuated lead) when connected to circuits with low impedance (resistances up to 100 KΩ). When enabled, the PicoScope will display the status of the connection to the circuit in the form of an onscreen icon, and Channel LED located on the front of the scope.
The example below confirms the status of a connection to Channel A (good connection indicated by a green icon), no connection to Channel B (indicated by a red icon) and that ConnectDetect is not applicable to Channel C (indicated by a grey icon) as a x10 attenuator is installed (this would also apply to current clamps and pressure transducers).
The ConnectDetect icons will remain on screen briefly once a good connection has been established and then turn semitransparent to prevent obscuring the waveform under review. Should a connection fail at any time during a capture, the relevant channel icons will return to warn the technician of a change in connection status (failure).
ConnectDetect is an invaluable new feature to PicoScope that will enable us all to benefit, regardless of application, removing some of the pain involved with diagnosis.
Click below to read the original three-parts of the series…
PART 1
Looked at the basics of getting the best out of your PicoScope.
PART 3
Covered capture and analysis features that technicians will find invaluable during diagnosis procedures.


