
Hydraulic circuit
Bleeding
Warning: during bleeding, always pour new and clean brake fluid inside reservoir.
■ Connect the bleed pipe to the bleed screw.
■ Ensure the other end of the pipe is positioned in a catch reservoir containing a small amount of brake fluid.
■ Position bowl bottom at least 300mm above bleeding screw.
■ Loosen bleeding screw by half a turn.
■ The best place to start the brake bleed is furthest away from the master cylinder. A pressure bleeder is recommended.
■ Fill the reservoir with brake fluid to the ‘Max.’ mark.
■ Continue pressing brake pedal until clean and air-free brake fluid is pumped into the catch reservoir.
■ Once the pressure bleeding is complete and the air is out the system, tighten the bleed screw.
■ Apply brake pressure using the foot brake and check for leaks.
Warning: ensure the bleed screw is tightened and the dust cap is replaced to prevent corrosion.
■ Repeat the same procedure for the other brake lines.
Brake pads
Removal
■ Position vehicle onto lift.
■ Switch the vehicle off and remove the key from the ignition.
■ Remove rear wheels.
■ Release park brake.
■ Remove park brake cable and caliper retainer.
■ Using the correct size spanner remove the caliper mounting bolts and free the caliper from the hub section.
■ Remove outer and inner brake pads.
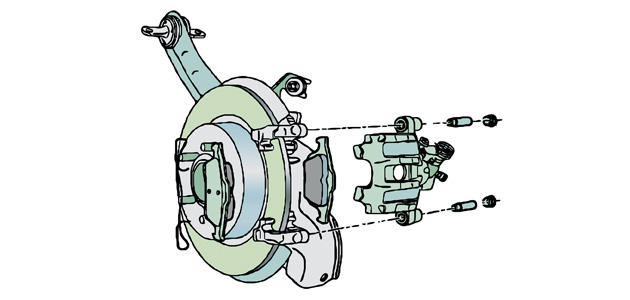
Brake pad removal (pictured): When retracting the piston back into the caliper housing, brake fluid is pushed into the reservoir. When moving the caliper, ensure the caliper is supported. Make sure that the brake pad contact points are clean and free from any contamination.
Replacement
■ Retract the piston back into the caliper housing using the brake piston retraction tool.
■ Fit outer brake pad on wheel side (without retaining clip).
■ Fit inner brake pad on piston side (with retaining clip).
■ Tighten brake caliper to mount retaining screws to a torque of 35 Nm.
■ Adjust parking brake travel.
■ Bleed hydraulic system (as indicated in the “Hydraulic Circuit” procedure).
Brake discs
Removal
■ Position vehicle onto lift.
■ Switch the vehicle off and remove the key from the ignition.
■ Remove rear wheels.
■ Release park brake.
■ Remove park brake cable and caliper retainer.
■ Using the correct size spanner remove the caliper mounting bolts, and free the caliper from the hub section.
■ Remove brake outer and inner pads.
■ Remove brake caliper hose coupling.
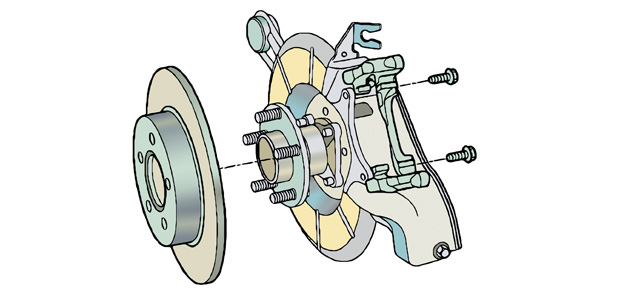
■ Loosen the caliper mounting bolts and remove the caliper mounting bracket.
■ Remove brake disc from hub.
Replacement
■ Ensure the wheel hub is clean and corrosion free and that the disc surface is clean and smooth.
■ Position brake disc onto hub by sliding it onto stud bolts.
■ Using the correct specialist tool, push the caliper piston fully home into the caliper.
■ Fit brake caliper mounting.
■ Tighten brake caliper mount retaining screws to a torque of 70 Nm.
■ Position the caliper in place and refit the caliper mounting bolts.
■ Fit the new outer brake pad on the wheel side of the hub.
■ Fit the new inner brake pad on the piston side of the caliper.
■ Tighten the brake caliper mounting bolts to a torque of 35 Nm.
■ Tighten hose coupling to caliper to a torque of 15 Nm.
■ Adjust park brake travel.
■ Bleed hydraulic system (as indicated in the “Hydraulic Circuit” section).
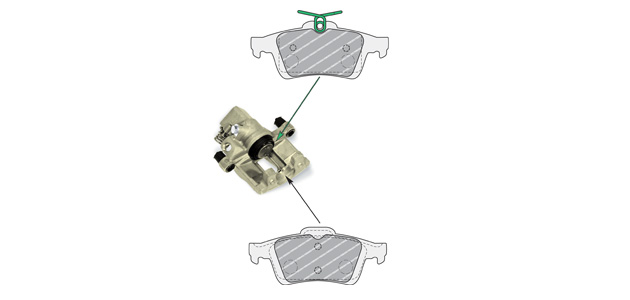
To ensure correct rear brake operation, it is critical to fit the pads as shown in this diagram.
Parking brake
Certain models may have been fitted with the optional Electronic Park Brake system. This system includes a special key, a clutch pedal switch, a brake pedal switch, an emergency brake release mechanism and an actuator positioned under the spare wheel compartment. The correct adjustment procedures for this must be followed.


