In the last instalment of our guide to Bosch’s KTS diagnostics software, ESI[tronic] 2.0, we looked at the built-in multi-meter and oscilloscope. This instalment, we investigate the maintenance and equipment tabs.
In the last instalment, we explored the added benefit of vehicle diagnosis with the built-in multi-meter or oscilloscope functions included in the KTS Vehicle Communication Interface (VCI).
This time, we’ll be looking at the vast amounts of vehicle service information and maintenance data that is available in Bosch ESI 2.0, alongside examining the Bosch spare parts catalogue, all of which are important features for daily workshop use and vehicle maintenance. If you subscribe to the ‘Advanced + Maintenance’ or ‘Master Package’, you’ll have access to the ‘Maintenance’ function in ESI[tronic] 2.0 online. Among other things, these include information about service times, the parts needed, the tyre size and pressure, as well as centralised programming information. Moreover, vehicle-specific workflows also feature in these packages, which allow you to carry out every repair in accordance with the manufacturer’s specifications and are therefore covered by the manufacturer’s warranty.
Service schedules
Once you have selected a vehicle in the ESI[tronic] 2.0 program, choose the ‘Maintenance’ tab at the top of the screen. This will present the ‘Subcategories’, which will appear on the left-hand side of your screen with many different information sources related to the vehicle’s service and maintenance requirements.
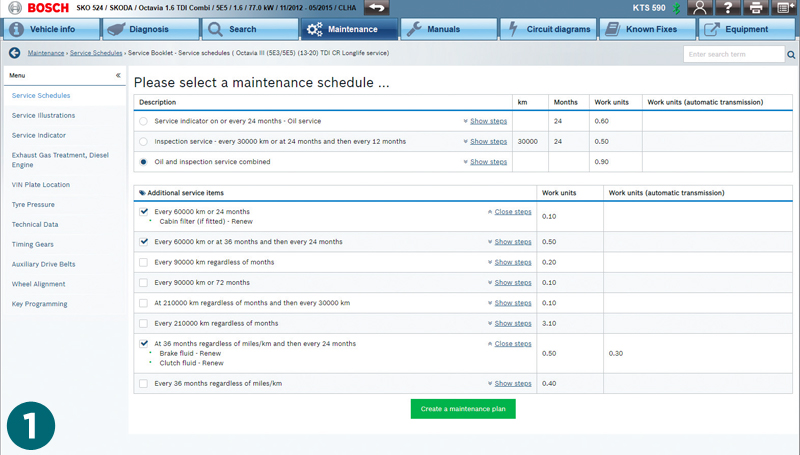
Depending on the vehicle make and model that you’ve chosen, you now need to select the type of service required. This consists of two parts: you first select the ‘basic’ service schedule based on mileage or months interval and then in the second part you can add additional service items which might also be needed based on the mileage of the car or the time period since the last service. By clicking on ‘Show steps’ a drop-down list shows you the details of each service item (Fig.1).
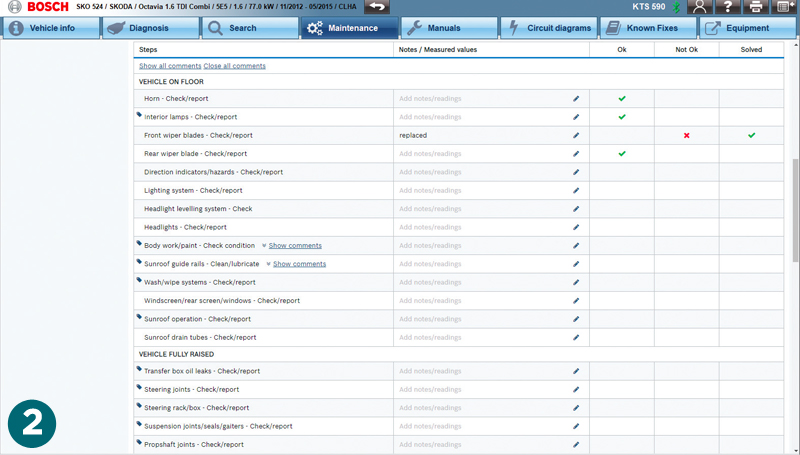
By clicking on the ‘Create a maintenance plan’ soft key at the bottom of the screen, you can create a specific service check-sheet to be displayed on screen. The check-sheet can be printed out and completed manually or filledout electronically throughout the job and printed at the end – a nice feature that prevents any greasy fingerprints spoiling the list (Fig.2).

Navigation tips
Once you have selected the required service operations, you will then see a list of needed service parts. This section will list out the necessary spare parts, such as oil and filters, along with capacities that will be needed to complete the service work on the vehicle (Fig.3).
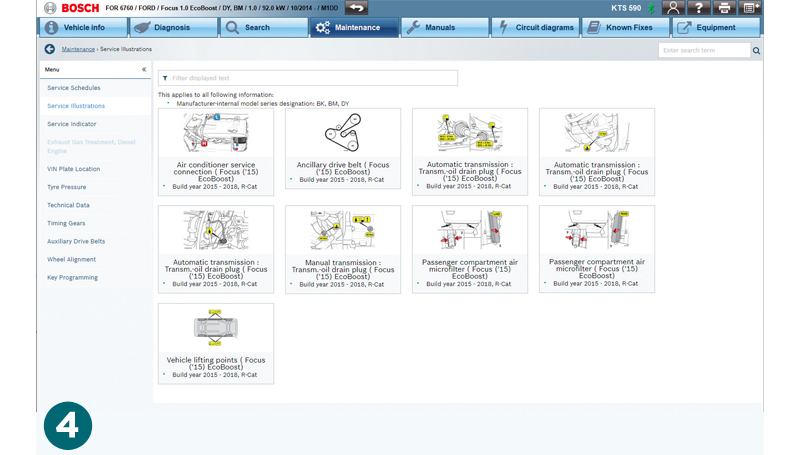
Next, the ‘Service Illustrations’ will provide all the available diagrams you’ll need while servicing the vehicle – such as transmission oil level plugs, auxiliary drive belt routing, cabin filter location and A/C service port locations (Fig.4). If needed, you can expand each individual diagram to full screen to view it in more detail. An addition that is really helpful on today’s complex vehicles.
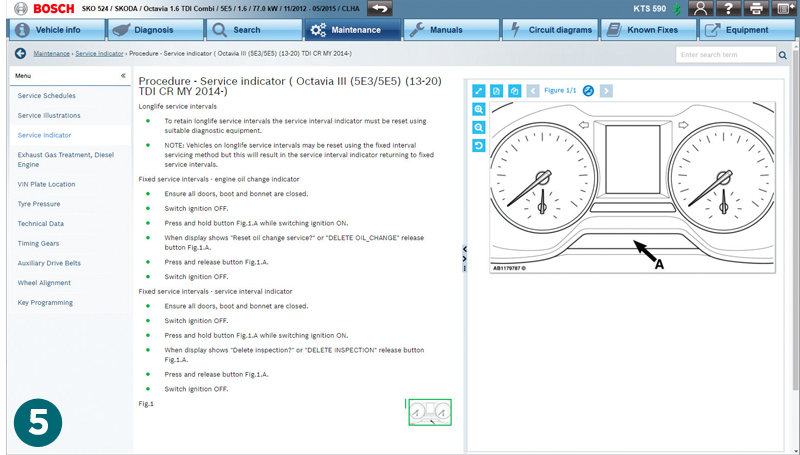
The ‘Service Indicator’ tab will then guide you through the service light reset process for the vehicle you’re working on (Fig.5). This may involve a ‘manual’ push button reset as described or the instruction to reset the service interval by means of a diagnostic test routine. In this last case, you can easily click on the ‘Diagnosis’ main tab and go straight to the maintenance service task to reset the service interval.
On diesel vehicles, the ‘Diesel Exhaust Gas After Treatment’ tab will be active and demonstrates how the DPF system works and how to initiate a passive diesel particulate filter regeneration. DPF problems on vehicles are increasingly common due to short journeys – making this a particularly useful section of data to be aware of.
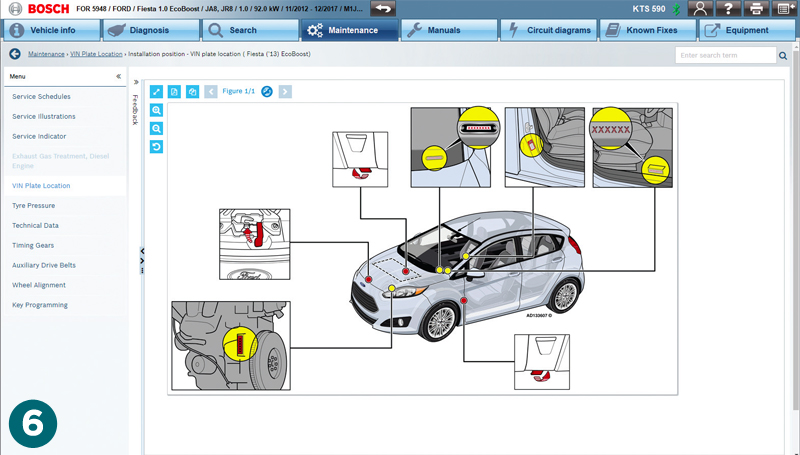
Likewise, the ‘VIN Plate Location’ tab offers a vehicle specific diagram of where to find identification details, such as VIN and engine numbers, as well as the exact position of the bonnet release safety catch, which can be difficult to locate on some models (Fig.6).
Accessing repair data
Next, the ‘Tyre Pressures’ tab lists all of the recommended tyre pressures for the vehicle model selected. In some cases, this can be quite a long list due to fitment variations. However, the search bar can be used to narrow down the options by wheel size or tyre width.
Remember, the manufacturer specified front and rear tyre pressures are also given in bar and psi for ‘laden’ and ‘un-laden’ situations. The ‘Technical Data’ tab is highly useful as it supplies essential information about the following:
- Vehicle designation
- Fuel injection system
- Ignition adjustment and emissions
- Starting and charging systems
- Service checks and adjustments
- Fluid types and capacities
- Tightening torque settings
- Minimum brake component thicknesses
- Air conditioning system service and repair data
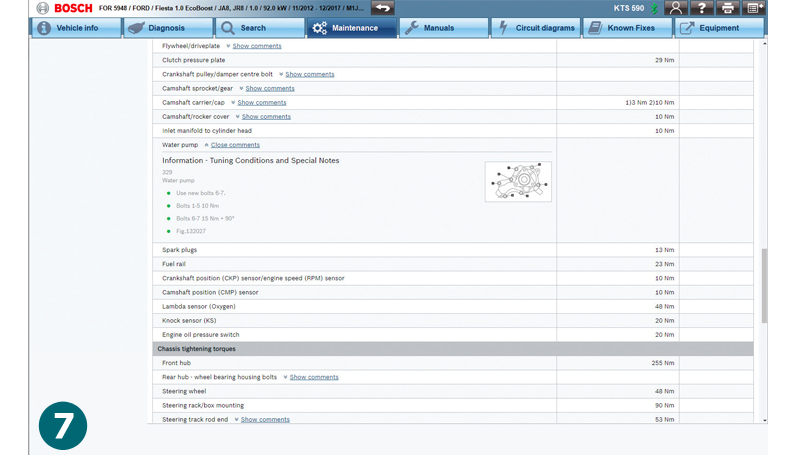
Wherever possible, the list will have icons that will present you with important additional information and diagrams that can help you do the job properly and efficiently (Fig.7).
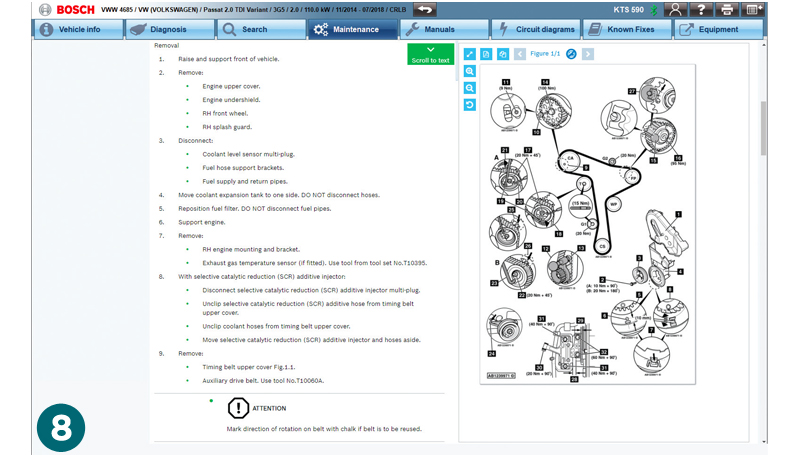
In the ‘Timing Belts/Chains’ tab, you’ll then find detailed instructions and diagrams for changing the belt, chain or timing gears – when they’re due for replacement or there’s a need for an engine re-build. With such a complex task, it’s critical to have the correct information to complete the job properly and this section will give you peace of mind that the manufacturer’s procedure has been followed (Fig.8).
The ‘Auxiliary Drive Belts’ tab guides you through the auxiliary drive belt and belt tensioner system operation. You’ll find all the details, text and diagrams showing the removal and installation procedure of the system components, as well as tightening torques of the mounting bolts.
In the ‘Wheel Alignment’ section, the recommended suspension geometry measurement values and setting data is displayed. The tolerances and diagrams for the toe-in, camber and caster adjustments to the front and rear wheels of the vehicle (where applicable) can be used with suitable wheel alignment measuring equipment to correctly align the wheels on the car.
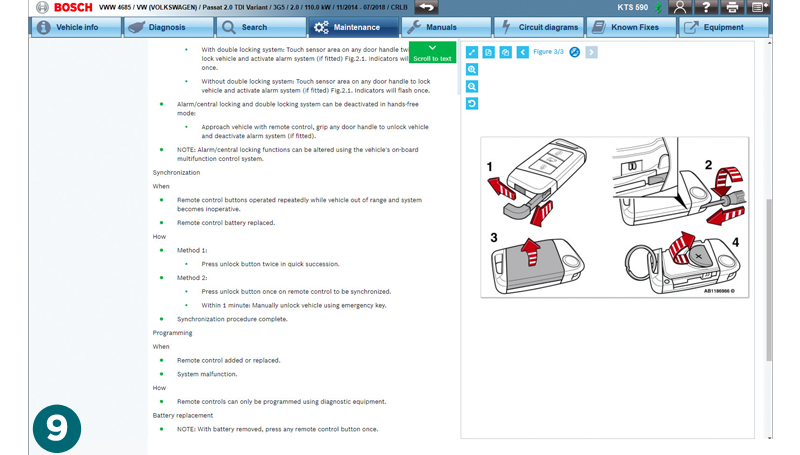
Finally, ‘Key Programming’ allows you to access all the information required for key battery replacement and remote central locking synchronisation (Fig.9). With many cars having ‘keyless’ entry and start systems, the instructions and diagrams in this section can be a real assistance in remedying any key problems.
Now that we have covered all of the ‘Maintenance’ section sub-tabs, do not forget that you can click the ‘Print’ icon, next to the ‘Main Menu’ soft key in the top right-hand corner of the screen at any time. You can also produce a screenshot of the data or print out the diagrams and text for reference.
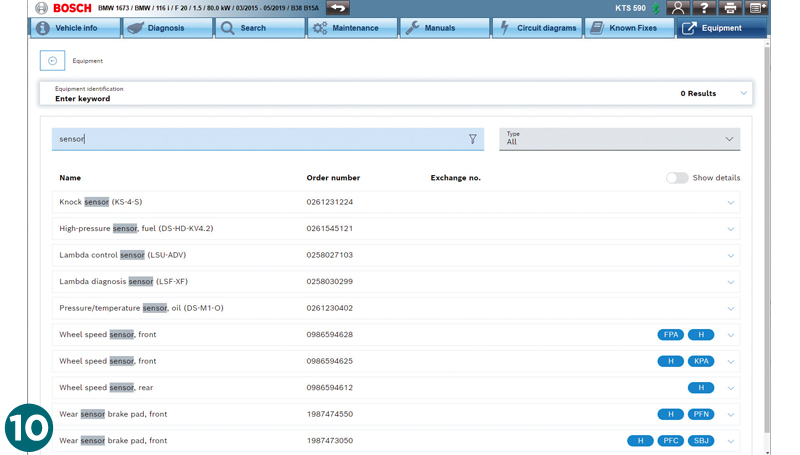
The last main tab is the ‘Equipment’ tab. Then, the original ESI[tronic] parts list will appear directly on the screen. The parts list contains all available information on every component made by Bosch for the vehicle that you’ve selected. This includes descriptions, model year ranges, diagrams, pictures and Bosch part numbers for the components (Fig.10).

Bosch parts are grouped in the categories of engine, bodywork, suspension and drivetrain. Depending on the vehicle manufacturer, the parts made by Bosch on the vehicle can range from batteries, alternators, starter motors and engine management sensors to wipers, lighting products, filters, brake components and fuel system pumps or injectors. There is now also a text search function in the ‘Equipment’ tab. This function allows you to type in the name of the component you are searching for, and whilst you type this a list of Bosch parts will be narrowed down accordingly and instantaneously (Fig.11).
Next month we take a look at ADAS calibration.