In this instalment of Schaeffler LuK’s clutch feature, REPXPERT Alistair Mason walks us through replacing the clutch assembly on a 2018 Euro 6 Fiat Doblo van with a 1.6 Multijet engine.
Vehicle Information
Make: Fiat
Model: Doblo
Year: 2018
Engine: 1.6 Multijet
Mileage: 89,000
Scheduled Time: 7.6 hours
The vehicle has covered over 89,000 miles, and the customer has reported clutch dragging and difficulty getting into gear. Following a pre-inspection, clutch replacement was advised, and authorisation for the repair was given. For this job, information seemed limited, but on inspection, removal of the sub-frame and gearbox appeared most efficient. With a recommended repair time of 7.6 hours, this can be a profitable job for independent garages.

Gearbox Removal
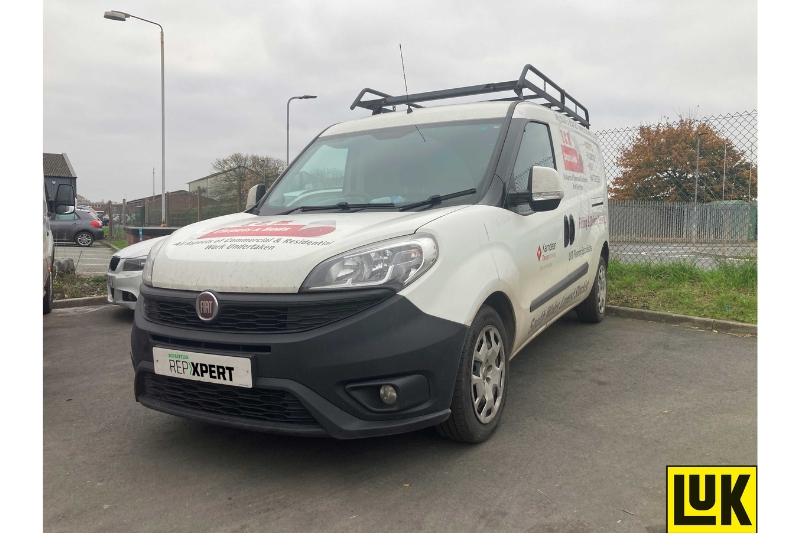
Place the vehicle on the lift, open the bonnet, and remove the engine cover, battery, and battery tray (note a hidden bolt under the cover – see Fig.1). Loosen but don’t remove the gearbox mounting bolts and remove the DPF-to-manifold heat shield (Fig.2).
Remove gear cables and upper bell housing bolts. Raise the vehicle to waist height, remove both front wheels, disconnect the front anti-roll bar links, and remove both front hub nuts. Raise the vehicle to gain access underneath. Remove the engine/gearbox undertray, disconnect the exhaust after the DPF, release the center exhaust mount, disconnect both bottom ball joints from the hubs, and remove the steering rack-to-subframe bolts. Secure the rack to the vehicle and disconnect the lower gearbox pendulum mount.
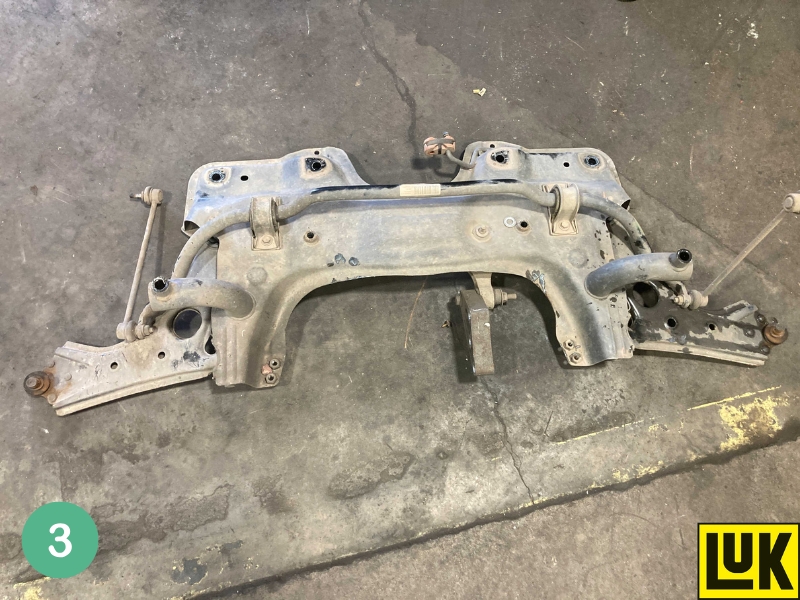
Support the subframe with a transmission jack, remove the six bolts securing it, then lower the jack and remove the subframe (Fig.3). Drain the gearbox oil, refit the drain plug, and torque to spec. Remove both front driveshafts, disconnect the reverse light switch multiplug and the earth strap, clamp the hydraulic clutch pipe, and disconnect it from the CSC connection. Remove the starter motor bolts and lower bell housing bolts.

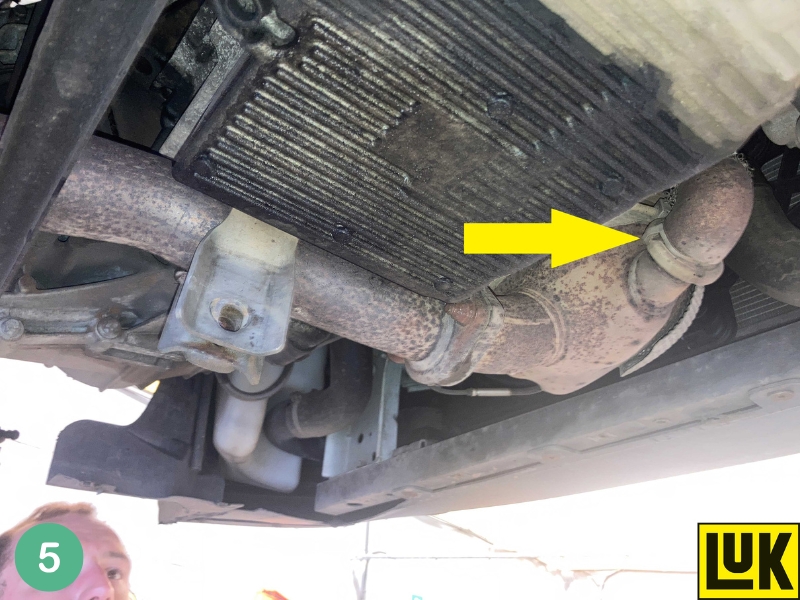
Lower the lift, slacken the DPF-to-manifold clamp (Fig.4), then raise the lift to access the underside. Remove the small bypass pipe clamp (Fig.5), the two DPF retaining bolts, and ease the DPF away from the engine to access the DPF retaining bracket (Fig.6). Remove the three bracket bolts and remove the bracket.
Support the engine and gearbox with a transmission jack. In the engine bay, remove the gearbox mounting bolts. Lower the engine and gearbox slightly to aid removal. Remove the two remaining bell housing nuts and carefully slide the gearbox away from the engine. Once clear, lower and re-move it from the vehicle.
Clutch Replacement
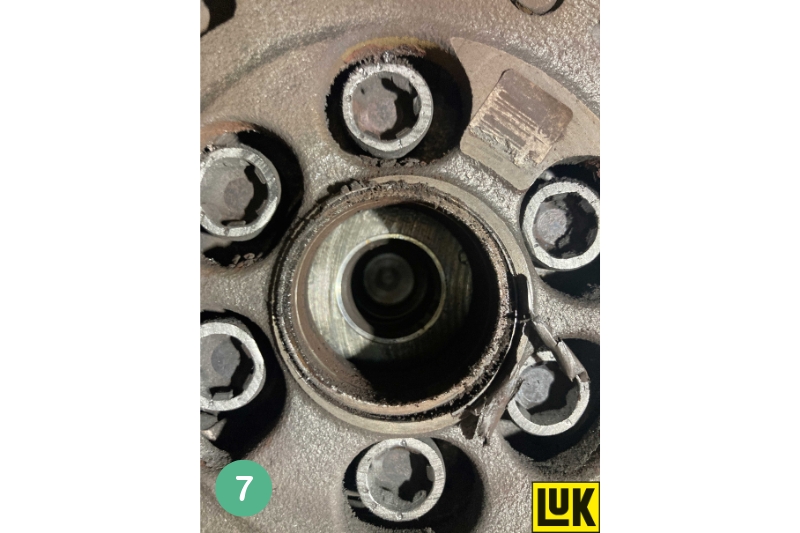
Remove the six clutch bolts and the clutch assembly. Upon inspecting the dual-mass flywheel (DMF), it was found that the center bearing had worn out (Fig.7), so the DMF also needed replacement.
Remove the DMF bolts and inspect for leaks, cleaning as needed. Remove the old CSC, clean out the bell housing, and fit the new CSC. Torque the two retaining bolts, apply a small amount of high melting point grease on the gearbox input shaft splines, and slide the new clutch plate up and down the splines to distribute the grease evenly.
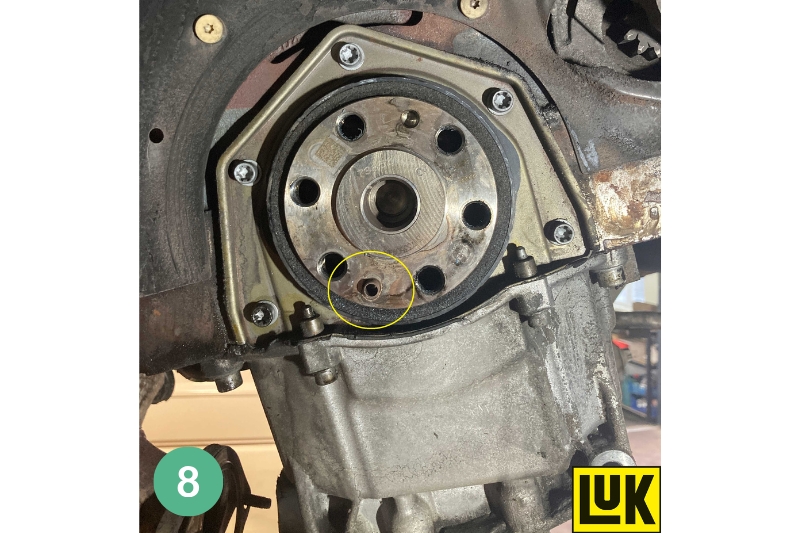
Align the new DMF on the crankshaft, ensuring the crank dowel fits into the flywheel drilling (Fig.8). Insert and torque the six DMF bolts, then degrease the DMF face. Mount the new clutch plate using the SAC tool, with the gearbox side facing the gearbox, and secure it to the alignment dowels. Attach three clutch bolts, tighten slightly, then remove the SAC tool, install the remaining bolts, and torque to spec.
Flush the clutch fluid system by placing an oil drainer under the hydraulic clutch pipe, releasing the clamp, and allowing old fluid to flow out. Top up with fresh fluid until it runs through the system. Re-clamp the hydraulic pipe when complete.
Reinstallation
Ensure that all components are clear of obstructions for the gearbox installation and check the alignment dowels. Position the gearbox on the transmission jack, bring it close to the engine, and carefully align the studs, rotating the engine slightly if needed. Once aligned, secure with the two nuts on the studs.
Reassemble components in reverse order of removal. Bleed the clutch to ensure proper pedal feel. Refill the gearbox oil and reset any affected electrical systems after reconnecting the battery.


