
KTS diagnotics made ‘ESI’ from Robert Bosch.
This regular series of technical articles from Bosch focuses on how to get the best out of its ESI[tronic] 2.0 software, which is used in conjunction with the KTS range of diagnostic tools for vehicle fault diagnosis and service function procedures. Because of the vast range of features available through the software, Bosch’s technical team will be breaking things down into bite-sized chunks, starting at a beginner level and progressing through to more advanced functions.
In the first instalment of the series we covered the importance of selecting the right vehicle within Bosch ESI[tronic] 2.0 to ensure that you get reliable information from the tool to assist with an accurate diagnosis and repair. In this month’s column we’ll show you a few more features that help to highlight how the Bosch diagnostic system does so much more than just reading and erasing the DTC error memory of an ECU.
‘System Overview’ feature
We like to think of this great feature as a ‘complete vehicle diagnostic check’. In our opinion it is a good idea to perform this function on every vehicle that comes into the workshop for a service or repair. Firstly it could highlight any intermittent or pending electrical or mechanical problems in a system on the vehicle that the customer may not be aware of. Secondly it is a useful way to check that the vehicle has a clean bill of health when it is returned to the owner after any service or repair work is completed.
In ESI[tronic] 2.0, under the Diagnosis main tab, the System Overview can be performed by clicking on ‘System search’ F12 soft key in the ‘System Overview’ sub tab. The KTS will perform a full ‘Control unit search’ of all communicating systems fitted to the vehicle and then populate a list of ECU’s that are present and the number of fault codes (if any) in each one.
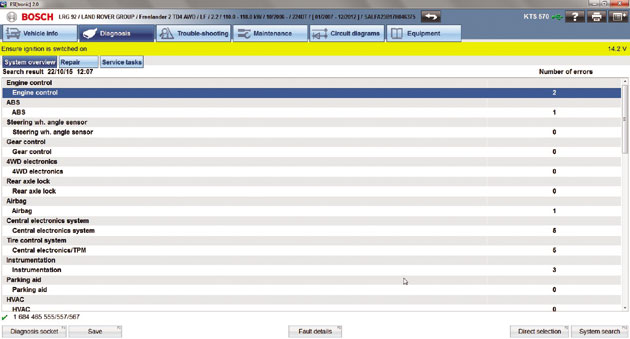
Many newer vehicles will now support a fast CAN Bus search of all of the ECU’s on the vehicle system communication network. The results of the system overview can vary from car-to-car due to some vehicle manufacturer differences and, as such, some full diagnostic scans are very fast. Certain vehicle brands can have up to 60 ECU’s that can all be checked in less than a minute, which makes it really quick for the technician to be able to assess the diagnostic state of the vehicle. With some other cars the process may take a bit longer, as the KTS will have to check each ECU one by one for presence and fault status in each group.
When the system overview is complete you will see a list of all ECU systems that are communicating and an indication if any fault codes are present. This can be very useful when analysing a vehicle before any in-depth diagnostic testing as certain faults – such as traction control and ESP problems – can log a DTC in more than one ECU (engine and ABS).
The ‘F3’ save button can be used to store this complete list into the job report (‘Protocol’ – we’ll talk about this later). Then, if the ‘F5’ fault details button is clicked, a specific list of DTC’s and descriptions (where available) is then shown which again can be saved to the job protocol with the ‘Save’ F3 soft key. At this point the ‘Delete all faults’ F7 soft key can be used to see which trouble codes will clear and which ones are static faults at that moment.
Going back to the overview list, if required, any of the system names in the categories can be double-clicked for direct access to the ECU diagnostic functions for further investigation and testing. If the fault code is erased at this point, the overview list will refresh when you return to it, meaning that you can save a ‘before’ and ‘after’ status of the job that you’re working on to show to the customer.
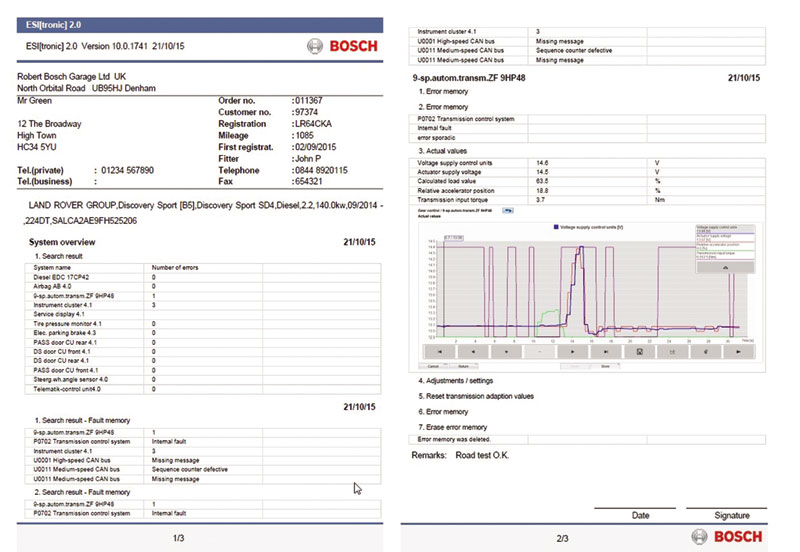
Using the protocol report (described in the next section), it is very simple to use the system overview to produce a professional and accurate vehicle report which can be used to justify any repairs that have been carried out in the workshop to the vehicle owner.
‘Protocols’ feature
This is another great feature in Bosch ESI[tronic] 2.0. Whilst using the diagnostic features of the KTS, if you see the ‘Save’ or ‘Store’ (F2 or F4 soft keys) along the bottom, any data on the screen at that time will be added to the job protocol. This report will show the whole process followed by the technician during any diagnostic fault finding work.
This could include a whole host of information, including the ECU system names and identification details, the number of trouble codes stored and descriptions, which trouble shooting (SIS) repair instructions have been followed and the results of any direct multimeter measurements made from the test plan. Other data includes the erase error memory function, actual value parameters in numerical format or time profile (this consists of a screen shot of the AV graphing) and also which actuators, function tests, adjustments/settings or special functions were performed.
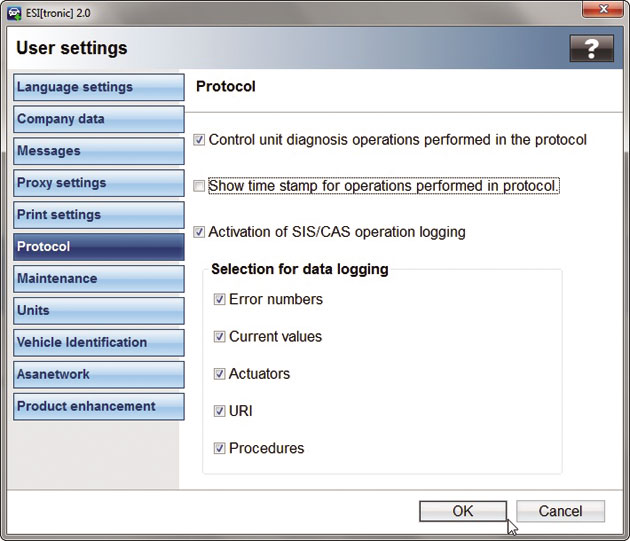
The amount of information that is saved in the protocol can be defined to suit your preference under ‘User settings’ in the main menu, along with your garage details that will appear on the report. One of these features is an operation time stamp which could be useful if you’re justifying a lengthy repair process, or it can be turned off, if not needed.
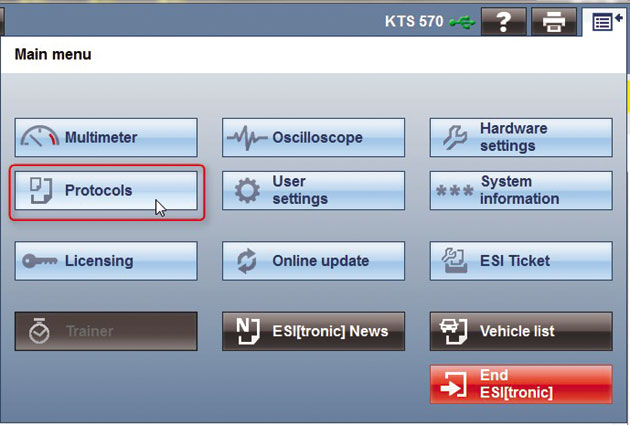
Under ‘Main menu’, ‘Protocols’ the list of stored reports can be accessed and, by clicking on ‘edit’ the customer details, job number, technician’s name and vehicle info can be added, along with any advisory comments to be reported to the customer.
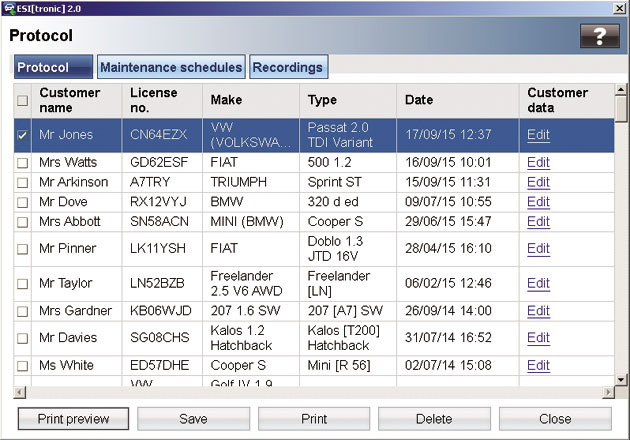
At any point the protocol file can be previewed and saved in .pdf format to another folder or to be printed. The printed protocol report looks extremely smart (especially if printed in colour) and is great to attach to the invoice of a job that involved any diagnostic interaction so that the customer can see what was found and subsequently repaired (if necessary) to solve the problem.
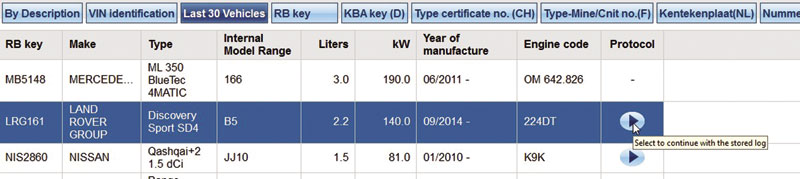
Every time a different vehicle is selected and some information is saved a new protocol report will be generated with the relevant details. This is then added to the list in the main menu. A new feature in ESI[tronic] 2.0 is that you can now continue saving data to a previous protocol in the ‘last 30 vehicles’ list if you return to an unfinished job after working on other vehicles.
We hope that these short explanations help you with these great Bosch ESI 2.0 features and if you’re not using them already, what are you waiting for?
Keep a look out for the next instalment!


