Last month in our guide to Bosch’s KTS diagnostics software, ESI[tronic] 2.0, we looked at identifying known fixes. In the fifth instalment, we are taking an in-depth look at troubleshooting and SIS repair instructions.
In our previous issue, we put the ‘Known Fixes’ tool under the spotlight. Always your best starting point, this useful functionality can save hours of frustration and never-ending Google searches by listing the most common proven fixes in one convenient place. But what happens if the fix you need isn’t included?
Considered the crown jewel of ESI[tronic] 2.0, the service information system – or SIS for short – is Bosch’s intuitive troubleshooting function designed to fill in the blanks. By bringing together an extensive Bosch technical content database with a direct interface to the multimeter and KTS diagnostic tester – SIS can guide you from symptom detection and associated trouble code to root cause and rectification.
In this short guide, we will focus on the test procedure for components. But remember, there are plenty more document types available in SIS – from installation position to wiring diagrams. With many documents added directly from the OE to give you the same information as an OE mechanic.
Using SIS
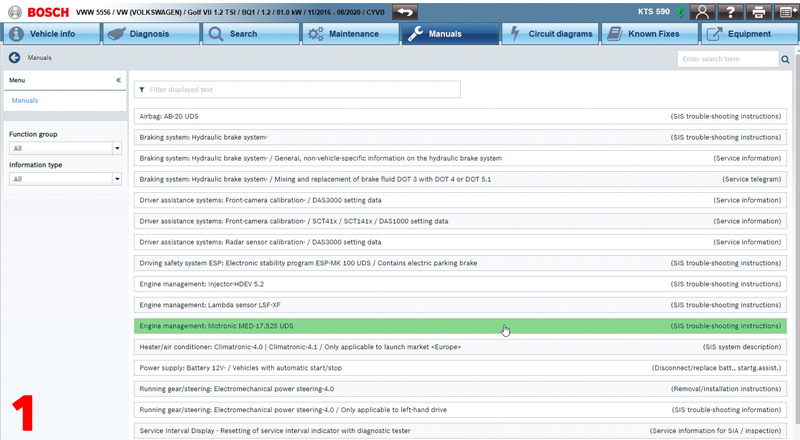
In most cases all of the information required for fault finding, maintenance and routine service tasks is available on the tool (Fig.1).
The three main ESI subscription types for car and LCV applications are the ‘diagnostics package’, ‘advanced package’ and the ‘master package’, which all contain the full features of diagnosis of controls units (SD), including secure diagnosis access (SDA) and the known fixes database. Alternatively, the ‘advanced package’ comes with the service information system (SIS) to provide you all the necessary technical information for troubleshooting and repair including: troubleshooting instructions, test instructions, installation and replacement manuals and wiring diagrams. Finally, the ‘master package’ adds maintenance schedules and information as well as additional wiring diagrams from comfort electronics systems.
Step one
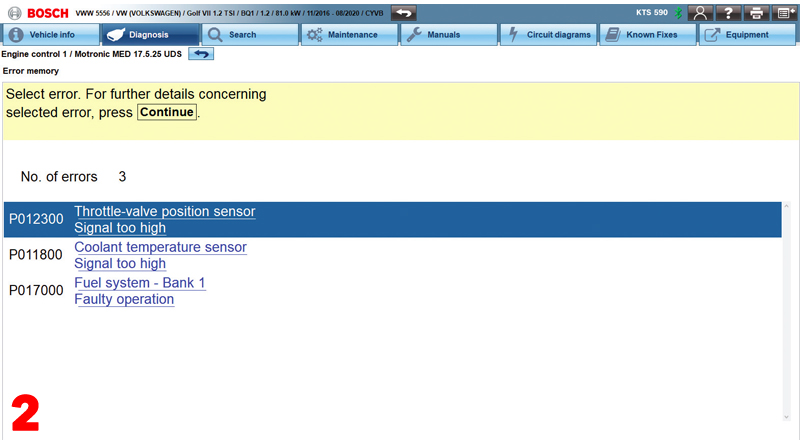
When you read the error memory of an ECU with fault codes you will see the DTC number, description and the status of the fault code – for example, whether it is static or sporadic and often applicable freeze frame data as well (Fig.2). By clicking on the blue and underlined DTC you can quickly and easily open the troubleshooting instructions for the error and vehicle in question – including repair instructions for all of the data that Bosch has associated to that particular fault code (Fig.3).
Step two
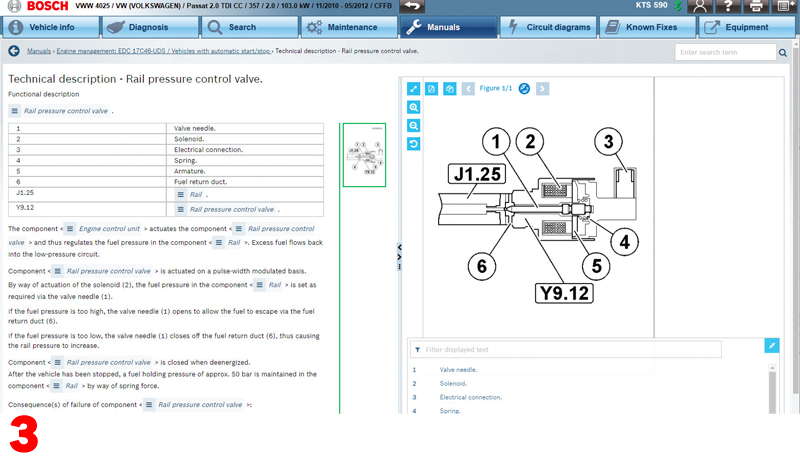
The first page of the guided help info gives you a list of other possible related fault codes. An ‘open instruction’ link at the top of the page guides you to the functional description of the component to be tested – whether it’s a sensor or an actuator (Fig.4). This is really useful if you need to know what type that particular part is, how it works and what it is responsible for. Giving you a far better understanding of the system you’re working on.
Step three
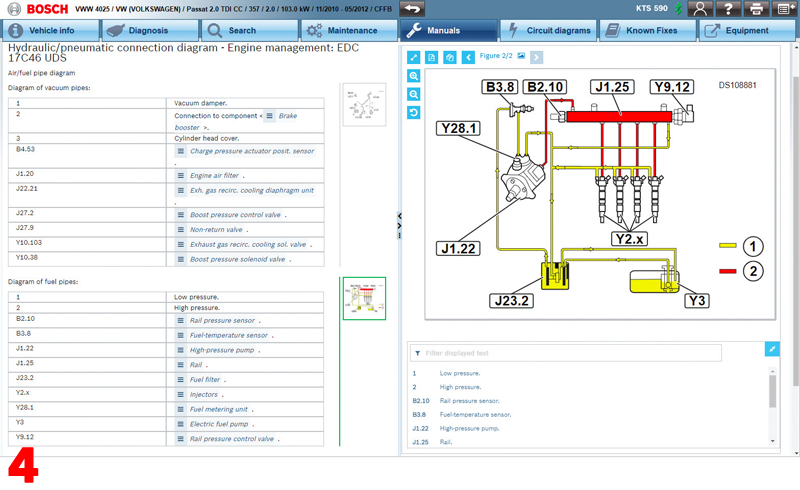
You will often be given a picture or a diagram of the wiring connector for the component in question as well as a test plan to check the power supply, ground connection and signal wires (Fig.4). The required pin assignments and test conditions are clearly shown alongside the expected set value range to expect if all is well.
Step four
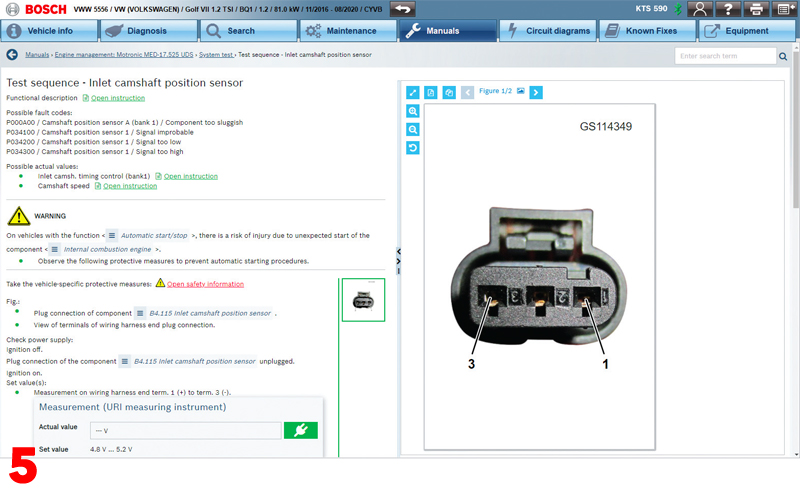
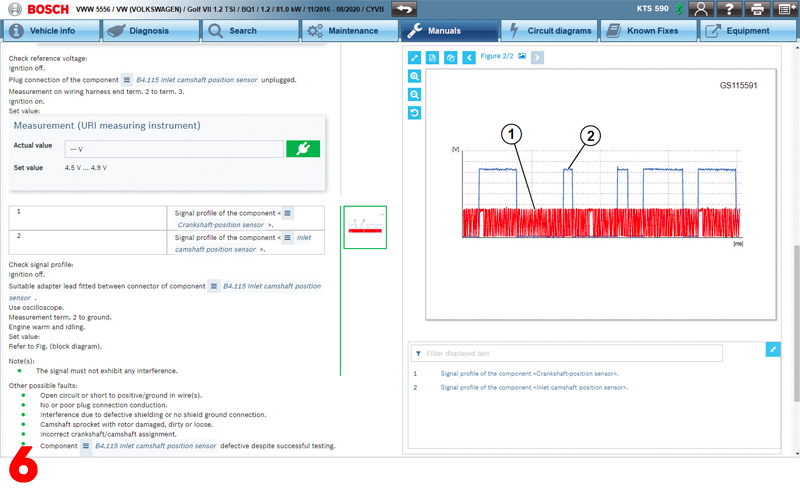
The ‘read measured value’ button can be pressed to ‘pop-up’ the multimeter function of the KTS 560 or 590 for a real-time measurement (Fig.5). The detailed instructions will guide you through the process of a complete test plan by checking the relevant values that are critical to successful operation of that component or circuit. Oscilloscope analysis may be necessary, in which case the test connection set-up and correct waveform profile will be shown on the screen (Fig.6).
Step five
If by this time you haven’t managed to pinpoint the problem and find the cause of the fault, the instructions will also contain a list of other possible defects to be checked. This whole process should help you through the job from beginning to end and obtain the correct diagnosis of a fault on the vehicle which should lead to a first-time fix.
ECU selection
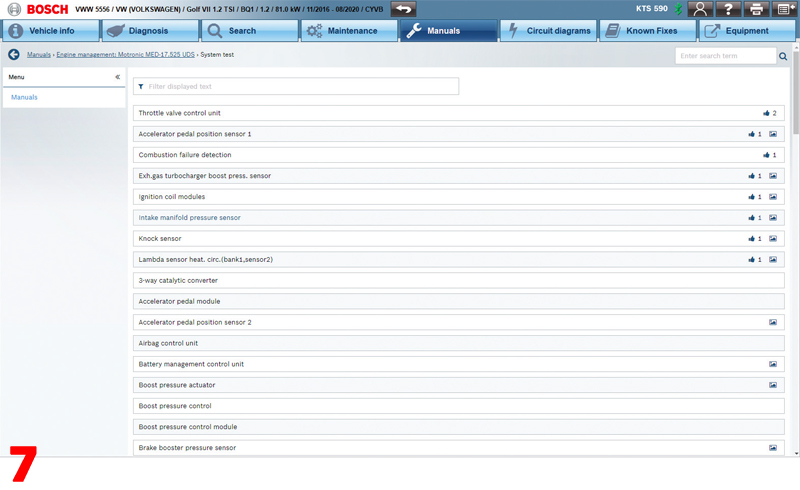
You do not have to enter the guided help files from the instructions button of a fault code. If the vehicle you have selected has a problem and there are no DTCs stored or the car isn’t present, you can select an ECU from the system group selection list found under the manuals tab at the top of your screen. You can either search on symptoms or directly open a test manual for each individual component (Fig.7).
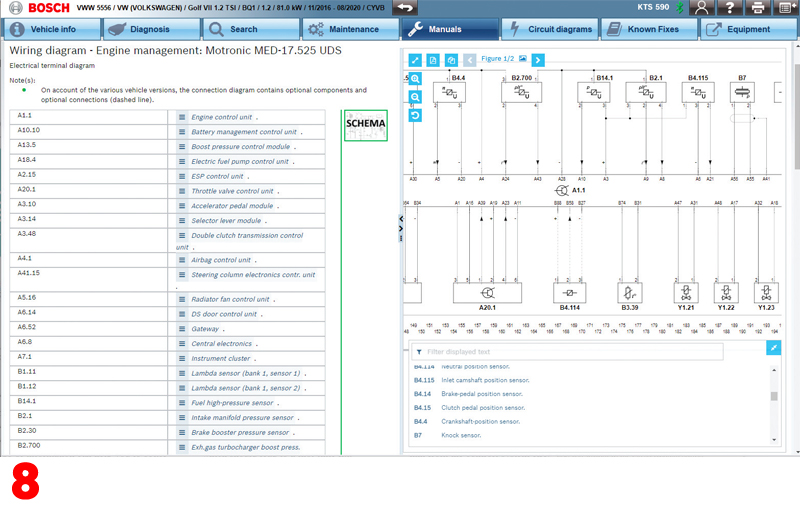
The menus of the troubleshooting repair instructions generally follow the same format and layout, no matter which vehicle or system you’re looking at. Again, this makes the tool feel familiar and helps you to work smarter and more efficiently by finding the right information fault finding fast. Similarly, if you are looking for a circuit diagram, you can also go straight there via the ‘circuit diagram’ button (Fig.8).
We have only just scratched the surface of the usefulness and capabilities of the Bosch ESI 2.0 troubleshooting instructions in this short guide. As you continue to get familiar with the function you will discover many topics for each system including: safety measures, special tools, descriptions, guided troubleshooting, CAS[Plus] interface links to the serial diagnostic functions of KTS, wiring diagrams, ECU connector pin assignments, component position, removal and installation instructions and diagrams, to name but a few.
Next month we will explore RMI Manuals – a technical support library designed to give you the information needed to deliver effective repairs and replacements.


