The experts at INA – a brand of Schaeffler Automotive Aftermarket – show you how to perform an accurate timing belt replacement on a Renault Modus 1.5dci.
Timing belt replacements can be quite tricky and complex, with a four hour repair time on the Renault Modus, so this clinic should prove useful to any independent aftermarket garage looking to undertake this kind of service.
The engine has been identified as an interference type so, in the event of a cambelt failure, the likelihood of engine damage is extremely high. It’s important to install a new timing belt system on an engine at ambient room temperature. Always adhere to turning the engine in the normal direction of rotation unless advised otherwise by the OEM installation instructions. Recommended torque values should always be used. It’s recommended that all the tensioners and pulleys are replaced at the same time as the cambelt.
You will require the special camshaft and crankshaft locking pins to undertake this repair. We used a two-post ramp, but a four-post ramp would be suitable. If the vehicle is fitted with alloy wheels then check the wheel bolt locking tool is available prior to the repair. It’s best practice to disconnect the battery terminals and stow safely before starting.
Auxiliary belt removal
Remove both of the engine covers, as they are split into two small sections. Unbolt the engine support mount and torque arm and remove completely.
Disconnect the position sensor from the high pressure pump and remove this so it doesn’t get damaged.

Raise the vehicle and remove the nearside front wheel. Remove the wheel arch liner, which is split so you will only need to remove the front section, to expose the auxiliary drive system. Remove the fuel filter housing bracket and remove the fuel filter, not forgetting to blank off the fuel pipes with some suitable blanking plugs. The back plate of the fuel filter housing should also be removed to expose the auxiliary tensioner.
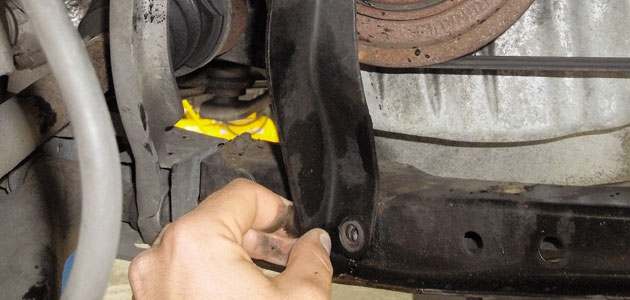
Remove the black support bar that’s fixed to the subframe and chassis so it will make it easier to gain access to the auxiliary belt and crank shaft pulley.
You should now be able to slacken off the auxiliary belt tensioner and remove the auxiliary belt. You can now remove the lower timing belt cover. Remove the closing bolt which is in the position of where you need to install the crankshaft locking pin. Install the locking pin and rotate the engine in the direction of engine rotation by turning at the crankshaft until the crankshaft stops against its arresting position. Install the camshaft locking pin, making sure it slots into the locating hole inside the cylinder head.
Remove the camshaft locking pin, the crankshaft locking pin and lock the flywheel with a suitable screwdriver and remove the crankshaft bolt and pulley. Remove the tensioner bolt, tensioner and, finally, the timing belt. At this point it’s advisable to check the condition of the water pump as the timing belt also drives this system. Regardless of the condition it’s strongly recommended to replace the water pump at the same time. Also check the crank seals for any leaks and replace them if necessary.
Installing the new timing belt
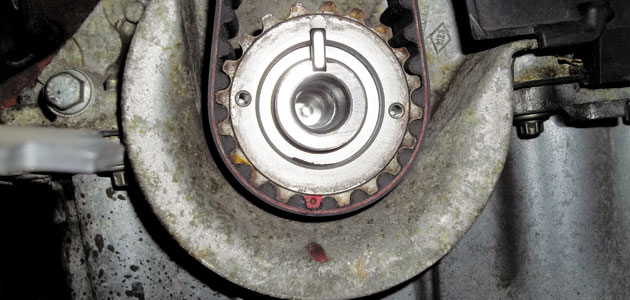
Install the camshaft and crankshaft locking pins and make sure the crankshaft is resting against the locking pin and the crankshaft groove is at the twelve o`clock position.

Install the new tensioner pulley and make sure the locating tab is correctly located in the cylinder head. Use the new bolt to install the tensioner and at this stage only finger tighten.
Install the new timing belt, making sure the timing marks are aligned with the marks on the cam pulley and high pressure pump pulley, and make sure the belt is taught on the non-tensioned side. Rotate the tensioner anticlockwise until the pointer rests at the lowest position and tighten the tensioner bolt to 27Nm. Install the crankshaft pulley using a new bolt and tighten the bolt to the VM’s torque setting.
Please note: for the 1.5dci engine you have two types of crankshaft pulley bolt so the correct torque must be applied. Remove the camshaft and crankshaft locking pin and rotate the engine two turns in the direction of engine rotation. Before the second rotation is completed install the crankshaft locking pin and carry on rotating the engine until the crankshaft rests against the locking pin. Install the camshaft locking pin and it should locate easily in the crankshaft webbing and locating hole in the cylinder head.
Remove the locking pins once again, slacken the tensioner bolt by one turn and set the pointer on the tensioner to the middle position.

Then tighten the tensioner bolt to 27Nm. Rotate the engine a further two turns in the direction of engine rotation and, before the second rotation is complete, install the crankshaft locking pin, rotating the crankshaft until it rests against the locking pin. The camshaft locking pin can now be installed and it should locate easily in the cylinder head and the tensioner pointer should be at the middle position. If not, the tensioning procedure must be repeated. Remove the timing pins and install the components in the reverse order of removal.


