
- VEHICLE: Ford Transit Tourneo
- ENGINE: 2.0TDCi FIFA
- YEAR: 2005
- SYSTEMS: Delphi
The Transit in question arrived at our workshop on the back of a visit to another local garage and – for a change – the vehicle had remaineduntouched due to the frequency of the fault.
We were informed that the issue with the car was an intermittent cutting out fault, and after a bit of probing as to when the problem occurred, I was told that if the vehicle was driven around town it would be fine, but when it was taken out for a run it would sometimes cut out.
Additionally, the ‘glow plug’ light would flash and then the vehicle would immediately restart and drive OK until the next time.
As we all know, intermittent faults can cause a lot of stress and can be a pain to diagnose correctly, let alone quickly. After a little more digging and a road test (the vehicle was put under load on a long straight with a slight incline), I found that the fault would occur. Armed with this information, I now set about my diagnosis.
The diagnosis
As is the case with most of the diagnosis that we do, I scanned the engine ECU and retrieved two DTCs (fault codes):
1. P0251 Injection pump fuel metering control A, cam/rotor/injector – circuit malfunction
2. P1211 Injector control pressure – pressure high/low
I could now tell that the problem was fuel pressure related, and a quick look on Autodata revealed a surprising ‘known fix’ for these exact two fault codes (see Fig 1).

(Fig 1): The Autodata ‘known fix’
With this information, I decided that I could either mess around road testing the vehicle, whilst watching the scan tool data or I could try and duplicate the fault in the workshop.
I decided that the latter option would be the best in this circumstance, as road testing, whilst trying to watch data on the scan tool, can be a pain at the best of times. My first step, therefore, was to drive the high pressure pump to maximum pressure, whilst observing the reading from the rail pressure sensor using my oscilloscope (see Fig 2).
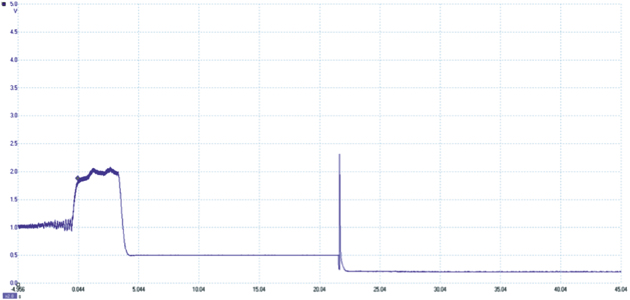
(Fig2): Rail pressure sensor reading
This test showed us that the high pressure pump wasn’t achieving maximum pressure. Unfortunately, this didn’t mean that the high-pressure pump was definitely at fault, although still possible, but it did tell me that we had now ‘seen’ the fault, so the next job was to find out why this was occurring.
Referring back to the known fixes and bulletins from Autodata, and due to the fact that the vehicle was almost due for its next service, I decided to replace the fuel filter. I then performed the same integrity test on the high-pressure pump, yet this yielded the same results.
Although the filter change didn’t cure the fault, I did empty the old diesel onto a white sheet of paper to try and see if there were any metal filings (signs of pump failure) and once again the results were nothing out of the ordinary.
Four possible causes
So what else could cause this fault? In my mind the options were:
1. Fuel supply
2. IMV (inlet metering valve)
3. Injector(s)
4. High pressure pump
With these four possible causes, the next step for me to take was to carry out the high-pressure pump test again, but this time I would attach my spill bottles to the injectors (see Fig 3).
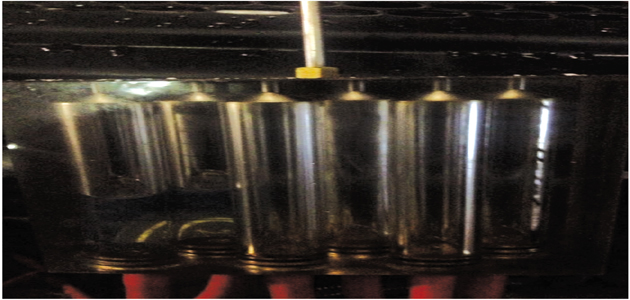
(Fig 3): Number 1 and 2 cylinders have experienced excessive leak off
As you can see from this picture, undertaking the pump integrity test with the spill bottles connected showed that number 1 and 2 cylinder injectors experienced excessive leak off – a major problem and one which had pointed us straight to the issue. You need to have a sealed system to be able to generate pressure and, to help you to understand this more clearly, just imagine trying to blow up a balloon with a hole in the top – you’ll never be able to get it to its maximum capacity if the hole remains. In simple terms, that’s exactly what we had with this vehicle.
In summary
After having a long chat with the garage from which the vehicle arrived with us, it was decided to replace all four injectors. We felt this was as a good rule of thumb due to the fact that the vehicle was used as a taxi and the injectors were all the same age.
After replacing the injectors and programming the correction factors, I undertook the pump integrity test again to make sure all was well. As you can see from the waveform (see Fig 4), the earlier fault had now been rectified.
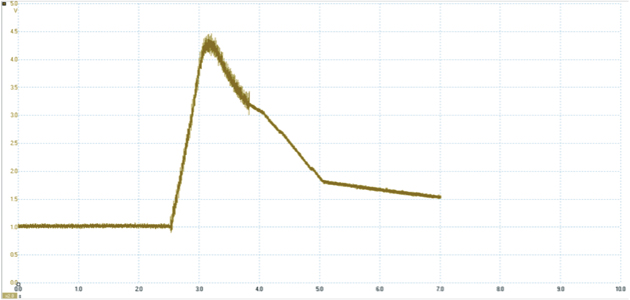
(Fig 4): A second pump integrity test – the fault has been rectified
I find it very important after a job like this to check the fix properly, so actually seeing that the fault has been rectified by performing a test like this gives you the confidence that you’re not going to see the vehicle again for a while.
An extended road test was carried out and the vehicle drove perfectly before being handed back to the customer.


