Why do clock springs go wrong and how do you install a new one?
Malfunctioning of the clock spring (also known as Air Bag Squib) on the Chrysler Voyager and Grand Voyager models is not an uncommon problem, to the point that Daimler Chrysler issued a safety recall in the US in 2004 for this particular problem on models manufactured between 1996>2000, which affected as many as 1.2 million vehicles worldwide.
If the clock spring is working correctly, the air bag warning light will illuminate for a few seconds when the vehicle is started and then go out. If the air bag light isn’t working properly then the clock spring may have failed.
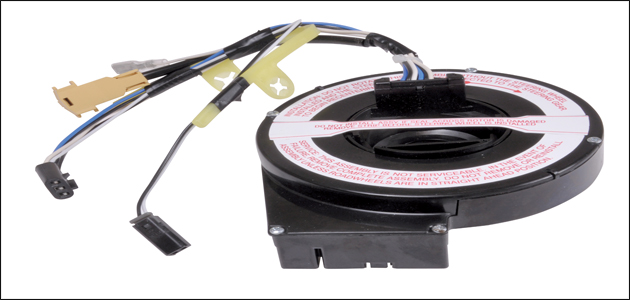
What is a clock spring?
A clock spring allows constant contact to be made between the stationary wiring loom on he steering column to the moving components on the centre of the steering wheel. This is done via coiled strip cables inside the clock spring that can fail through fatigue, rendering the steering wheel-mounted controls inoperable.
Symptoms
– Air Bag warning light intermittently or constantly illuminated when ignition is turned on
– Horn not working
– Cruise control not working
Scanning for a Diagnostic Trouble Code (DTC) will usually discover a code that relates to ‘Driver Squib Circuit Open’ which will confirm that the clock spring is indeed faulty and requires replacing.
Fitting Guide
Note: allow approximately 45 minutes to replace the faulty clock spring (ADA101413)
1) Disconnect the battery and wait for a minimum of two minutes before working on any part of the airbag system.
2) Turn the steering wheel to the straight ahead position – IMPORTANT.
3) Remove the airbag module from the steering wheel (screws located reverse of the wheel).
4) Disconnect the electrical connectors from the back of the air bag after releasing the lock and remove it from the vehicle. Place it in a safe location with the pad side up.
5) Remove the screws that hold the speed control switches to the wheel. Disconnect the wires and remove the switches. Remove the steering wheel centre nut and remove the steering wheel from the vehicle (use a wheel puller if necessary).
USEFUL HINT: Mark the shaft and steering wheel so that you can align them when refitting the steering wheel later.
6) Remove the steering column shrouds (screws located on the underside).
7) Remove all connectors from the clock spring to steering column harness.
8) Remove the clock spring by pressing the two tabs on the assembly (located at about 5 o’clock and 11 o’clock positions).
Clock spring installation is the opposite of removal
– The new clock spring has a taped seal across its centre to prevent it from being turned prior to installation. This is necessary as the centre has a limited number of turns from side to side and if it were installed whilst on full lock it would break the first time you attempt to turn the steering wheel.
– On fitting, release the clock spring locking pins to engage the mechanism.
– Refit the steering wheel, taking care that the wheel and shaft are correctly aligned. Feed the wires from the clock spring through the wheel openings, ensuring the flats on the wheel align to the flats on the clock spring inside.
– Tighten the steering wheel nut to 61Nm or 45ft/lbs.
– Refit and reconnect the steering wheel controls and air bag.
– Reconnect the battery.
– Clear all fault codes from the ECU and rescan.
Note: It is strongly advised to add a small amount of dielectric grease to all connections of the clock spring to ensure the correct levels of resistance are maintained.