TIMING BELT KIT(S):
VKMC 01259-1 and VKMC 01259-2
TOOL KIT: VKN 1000
VEHICLE APPLICATIONS:
Audi: A3, A3 Quattro, A3 Sportback 2.0 TDI – 16V
W: Golf V, Golf Plus, Jetta III, Passat, Touran 2.0 TDI – 16V
Seat: Altea, Altea XL, 4×4 Leon, Toledo III 2.0 TDI – 16V
Skoda: Octavia, Octavia RS, Superb 2.0 TDI – 16V
Timing/distribution systems on today’s engines require the use of special service tools so that, after repair, the engine’s power, fuel economy and longevity are all assured.
While using the right tools is essential, the following factors are also critical for timing system set-up:
The right tools
The correct and complete kit for the engine being serviced is needed, including the water pump, if driven off the timing system. You may also need a hydraulic unit, plus all nuts, studs and bolts that require replacement.
Auxiliary belt and/or complete auxiliary kit
When replacing the timing system, the technician should always replace the auxiliary belt as well. This complies with some engine manufacturer’s recommendations for renewing the auxiliary system at the same replacement interval as the timing system.
TVD – Torsional Vibration Damper
Some engine manufacturers recommend renewing the TVD at the same replacement interval as the auxiliary and timing system. Always check TVD condition and, if in doubt, replace the component.
Over-tensioned/under-tensioned?
Always check your settings and follow the VM’s recommendations.
Clockwise or anti-clockwise?
Check the directional arrow on the adjuster plate (if applicable). Rotating in the wrong direction can cause incorrect wrap angle and lead to belt over-heating and failure, resulting in engine damage.
You should then prepare the engine by following the VM’s instructions:
1. Support the engine following all safety guidelines. When preparing the engine, care should be taken in removing the engine mount, to avoid loosening the idler retaining bolt. Remove the upper timing cover to ensure that the retaining bolt of the idler does not turn whilst removing the engine mount. Do not remove the RH engine mount until the timing belt is slackened, or damage could occur to the engine.
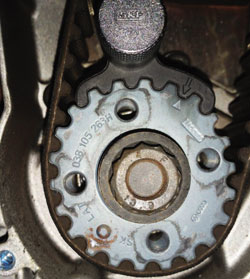
2. Set the crankshaft at TDC on the No. 1 cylinder, ensuring that the window of each camshaft is at the 12 o’clock position. It should be noted that this engine could have two different crankshaft settings. Lock the crankshaft using the VKN tools 1000-3 (A) or 1000-4 (B).
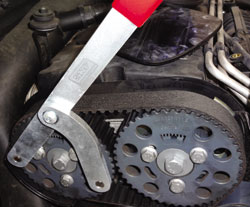
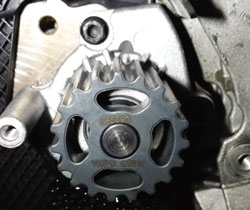
3. Use a camshaft gear retaining tool, and loosen the three bolts on each camshaft until they can be moved.
4. Lock the camshafts using VKN 1000-1. Slacken the tensioner retaining nut using VKN 1000-5 (two pin wrench) and turn the tensioner anti-clockwise until the VKN 1000-7 (tensioner retaining pin) can be inserted into the aligning hole.

5. Turn the tensioner pulley fully clockwise to reduce the pressure on the drive system and lightly secure the retaining bolt. Remove the RH engine mount then remove the timing belt, tensioner and idlers. Drain the cooling system and flush with clean water. Remove the water pump. Clean the pump area of any old gasket residue, ensuring that all threaded holes are clean, as this could have an effect on the final applied torque to the water pump. Care should be taken NOT to cut into the cylinder block using sharp instruments, as this could result in coolant leakage.
When renewing the cooling system components, always ensure that the engine and radiators are thoroughly flushed with clean water. Any remaining residue such as metal particles, calcium deposits etc. can destroy the seal in the new water pump!
Now follow the installation guidelines for VKMC 01259-1 and VKMC 01259-2:
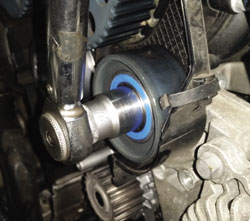
1. Make sure that the pump area has been cleaned, check that the ‘O’ ring is correctly installed and fit the new pump (VKPC 81627 from kit VKMC01259-1 or VKPC 81218 from kit VKMC 01259 -2). Torque the water pump retaining bolts to 15 Nm.
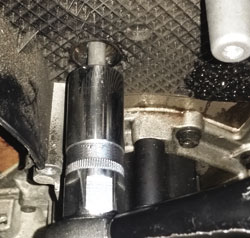
2. Using the correct stud replacement tool, remove and replace the VKM 11255 tensioner stud and the VKM 21147 idler stud. Torque both studs to 15 Nm.
3. Fit the VKM 21259 idler, using the new retaining bolt. Torque to 90 Nm and 90˚. Failure to follow the torque specifications on the VKM 21259 idler retaining bolt could cause excessive vibrations, and severe damage to the engine.
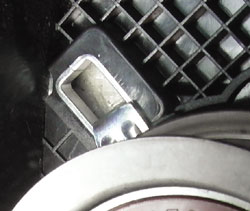
4. Install the new VKM 11255 tensioner. Ensure that the tensioner is located in the retaining slot of the engine. Lightly tighten the retaining nut (if pin is not fitted). Slacken the tensioner retaining nut and using VKN 1000- 5 (two pin wrench), turn the tensioner anti-clockwise until VKN 1000-7 (tensioner retaining pin) can be inserted into the aligning hole.
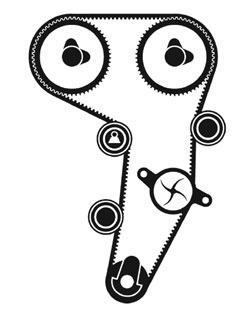
5. Check that the timing is still set. Turn the camshaft sprockets fully clockwise. Fit the new timing belt, starting at the crankshaft (1) in a clockwise direction, then follow with idler (2), tensioner (3), camshaft sprockets (4), idler (5) and water pump (6).
6. Slacken the tensioner retaining nut and remove the locking pin. Using the VKN 1000-5, rotate the tensioner clockwise until the pointer is aligned with the notch on the backing plate. Holding the tensioner adjusting plate with the VKN 1000-5, torque the retaining nut to 20 Nm and 45˚. The pointer may move in a clockwise direction up to 5 mm. Do not attempt to readjust.
7. Hold the camshaft sprockets with a retaining tool and torque the six bolts (three on each camshaft) to 25 Nm. Do not rely on the pins to hold the camshaft sprockets whilst torqueing, as damage could occur to both tool and engine. Recheck the timing.
8. Remove all locking tools and rotate the engine twice in a clockwise direction, until TDC. Refit all locking tools and check the tensioner setting. If the locking tools can’t be reinserted or the tensioner is not correctly aligned, restart procedure from step 4; refitting the RH engine mount. Install the components in reverse order of removal. Torque the crankshaft pulley to 10 Nm and 90˚ using new bolts and then refill the cooling system with new coolant, following manufacturer’s recommendations.


